
In our previous article, we Dockerized our Node.js server, pushed that container image to AWS ECR, and then launched an EC2 instance with that container running inside. With our network and security group configured, we could send HTTP requests to our EC2 instance (at port 80) and receive responses from our server.
For our next trick, let's set up a custom domain name and make our server accessible via HTTPS. Here are the steps we're going to take:
- Create a hosted zone for our domain in Route 53.
- Create an SSL certificate for our custom domain AWS Certificate Manager.
- Create a target group which our application load balancer will forward requests to.
- Create an application load balancer for our EC2.
- Update our security group to allow traffic on port
443. - Create a Route 53 record to route subdomain requests to our load balancer.
Create A Hosted Zone
For this walkthrough, we'll assume that you have already purchased a domain name, and that you would like to point a subdomain to the server you are running on EC2. To route the subdomain to the correct resource and to request an SSL certificate for this subdomain, you'll need to create a hosted zone in AWS Route 53.
On the "hosted zones" page, click on "Create hosted zone."
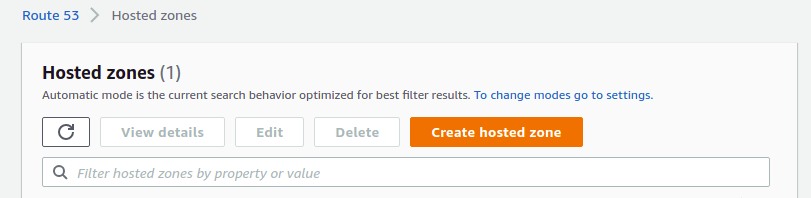
Enter the domain name (that you control), select the "public hosted zone" type, and click "Create." You'll see the newly created hosted zone in your list. Click on it. You'll see several name servers listed in the NS record.
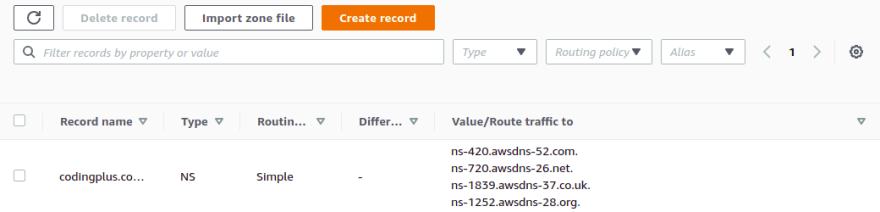
You will need to login to the service where you purchased and manage this domain. At that service, you will need to set the name servers to use these values provided by AWS. This will give Route 53 control to handle subsequent domain (and subdomain) routing.
Create an SSL Certificate
With your domain set up in Route 53, requesting an SSL certificate for your subdomain is quick and simple. Go to AWS Certificate Manager. Make sure that you are in the same region where you deployed your EC2 instance.
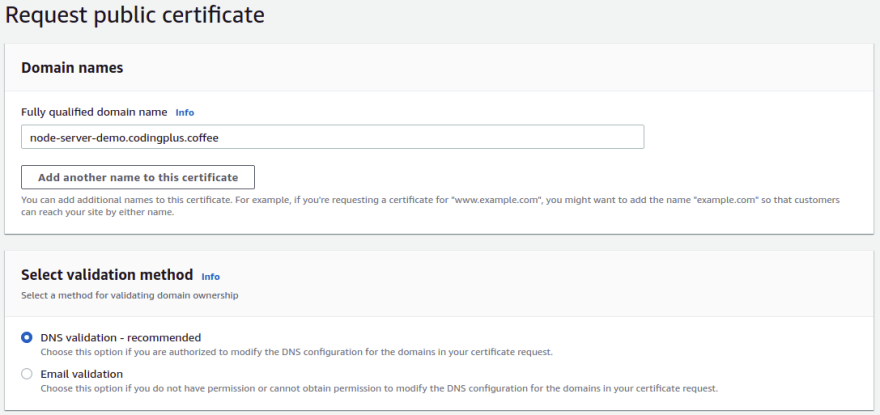
Click on "Request a certificate" to request a public certificate.
Enter the domain name that you want to use for accessing your server. For our demo, we will use node-server-demo.codingplus.coffee. Select "DNS validation" as the validation method.
Your certificate will now be listed, but its status will be "Pending validation." Click on it to see more details.

To issue the certificate, you need to verify that you control this domain. With "DNS validation," this is done by creating a publicly accessible CNAME record with a specific key and value—something that only the owner of a domain is able to do. Fortunately, because you are now managing your domain in Route 53, you can tell Certificate Manager to create the necessary validation record for you. Click on "Create records in Route 53."

If you look back at the DNS records for your hosted zone, you'll see that there's a new CNAME record in the list.
After a few minutes, the Certificate Manager will show your certificate as successfully verified and issued. We have our certificate. It's time to use it.
Create a Target Group
We will need to set up a few more AWS resources in order to get HTTPS access to the server on our EC2 instance. Ultimately, we will need an application load balancer (ALB). That ALB will need to listen for requests on port 443, and then forward those requests to a target group. The target group will take those requests and distribute them appropriately to registered targets. In our setup, we only have one target—our EC2 instance.
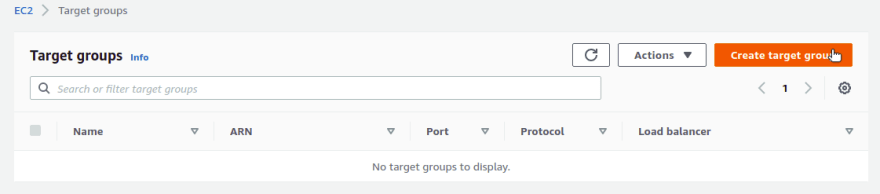
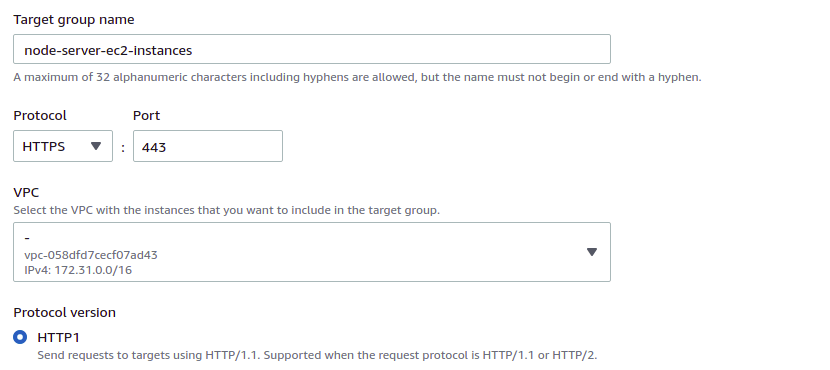
We'll start by creating the target group. Go to the AWS EC2 service. Make sure you are working in the region where you launched your EC2 instance. Navigate to the "Target Groups" page. Click on "Create target group."
Our target type will be "Instances."

Choose a name for your target group. We'll go with node-server-ec2-instances. For protocol, choose "HTTP" at port 80. For protocol version, choose "HTTP1."
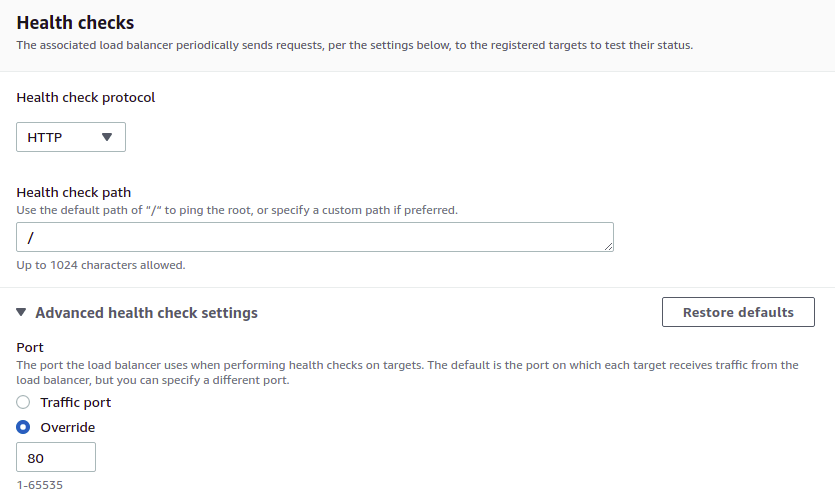
For the health check protocol, choose "HTTP", leave the health check path as /, and choose to override the health check port, using port 80. This is the port that is open on our EC2 instance, and a request to / will be a request to our Node.js server at the / path, which is an accessible endpoint.
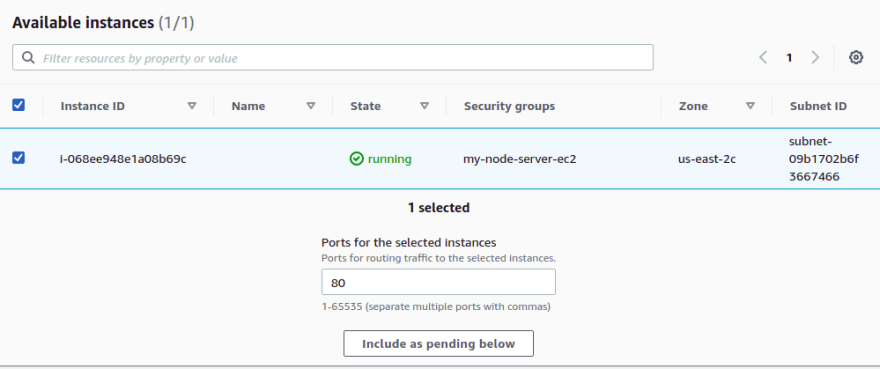
Lastly, you'll need to register targets for the group. Select your EC2 instance, making sure to use port 80, and then click on "Include as pending below."
Finally, click on "Create target group" to finalize your target group creation.
At this point, if you poke around, you'll see that your target group is listed as "unused" because it is not configured to receive traffic from the load balancer. It's time to create one.
Create an Application Load Balancer
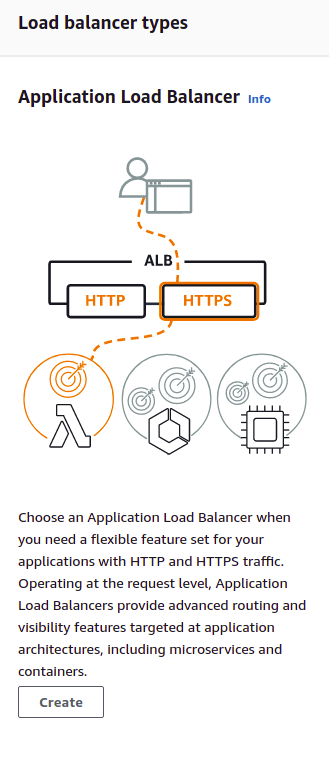
In the EC2 service sidebar, click on "Load Balancers." On that page, click on "Create Load Balancer." From the different load balancer types, choose "Application Load Balancer" and click on "Create."
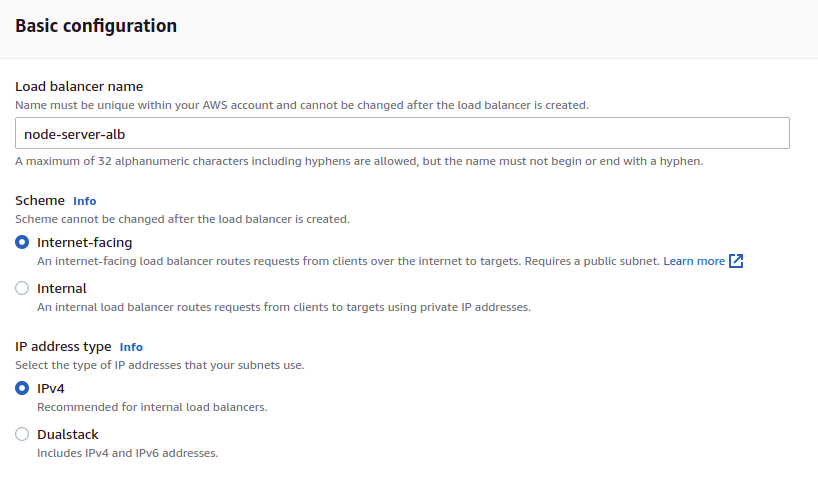
Basic Configuration
Choose a name for your load balancer. We'll go with node-server-alb. For "scheme," choose "Internet-facing." For "IP address type," choose "IPv4."
Network Mapping
Under "Mappings," you will need to choose at least two availability zones to which your load balancer will route traffic. One of the availability zones you choose must be the availability zone where your EC2 instance resides. To find out which zone that is, you can look at the network settings for your EC2 instance. In a production environment, you would probably have multiple EC2 instances (all serving up the same application), spread out across multiple availability zones. The job of the load balancer is to distribute traffic among healthy targets across those zones.
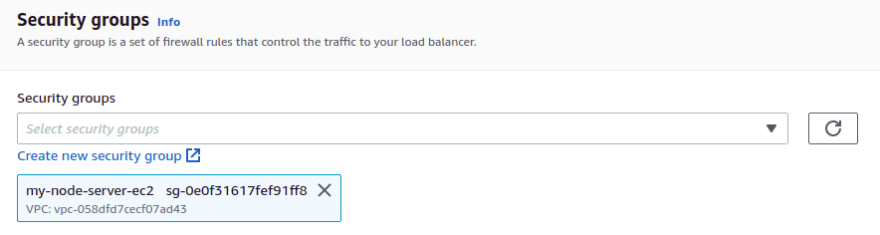
Security Group
In our previous post, we created a security group for our EC2 instance. This security group opened up inbound traffic on ports 22 and 80. Choose this same security group for the load balancer. (In a later step, we will need to open up inbound traffic on port 443 as well.)
Listeners and Routing
Our ALB will listen for HTTPS requests on port 443, and then forward those requests to a target group. Find the target group you just created in the drop-down list.

Secure Listener Settings
For this setting, use the default security policy. Then, choose an SSL certificate "From ACM," finding the newly-created certificate in the drop-down.

Lastly, click on "Create load balancer" to finalize. AWS will begin provisioning your load balancer.
Add Listener for Redirecting Port 80 Traffic To Port 443
We would also like our load balancer to listen for any traffic on port 80, and then redirect that traffic, using HTTPS, to port 443. While your load balancer is being provisioned, go to its "Listeners" settings and click on "Add listener."
Use these settings to add the listener:

You'll see the newly created listener in your list. However, you'll also notice a little alert triangle next to your HTTPS 443 listener.

Oh, that's right. We set up our security group to allow SSH traffic on port 22 and HTTP traffic on port 80. Now that our load balancer is expecting to handle traffic on port 443, we need to update our security group to allow that traffic.
Update Security Group to Allow Traffic on Port 443
Click on "Security Groups" in the EC2 service sidebar. Find the security group used by your ALB and select it. Then, click on "Edit inbound rules."
When all is said and done, we should have one rule for SSH traffic on port 22, two rules for HTTP traffic on port 80 (one for "anywhere-IPv4" and one for "anywhere-IPv6"), and two rules for HTTP traffic on port 443 (one for "anywhere-IPv4" and one for "anywhere-IPv6"). It's these last two that we need to add.
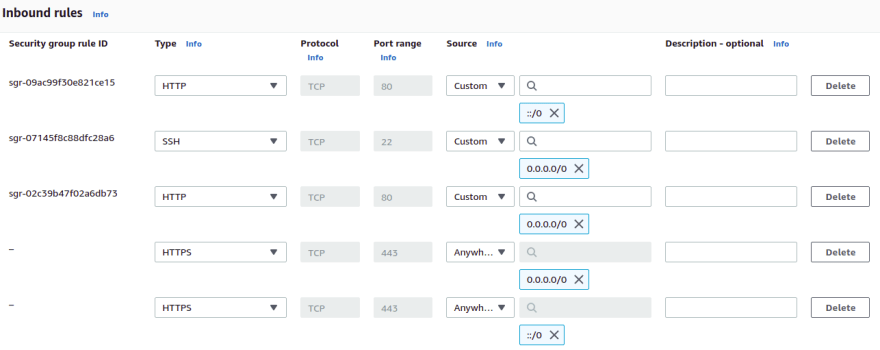
Click on "Save rules."
Now, your ALB can receive traffic on port 443, sending that traffic to the target group with your EC2 instance.
Update Hosted Zone to Route Custom Domain Traffic to ALB
For our very last step, we need to add some records to our hosted zone at Route 53. We need to let domain management know that requests to our subdomain (the one we requested the SSL certificate for) should be routed to our load balancer.
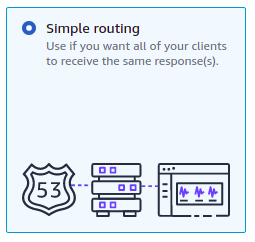
Navigate to the Route 53 service. Find your hosted zone, and then click on "Create record." Go ahead and click on "Switch to wizard." For routing policy, choose "Simple routing."
Next, we'll see a list of records to define. It's empty. Click on "Define simple record."
Enter your subdomain for the "Record name." We will create an A record that is an "Alias to Application and Classic Load Balancer." We choose the region where our ALB resides, and then we choose our ALB from the drop-down list.
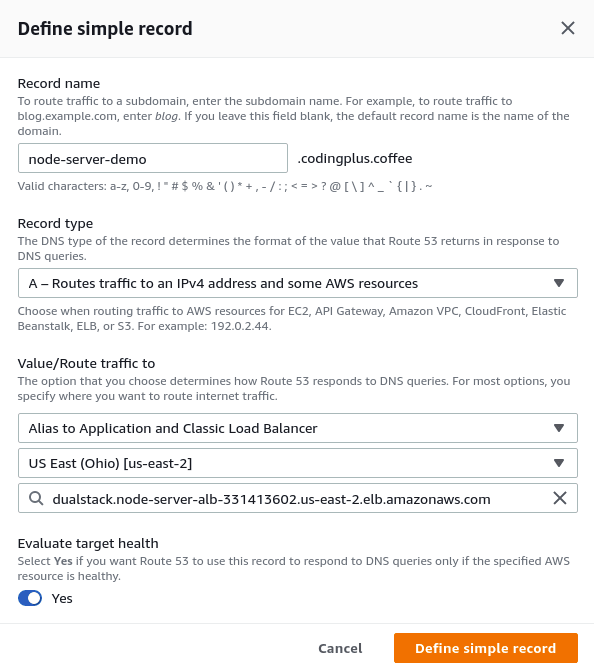
We click on "Define simple record" to finalize. Our list of records to create now has a single A record.
Click again on "Define simple record" at the top of the list, and perform all of the same steps as above, but this time for a AAAA record type. Once that's done, your list should look like this:
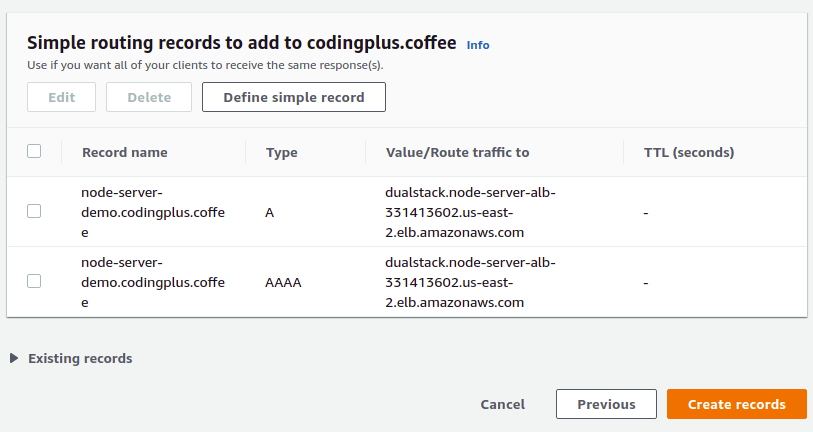
Click on "Create records" to finalize.
Test an HTTPS Request
Everything is in place. Finally... we can test it out by sending a curl request with HTTPS to our custom domain:
$ curl -i https://node-server-demo.codingplus.coffee
HTTP/2 200
date: Mon, 22 Nov 2021 05:48:30 GMT
content-type: text/html; charset=utf-8
content-length: 12
x-powered-by: Express
etag: W/"c-5E8zZAGdGKFRyrcHK1pAu1s+J08"

Hello world.
It works! A quick check in the browser shows a secure connection, and we can even see our SSL certificate issued by Amazon.
Conclusion
That might feel like a lot of steps just to get HTTPS. As I mentioned above, the steps are not few, but they are straightforward. For spinning up our server in a Docker container, we could have used another service like AWS ECS or AWS CloudFormation, which might handle some of these manual steps for you. However, by manually going through the steps here, we see all of the individual pieces and configurations that need to be set up and connected together. It's a good process to go through for learning.
We did it! After walking together through the previous post and this one, we have accomplished the following:
- Containerized a Node.js Express server
- Pushed the container image to ECR
- Launched and configured an EC2 instance to run that container
- Configured the network to allow HTTP requests to our EC2 instance (and subsequently, to our server)
- Used Route 53 and Certificate Manager to set up a custom domain and provision an SSL certificate
- Created a target group and an application load balancer
- Configured our load balancer to forward HTTPS traffic to our EC2 instance
That's a pretty strong set of accomplishments. Well done!

Top comments (0)