
I am going to keep it short and simple, I wanted to experiment with Vue.JS so I just read up a bit and gathered resources from here and there to build a basic app using DRF and Vue.JS, this will not be perfect as this blog is made after spending less than 3 hours on Vue, let me know in the comments if there is something that could have been handled in a better way...
What are we building?
In this post we will be making a very simple voting app with the following functionalities:
- The admin is able to register new candidates
- Normal users are able to view and vote for candidates (only once, tracked using the IP address of the request)
If you just want the code then: https://github.com/amartya-dev/vote_drf_vue (Do star the repo in case you find it useful :P)
The Backend with Django Rest Framework
The application architecture
The requirements are simple, we need a candidate table (model/entity or whatever you want to call it) which will contain the details about the candidates and to track the votes and the IP addresses we would need another Vote table which contains the IP address and the candidate voted for.
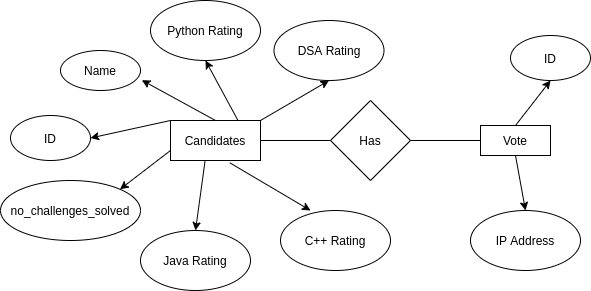
We want to be able to get the votes directly with the candidate information for easy access thus, it might be a good idea to include the total number of votes there.
We would need to set up your Django project at this point, so let us quickly create a project and the main app inside it via:
django-admin startproject coda
cd coda/
python manage.py startapp main
As it is pretty clear at this point, our project is called coda, and the app is called main.
Let us code the models for our application according to the above constraints (the following code goes in coda/main/models.py):
class Candidate(models.Model):
    name = models.CharField(max_length=250)
    no_challenges_solved = models.IntegerField()
    votes = models.IntegerField(default=0)
    python_rating = models.IntegerField(default=1)
    dsa_rating = models.IntegerField(default=1)
    cplus_rating = models.IntegerField(default=1)
    java_rating = models.IntegerField(default=1)

    def __str__(self):
        return self.name


class Vote(models.Model):
    ip_address = models.CharField(
        max_length=50,
        default="None",
        unique=True
    )
    candidate = models.ForeignKey(
        to=Candidate,
        on_delete=models.CASCADE,
        related_name='vote'
    )

    def save(self, commit=True, *args, **kwargs):

        if commit:
            try:
                self.candidate.votes += 1
                self.candidate.save()
                super(Vote, self).save(*args, **kwargs)

            except IntegrityError:
                self.candidate.votes -= 1
                self.candidate.save()
                raise IntegrityError

        else:
            raise IntegrityError

    def __str__(self):
        return self.candidate.name
I have overridden the save() method of the Vote model to achieve the following:
- As I am maintaining the number of votes for each candidate, as soon as there is a request for a vote I append the number of votes of the associated candidate. The catch here is that in case there is a repeated request the incremented votes' value needs to be decremented again. Thus, I use the except block to do precisely that.
- I wrote the conditional to check the commit flag so that I can save an instance of the model without committing the transaction to the database.
The serializers
To be able to write the API and corresponding views we would need the serializers to parse the data to JSON and vice versa.
Create a file called serializers.py inside coda/main/, I will be creating two serializers here:
- The candidate serializer which I am going to use for the CRUD operations for candidates and
- The Vote serializer which I am going to use to just allow the cast of a vote. Thus, I have overridden the
create()method where I am just returning an object of theVoteclass without committing the entry into our DB, reason: I would be adding the IP address in views for which I just need the object as sort of a baseline. Also, I am usingcandidate_nameto make easily send that data from the frontend and get the corresponding candidate instance. You might want to change that to id in case the uniqueness of candidate names is not guaranteed.
from rest_framework import serializers
from main.models import Candidate, Vote
from django.shortcuts import get_object_or_404
from django.db import IntegrityError


class CandidateSerializer(serializers.ModelSerializer):
    votes = serializers.ReadOnlyField()

    class Meta:
        model = Candidate
        fields = "__all__"


class VoteSerializer(serializers.ModelSerializer):
    candidate_name = serializers.CharField()

    def create(self, validated_data):
        candidate = get_object_or_404(Candidate, name=validated_data["candidate_name"])
        vote = Vote()
        vote.candidate = candidate
        try:
            vote.save(commit=False)
        except IntegrityError:
            return vote
        return vote

    class Meta:
        model = Vote
        exclude = ("id", "ip_address", "candidate")
Views
The time to finally write our logic for all the operations we need from this application, I am using generic viewsets and views provided by Django Rest Framework, I use a ModelViewSet for candidates CRUD operations and very generic APIView for casting the vote like so:
from rest_framework.viewsets import ModelViewSet
from rest_framework.views import APIView
from rest_framework.response import Response
from rest_framework import status
from rest_framework.permissions import IsAdminUser
from main.serializers import VoteSerializer, CandidateSerializer
from main.models import Candidate
from django.db import IntegrityError


def get_client_ip(request):
    x_forwarded_for = request.META.get('HTTP_X_FORWARDED_FOR')
    if x_forwarded_for:
        ip = x_forwarded_for.split(',')[0]
    else:
        ip = request.META.get('REMOTE_ADDR')
    return ip


class CandidateViewSet(ModelViewSet):
    queryset = Candidate.objects.all().order_by('-votes')
    serializer_class = CandidateSerializer
    permission_classes = [IsAdminUser, ]


class CastVoteView(APIView):

    def post(self, request):
        serializer = VoteSerializer(data=request.data)
        if serializer.is_valid(raise_exception=ValueError):
            created_instance = serializer.create(validated_data=request.data)
            created_instance.ip_address = get_client_ip(request)

            try:
                created_instance.save()

            except IntegrityError:
                return Response(
                    {
                        "message": "Already voted"
                    },
                    status=status.HTTP_400_BAD_REQUEST
                )

            return Response(
                {
                    "message": "Vote cast successful"
                },
                status=status.HTTP_200_OK
            )
I use the uncommitted object I get from serializer's create() function and add the IP address from request to it before finally committing the entry to the database.
The URLS
Let us wrap this up by binding our views to URLs, create a file called coda/main/urls.py and add:
from django.urls import include, path
from rest_framework import routers
from main import views as main_views

router = routers.DefaultRouter()
router.register(r'candidate', main_views.CandidateViewSet)

app_name = 'api'
urlpatterns = [
    path('', include(router.urls)),
    path('vote/', main_views.CastVoteView.as_view(), name='vote')
]
Then add these to the main URLs i.e. coda/urls.py :
from django.contrib import admin
from django.urls import include, path

urlpatterns = [
    path('api/', include('main.urls', namespace='api')),
    path('admin/', admin.site.urls),
]
Finally, we would need to allow cross origins requests and add this app to the settings:
So first install django-cors-headers by:
pip install django-cors-headers
Then modify coda/settings.py:
...
INSTALLED_APPS = [
    'main.apps.MainConfig',
    'django.contrib.admin',
    'django.contrib.auth',
    'django.contrib.contenttypes',
    'django.contrib.sessions',
    'django.contrib.messages',
    'django.contrib.staticfiles',
    'rest_framework',
    'corsheaders'
]
...

CORS_ORIGIN_ALLOW_ALL = True
Time to make, run migrations, and run our server:
python manage.py makemigrations
python manage.py migrate
python manage.py runserver
The vue frontend:
Let us quickly write the frontend for our app, I used vue-cli and yarn in order to set up the project, thus:
vue create vote-app
Use the default settings then add the following packages:
yarn add axios router vuetify @mdi/font
Yes you saw it right, I am going to use vuetify in order to make my application look a bit cool xD
The first thing to do is to set up our application to use Vuetify thus, create a folder called plugins in the src directory and create a file called vuetify.js inside it:
import Vue from 'vue'
import Vuetify from 'vuetify'
import 'vuetify/dist/vuetify.min.css'
import '@mdi/font/css/materialdesignicons.css'

Vue.use(Vuetify, {
  iconfont: 'md',
})

export default new Vuetify({})
Now we need to modify our main.js file in order to use Vuetify and Router with our application like so:
import Vue from 'vue'
import App from './App.vue'
import router from "./router";

import BootstrapVue from "bootstrap-vue";
// import VeeValidate from "vee-validate";
import vuetify from '@/plugins/vuetify' // path to vuetify export

Vue.config.productionTip = false

new Vue({
  router,
  vuetify,
  render: h => h(App),
}).$mount('#app')
Let us define the routes in our router, create a file called router.js in your src folder and add the following routes to it:
import Vue from "vue";
import Router from "vue-router";

Vue.use(Router);

export default new Router({
  routes: [
    {
      path: "/",
      redirect: '/index'
    },
    {
      path: "/register",
      name: "register",
      component: () => import("./components/Register.vue")
    },
    {
      path: "/index",
      name: "index",
      component: () => import("./components/Index.vue")
    },
  ]
});
Now that we are all set up it is time to create our components, let us start with index, create a file called Index.vue inside the components folder and add the following code:
<template>
  <v-card class="mx-auto">
    <v-row>
      <v-col v-for="(item, i) in candidates" :key="i" cols="10" style="margin: 2%">
        <v-card :color="white" light>
          <div class="d-flex flex-no-wrap justify-space-between">
            <div>
              <v-card-title class="headline" v-text="item.name"></v-card-title>
              <v-card-subtitle style="color:black">Votes: {{ item.votes }}</v-card-subtitle>
              <v-card-subtitle>
                <v-expansion-panels v-model="panel" :disabled="disabled">
                  <v-expansion-panel>
                    <v-expansion-panel-header>Details</v-expansion-panel-header>
                    <v-expansion-panel-content>
                      <b>Number of Challenges Solved:</b> {{ item.no_challenges_solved }}
                      <br />
                      <b>Python Rating:</b> {{ item.python_rating }}
                      <br />
                      <b>DSA Rating:</b> {{ item.dsa_rating }}
                      <br />
                      <b>Java Rating:</b> {{ item.java_rating }}
                      <br />
                      <b>C++ Rating:</b> {{ item.cplus_rating }}
                      <br />
                    </v-expansion-panel-content>
                  </v-expansion-panel>
                </v-expansion-panels>
              </v-card-subtitle>
              <v-card-actions>
                <v-btn class="btn-success" style="color:white" text v-on:click="vote(item)">Vote</v-btn>
              </v-card-actions>
            </div>
          </div>
        </v-card>
      </v-col>
    </v-row>
  </v-card>
</template>

<script>
import axios from "axios";
export default {
  data() {
    return {
      candidates: [],
    };
  },
  created() {
    console.log("Here");
    this.all();
  },
  methods: {
    vote: function (candidate) {
      if (confirm("Vote " + candidate.name)) {
        axios
          .post(`http://localhost:8000/api/vote/`, {
            candidate_name: candidate.name,
          })
          .then((response) => {
            console.log(response);
            alert("Voted for" + candidate.name)
            this.all()
          })
          .catch(function (error) {
            if (error.response) {
              console.log(error);
              alert("You are only allowed to vote once");
            }
          });
      }
    },
    all: function () {
      console.log("Getting data");
      axios.get("http://localhost:8000/api/candidate/", {
        auth: {
          username: "admin",
          password: "hello@1234"
        }
      }).then((response) => {
        this.candidates = response.data;
        console.log(response);
      });
    },
  },
};
</script>
We used axios to make a request for the available candidates since we have set up the django application to use basic authentication for allowing CRUD on the Candidates, you would need to hard code the admin id and password here.
Also, we used a function vote to make a request to vote for a particular candidate after confirmation via an alert window, and if the response is successful create a corresponding alert and vice-versa.
Let us now create the other component called Register.Vue in order to allow for registering new candidates:
<template>
  <v-container>
    <v-form @submit="create" ref="form" lazy-validation>
      <v-text-field v-model="admin_id" :counter="250" label="Admin Id" required></v-text-field>
      <v-text-field v-model="admin_password" label="Admin Password" type="password" required></v-text-field>
      <v-text-field v-model="candidate.name" :counter="250" label="Name" required></v-text-field>
      <v-text-field
        v-model="candidate.no_challenges_solved"
        label="Number of challenges solved"
        type="number"
      ></v-text-field>
      <v-select
        v-model="candidate.python_rating"
        :items="ratings"
        :rules="[v => !!v || 'Python Rating is required']"
        label="Python Rating"
        required
      ></v-select>
      <v-select
        v-model="candidate.java_rating"
        :items="ratings"
        :rules="[v => !!v || 'Java Rating is required']"
        label="Java Rating"
        required
      ></v-select>
      <v-select
        v-model="candidate.dsa_rating"
        :items="ratings"
        :rules="[v => !!v || 'DSA Rating is required']"
        label="DSA Rating"
        required
      ></v-select>
      <v-select
        v-model="candidate.cplus_rating"
        :items="ratings"
        :rules="[v => !!v || 'C++ Rating is required']"
        label="C++ Rating"
        required
      ></v-select>
      <v-btn color="primary" type="submit">Submit</v-btn>
    </v-form>
  </v-container>
</template>

<script>
import axios from "axios";
export default {
  data() {
    return {
      ratings: [1, 2, 3, 4, 5],
      num: 1,
      candidate: {
        name: "",
        no_challenges_solved: 0,
        java_rating: 1,
        cplus_rating: 1,
        dsa_rating: 1,
        python_rating: 1,
      },
      admin_id: "",
      admin_password: "",
      submitted: false,
    };
  },
  methods: {
    create: function () {
      axios
        .post("http://127.0.0.1:8000/api/candidate/", this.candidate, {
          auth: {
            username: this.admin_id,
            password: this.admin_password,
          },
        })
        .then((response) => {
          console.log(response);
          alert("Registered Succesfuly");
          this.$router.push("/");
        })
        .catch((error) => {
          console.log(error);
        });
    },
  },
};
</script>
Last but not the least we would need to create the navigation drawer in the App.Vue file in order to create the navigation and link it with our router, thus, the router will exist with the navigation drawer of Vuetify:
<template>
<v-app id="inspire">
<v-navigation-drawer v-model="drawer" app>
<v-list dense>
<v-list-item link>
<v-list-item-action>
<v-icon>mdi-home</v-icon>
</v-list-item-action>
<v-list-item-content>
<v-list-item-title>
<router-link to="/index">Candidates</router-link>
</v-list-item-title>
</v-list-item-content>
</v-list-item>
<v-list-item link>
<v-list-item-action>
<v-icon>mdi-account-plus</v-icon>
</v-list-item-action>
<v-list-item-content>
<v-list-item-title>
<router-link to="/register">Register New Candidate<br> (Only Admins)</router-link>
</v-list-item-title>
</v-list-item-content>
</v-list-item>
</v-list>
</v-navigation-drawer>
<v-app-bar app color="indigo" dark>
<v-app-bar-nav-icon @click.stop="drawer = !drawer"></v-app-bar-nav-icon>
<v-toolbar-title>Application</v-toolbar-title>
</v-app-bar>
<v-main>
<router-view />
</v-main>
<v-footer color="indigo" app>
<span class="white--text">© {{ new Date().getFullYear() }}</span>
</v-footer>
</v-app>
</template>
<script>
export default {
props: {
source: String,
},
data: () => ({
drawer: null,
}),
}
</script>
AND DONE...

You should be able to run the app via:
yarn serve
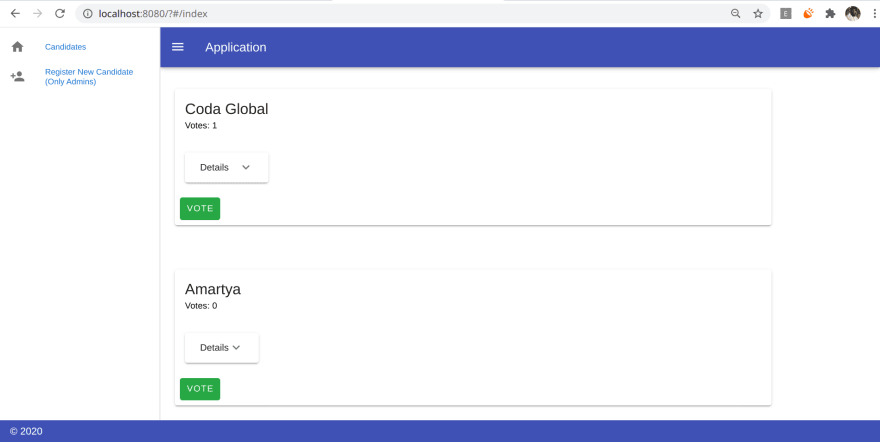
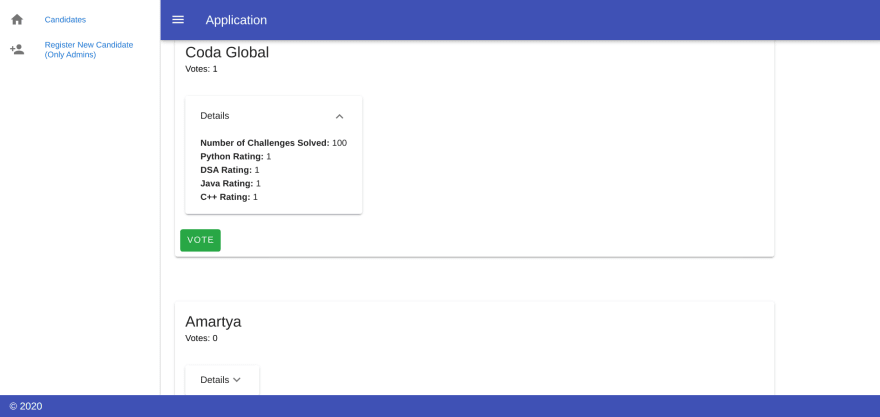
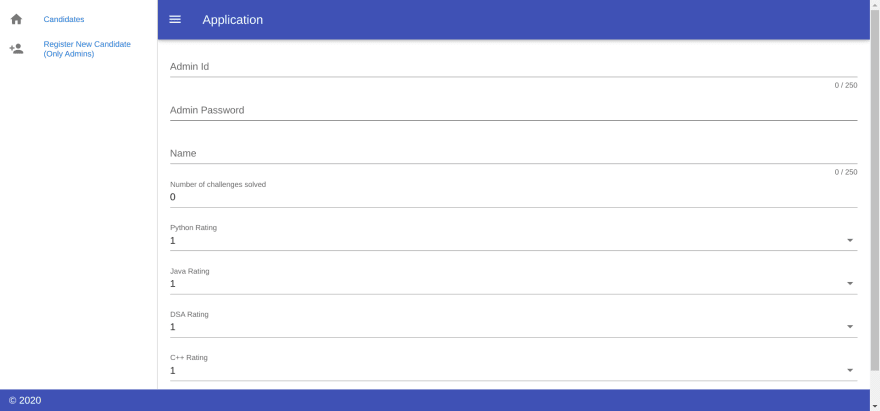
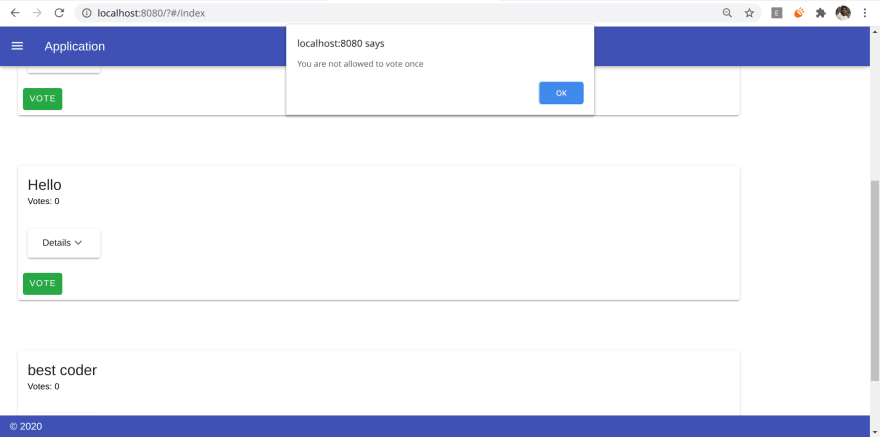
Enough talk just show me how it looks :P, sure here is how it looks:
Screenshots
Index
Detail View
Registering candidates
Voting

Vote twice error (based on IP)
Leave a star at the repo if you like the work :P. Let me know in the comments about what you would like me to write more about. Stay tuned because I am soon going to start my youtube channel.

Top comments (2)
You forgot a few things:
A this point (Views), I stopped doing the tutorial.
Installing a virtual environment is a good practice but not necessary, it is something we can choose to not do as well.
Well although not explicitly mentioned, the main app is registered in the INSTALLED_APPS snapshot provided. But I will still put in a point for this.
I did, would request you to go through the tutorial again, quoting from my article:
Yes I did not install DRF, I will add a point, thanks for the suggestions