Kubernetes has become the de-facto standard for running cloud applications. With Kubernetes, users can deploy and scale containerized applications at any scale: from one service to thousands of services. The power of Kubernetes is not free — the learning curve is particularly steep, especially for application developers. Knowing what to do is just half the battle, then you have to choose the best tools to do the job. So how do Python developers create a development workflow on Kubernetes that is fast and effective?
There are two unique challenges with creating productive development workflows on Kubernetes.
- Most development workflows are optimized for local development, and Kubernetes applications are designed to be native to the cloud.
- Most Kubernetes applications either start off or evolve into a microservices architecture. Thus, your development environment becomes more complex as every microservice adds additional dependencies to test code. And in turn, these services quickly become too resource-intensive and exceed the limits of your local machine.
In this tutorial, we’ll walk through how to set up a realistic development environment for Kubernetes. Typically, we’d have to wait for a container build, push to registry and deploy to see the impact of our change. Instead, we’ll use Telepresence and see the results of our change instantly.
Telepresence is an open source project that lets you run your microservice locally, while creating a bi-directional network connection to your Kubernetes cluster. This approach enables the microservice running locally to communicate to other microservices running in the cluster, and vice versa. Since you’re running the microservice locally, you’re able to benefit from any workflow or tool that you run locally.
Step 1: Deploy a Sample Microservices Application
For our example, we’ll make code changes to a Go service running between a resource-intensive Java service and a large datastore. We’ll start by deploying a sample microservice application consisting of 3 services:
-
VeryLargeJavaServiceA memory-intensive service written in Java that generates the front-end graphics and web pages for our application -
DataProcessingServiceA Python service that manages requests for information between the two services. -
VeryLargeDataStoreA large datastore service that contains the sample data for our Edgey Corp store.
Note: We’ve called these VeryLarge services to emphasize the fact that your local environment may not have enough CPU and RAM, or you may just not want to pay for all that extra overhead for every developer.
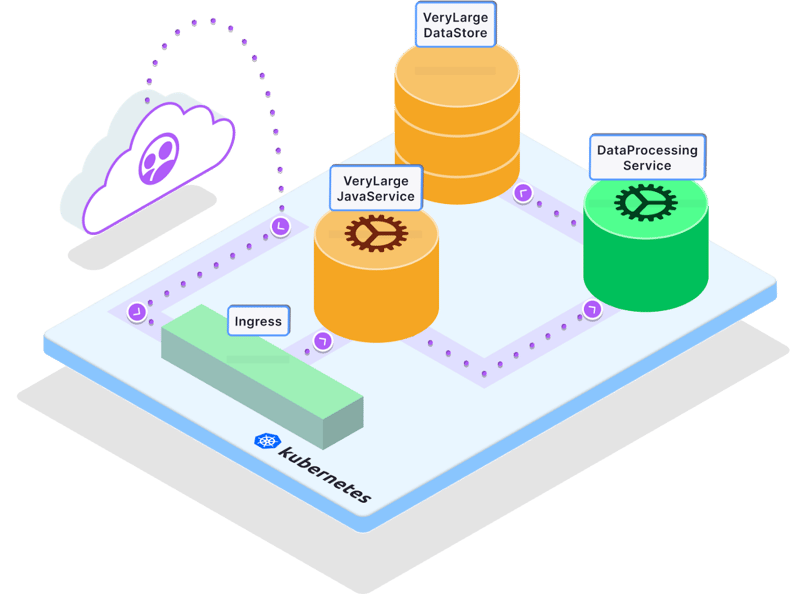
In this architecture diagram, you’ll notice that requests from users are routed through an ingress controller to our services. For simplicity’s sake, we’ll skip the step of deploying an ingress controller in this tutorial. If you’re ready to use Telepresence in your own setup and need a simple way to set up an ingress controller, we recommend checking out the Ambassador Edge Stack which can be easily configured with the K8s Initializer.
Let’s deploy the sample application to your Kubernetes cluster:
kubectl apply -f https://raw.githubusercontent.com/datawire/edgey-corp-python/master/k8s-config/edgey-corp-web-app-no-mapping.yaml
Note: This tutorial assumes you have access to a Kubernetes cluster with kubectl access. If you don’t, some options include MicroK8S and Docker Kubernetes.
Step 2: Set up your local Python development environment
We’ll need a local development environment so that we can edit the DataProcessingService service. As you can see in the architecture diagram above, the DataProcessingService is dependent on both the VeryLargeJavaService and the VeryLargeDataStore, so in order to make a change to this service, we’ll have to interact with these other services as well. Let’s get started!
- Clone the repository for this application from GitHub:
git clone https://github.com/datawire/edgey-corp-python.git
- Install the application dependencies with
pip(you may need to typepip3if you have Python 3 installed):
cd edgey-corp-python/DataProcessingService/
pip install flask requests
- Run the application (you may need to type
python3if you have Python 3 installed):
python app.py
- Test the application. In another terminal window, we’ll send a request to the service, which should return blue.
curl localhost:3000/color
blue
Step 3: Make Code Changes with Telepresence
To test a code change with Kubernetes, you typically need to build a container image, push the image to a repository, and deploy the Kubernetes cluster. This takes minutes.
Telepresence is an open source, Cloud-Native Computing Foundation project that solves exactly this problem. By creating a bidirectional network connection between your local development environment and the Kubernetes cluster, Telepresence enables fast, local development.
- Download Telepresence (~60MB):
# Mac OS X
sudo curl -fL https://app.getambassador.io/download/tel2/darwin/amd64/latest/telepresence -o /usr/local/bin/telepresence
# Linux
sudo curl -fL https://app.getambassador.io/download/tel2/linux/amd64/latest/telepresence -o /usr/local/bin/telepresence
- Make the binary executable:
sudo chmod a+x /usr/local/bin/telepresence
- Test Telepresence by connecting to the remote Kubernetes cluster:
telepresence connect
```


4. Send a request to the Kubernetes API server:


```
curl -ik https://kubernetes.default.svc.cluster.local
HTTP/1.1 401 Unauthorized
Cache-Control: no-cache, private
Content-Type: application/json
Www-Authenticate: Basic realm="kubernetes-master"
Date: Tue, 09 Feb 2021 23:21:51 GMT
```


Congratulations! You’ve successfully configured Telepresence. Telepresence is intercepting the request you’re making to the Kubernetes API server, and routing over its direct connection to the cluster instead of over the Internet.

## Step 4: Set up an Intercept
An intercept is a routing rule for Telepresence. We can create an intercept that will route traffic intended for the `DataProcessingService` in the cluster and route all the traffic to the local version of the DataProcessingService running on port 3000.
1. Create the intercept:


```
telepresence intercept dataprocessingservice --port 3000
```


2. Access the application directly with Telepresence. In your browser, go to http://verylargejavaservice:8080. Again, Telepresence is intercepting requests from your browser and routing them directly to the Kubernetes cluster.
3. Now, let’s make a code change. Open `edgey-corp-python/DataProcessingService/app.py` and change `DEFAULT_COLOR` from `blue` to `orange`. Save the file.
4. Reload the page in your browser, and see how the color has changed from blue to orange.

That’s it! With Telepresence we saw how quickly we can go from editing a local service to seeing how these changes will look when deployed with the larger application. When you compare it to our original process of building and deploying a container after every change, it’s very easy to see how much time you can save especially as we make more complex changes or run even larger services.


## Learn More about Telepresence
Typically, developers at organizations adopting Kubernetes face challenges slow feedback loops from inefficient local development environments. Today, we’ve learned how to use Telepresence to set up fast, efficient development environments for Kubernetes and get back to the instant feedback loops you had with your legacy applications.

If you want to learn more about Telepresence, check out the following resources:
* Watch a [demo video](https://www.youtube.com/watch?v=W_a3aErN3NU), which shows more details on different features in Telepresence
* Check out the [Python Quickstart for Telepresence](http://docs/latest/telepresence/quick-start/qs-python/)
* Learn about [Preview URLs](https://www.getambassador.io/docs/pre-release/telepresence/howtos/preview-urls/#collaboration-with-preview-urls)  for easy collaboration with teammates
* [Join our Slack channel](https://d6e.co/slack) to connect with the Telepresence community

In our next tutorial, we’ll use Telepresence to set up a local Kubernetes development environment and then use Pycharm to set breakpoints and debug a broken service. To be notified when more tutorials are available, make sure to check out our [website](https://www.getambassador.io) or follow us on [Twitter](http://www.twitter.com/ambassadorlabs).

*This post was originally published on [Python Pandemonium](https://medium.com/python-pandemonium/developing-python-applications-on-kubernetes-75be68a3f0f9).*

Top comments (0)