Lab Scenario
The café will soon be featured on a famous TV food show. When the show airs, Sofía and Nikhil anticipate that the café’s web server will experience a temporary spike in the number of users—perhaps even up to tens of thousands of users. Currently, the café’s web server is deployed in one Availability Zone, and Sofía and Nikhil are worried that the website won’t be able to handle the expected increase in traffic. They want to ensure that their customers have a great experience when they visit the website and that they don’t experience any issues, such as lags or delays in placing orders.
To ensure this experience, the website must be responsive, able to scale both up and down to meet fluctuating customer demand, and be highly available. Instead of overloading a single server, the architecture must distribute customer order requests across multiple application servers so it can handle the increase in demand.
Lab Overview
In this lab, you use Elastic Load Balancing (ELB) and Amazon EC2 Auto Scaling to create a scalable and highly available environment on Amazon Web Services (AWS).
Features
- Inspect a virtual private cloud (VPC).
- Update a network to work across multiple Availability Zones.
- Create an Application Load Balancer.
- Create a launch template.
- Create an Auto Scaling group.
- Set an alarm on a system metric to initiate auto scaling.
- Test load balancing and automatic scaling.
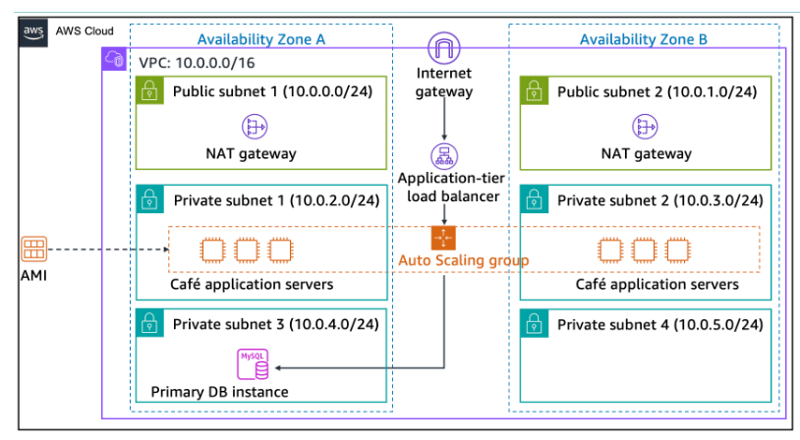
Architecture Diagram
Setup Instructions
Challenge 1: Implementing a scalable and highly available environment.
Task 1: Inspecting your environment
In this task, you evaluate your current lab environment.
- Explore the lab environment, including how the network is set up.
Task 2: Updating a network to work across multiple Availability Zones
Task 2.1: Creating a NAT gateway for the second Availability Zone
To achieve high availability, the architecture must span at least two Availability Zones. However, before you launch Amazon Elastic Compute Cloud (Amazon EC2) instances for your web application servers in the second Availability Zone, you must create a NAT gateway for them. A NAT gateway allows instances that do not have a public IP address to access the internet.
- Create a NAT gateway in the Public Subnet in the second Availability Zone.
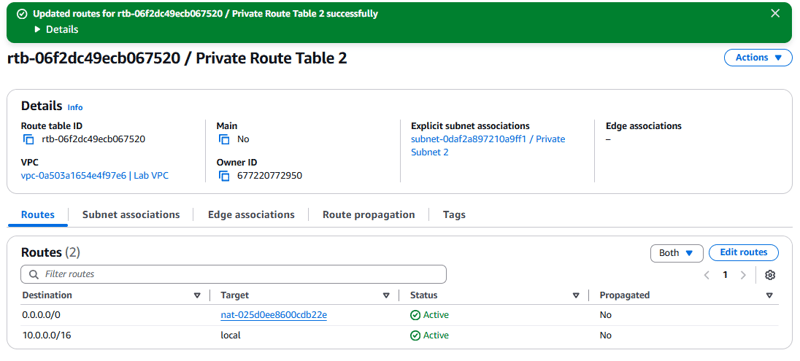
- Configure the network to send internet-bound traffic from instances in Private Subnet 2 to the NAT gateway that you just created.

Task 3: Creating a launch template
During the lab setup, an AMI was created from the CafeWebAppServer instance. In this task, you create a launch template by using this AMI.
- Launch template name: Cafe-LT
- Application and OS Images (Amazon Machine Image): Cafe WebServer
- Instance type: t2.micro.
- Key pair (login): Create new key pair.
- Security groups: Enter CafeSG.
- Resource tags:
a. Key: Name.
b. Value: webserver.
c. Resource types: Instances.
- IAM instance profile: CafeRole

Task 4: Creating an Auto Scaling group
Now that the launch template is defined, you create an Auto Scaling group for the instances. While creating an Auto Scaling group, you set a metric (CPU utilization) to initiate auto scaling events.
To create a new Auto Scaling Group, configure the following options:
- Auto Scaling group name: Cafe-ASG
- Launch template: Choose the launch template that you created in the previous task.
- VPC: Lab vpc
- Availability Zones and subnets: Private Subnet 1 and Private Subnet 2.
- Advanced options: Skip these options.
- Group size:
a. Desired capacity: 2.
b. Min desired capacity: 2.
c. Max desired capacity: 6.
- Automatic scaling - optional: Choose Target tracking scaling policy, and configure the following options:
a. Metric type: Average CPU utilization.
b. Target value: 25.
c. Instance warmup: 60.

To verify that you created the Auto Scaling group correctly, go to the Amazon EC2 console. You should have two instances, both with the name that you configured as Resource tags in the previous task.

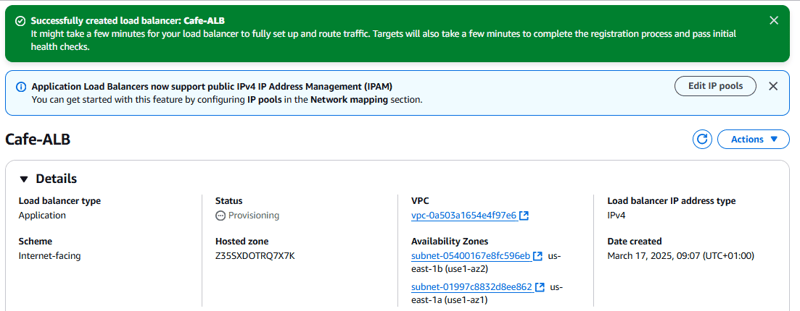
Task 5: Creating a load balancer
Now that your web application server instances are deployed in private subnets, you need a way for the outside world to connect to them. In this task, you create a load balancer to distribute traffic across your private instances.
To create an HTTP Application Load Balancer, configure the following options:
- Load balancer name: Cafe-ALB
- VPC: Lab vpc
- Subnets: Use the two public subnets.
- HTTPS security configuration settings: Skip these settings.
- Security groups: Create a new security group that allows HTTP traffic from anywhere.
- Target group: Create a new target group.
- Registering targets: Skip this section.
- Modify the Auto Scaling group that you created in the previous task by adding this new load balancer.
Task 6: Testing load balancing and automatic scaling
Task 6.1: Testing the web application without load
In this task, you test the café web application
- To test the café web application, visit the DNS name of your load balancer and add
/cafeto the end of the URL.

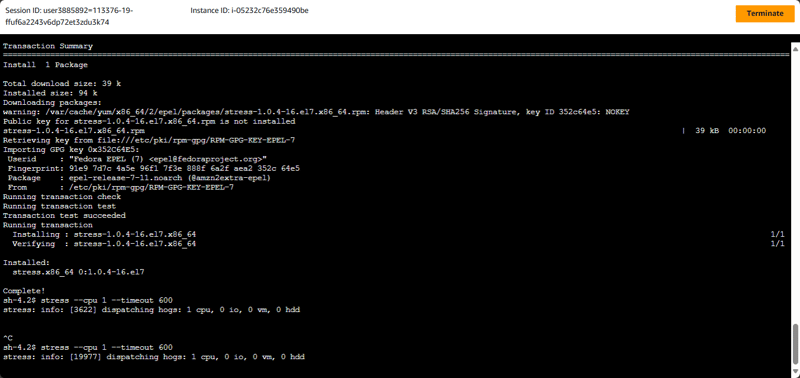
Task 6.2: Testing automatic scaling under load
In this task, you test whether the café application scales out automatically.
- By using AWS Systems Manager Session Manager, connect to one of the running web server instances.
- On the sessions manager terminal, use the following commands to start a stress test. This test increases the load on the web server CPU:
sudo amazon-linux-extras install epel
sudo yum install stress -y
stress --cpu 1 --timeout 600
- Verify that the Auto Scaling group deploys new instances.
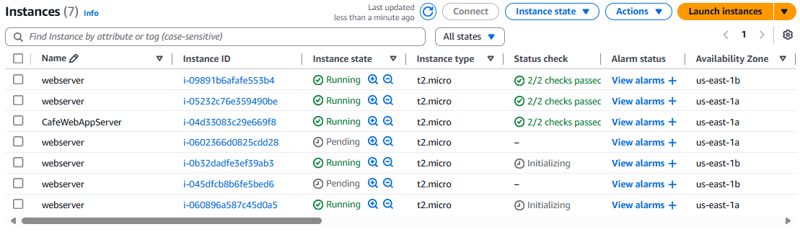
- Use
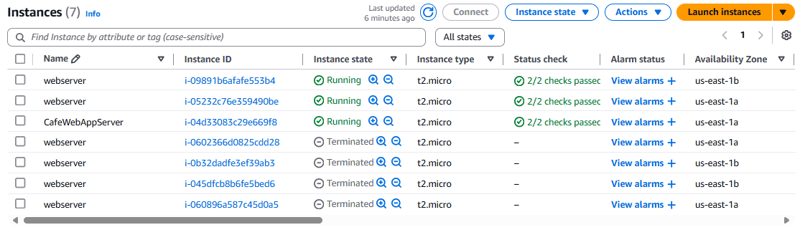
ctrl cto stop the stress test. - Refresh your instance. This reduces the load on the web server CPU.
- Verify that the Auto Scaling group terminates new instances.
What I Learnt
- Inspecting a virtual private cloud (VPC).
- Updating a network to work across multiple Availability Zones.
- Creating an Application Load Balancer.
- Creating a launch template.
- Creating an Auto Scaling group.
- Setting an alarm on a system metric to initiate auto scaling.
- Testing load balancing and automatic scaling.

Top comments (0)