Lab overview
In this lab, you review the default data encryption and AWS Key Management Service (AMS KMS) encryption used to encrypt data at rest. You review the default encryption of the objects stored in Amazon Simple Storage Service (Amazon S3). You create an AWS KMS key and use it to encrypt objects stored in Amazon Elastic Block Store (Amazon EBS) volumes. You also observe how AWS CloudTrail provides an audit log of AWS KMS key usage and how disabling the key affects data access.
Features
- Review the default encryption provided by Amazon S3.
- Access the encrypted Amazon S3 object.
- Create an AWS KMS customer managed key to encrypt and decrypt data at rest.
- Create and attach an encrypted data volume on an existing EC2 instance.
- Disable and re-enable an AWS KMS key and observe the effects on data access.
- Monitor encryption key usage by using CloudTrail event history.
- Review key rotation.
Architecture Diagram
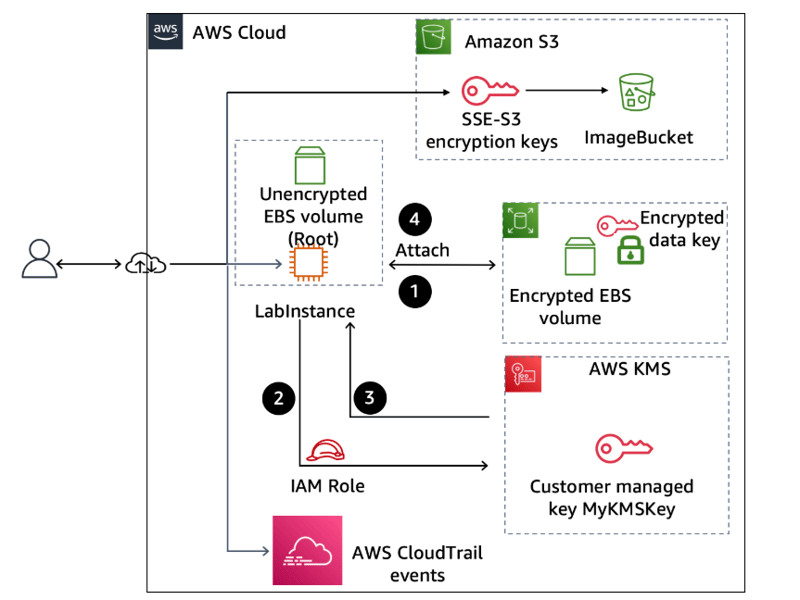
Diagram description
A user is connected to AWS Cloud resources through the internet. The S3 bucket named ImageBucket contains an object encrypted with server-side encryption with Amazon S3 managed keys (SSE-S3). The encrypted volume is attached to the EC2 instance named LabInstance. Requests to encrypt or decrypt EBS volumes are sent to AWS KMS, where the customer managed key named MyKMSKey is stored. CloudTrail logs AWS KMS key usage as events.
Setup Instructions
Task 1: Reviewing default encryption for objects in an S3 bucket
In this task, you upload an image file to an S3 bucket and review the default encryption provided by Amazon S3.
- Download the file named clock.png to your computer.
- Locate the S3 bucket and analyze its encryption settings.
- Choose the Properties tab.
In the Default encryption section, notice the setting Server-side encryption is automatically applied to new objects stored in this bucket.
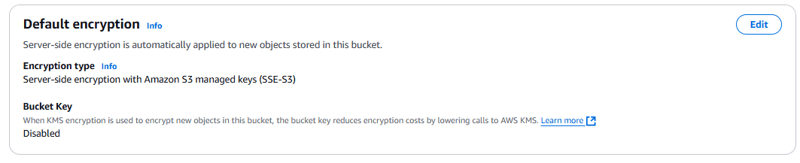
Note: Amazon S3 now applies server-side encryption with Amazon S3 managed keys (SSE-S3) as the base level of encryption for every bucket in Amazon S3.
- Next, you upload the clock.png to the bucket.
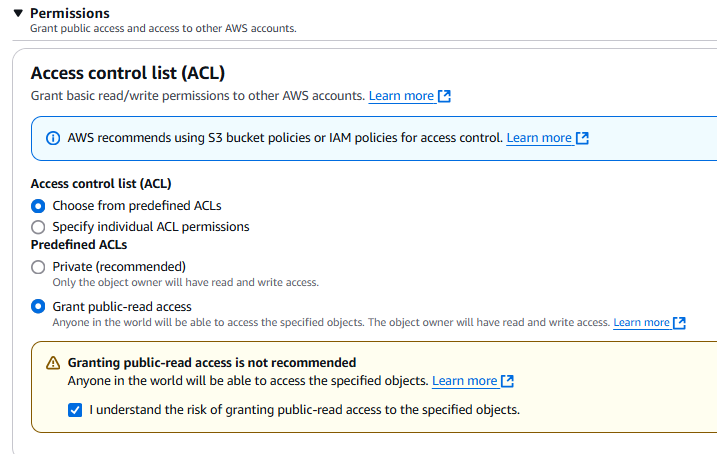
- Expand the Permissions option.
- Choose Grant public-read access.
- To open the file properties, choose the clock.png file.
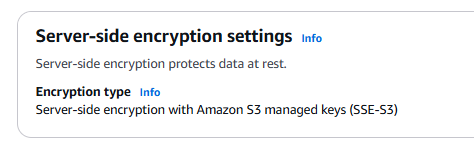
- In the Server-side encryption settings section, notice the following settings:
a. This encryption setting is enabled, and the following message is displayed: Server-side encryption protects data at rest.
b. For Encryption type, the following message is displayed: Server-side encryption with Amazon S3 managed keys (SSE-S3).
- To open the image, choose the Object URL.
You can use this method to access an Amazon S3 object from the public internet.

Note: The object is encrypted, but while it displays, it has to be decrypted. The service handles this decryption transparently.
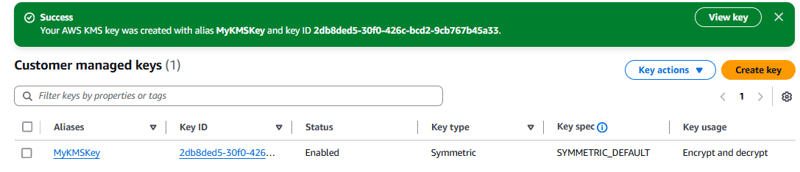
Task 2: Creating an AWS KMS key
In this task, you create a customer managed AWS KMS key. Later in the lab, you use the AWS KMS key that you create to generate, encrypt, and decrypt data keys. The data keys will be shared with Amazon EC2. The data keys are used to encrypt the actual data stored on EBS volumes.
- In the AWS Management Console, search for KMS and choose Key Management Service to open the AWS KMS console.
- Choose Customer managed keys.
- For Key type, choose Symmetric.
Note: Symmetric keys never leave AWS KMS unencrypted. The key that you create will be a 256-bit secret key.
- For Alias, enter MyKMSKey.
- On the Define key administrative permissions page, for Key administrators, search for and select the
voclabsrole. - On the Define key usage permissions page, for Key users, search for and select the
voclabsrole again.
Task 3: Creating and attaching encrypted data volume on an EC2 instance
In this task, you create an encrypted EBS volume by using the KMS key that you created in the previous task and attach it to your EC2 instance. When you attach the encrypted volume, the EC2 instance retrieves the data key from AWS KMS and uses it to decrypt the data on the EBS volume.
- Open the Amazon EC2 console and choose LabInstances provided for you.
- Note the Availability Zone for this EC2 instance. You need this information in a later step.
- Choose the Storage tab.
In the Block devices section, notice that the volume that is attached indicates it is not encrypted. This is the root volume, which contains the guest operating system installation. It was created when the the EC2 instance was created.

Next, you create the new encrypted volume.
- choose Volumes, On the Create volume page, configure the following settings:
a. For Volume type, keep the default.
b. For Size (GiB), enter 1.
c. For Availability Zone, choose the Availability Zone where the EC2 instance exists.
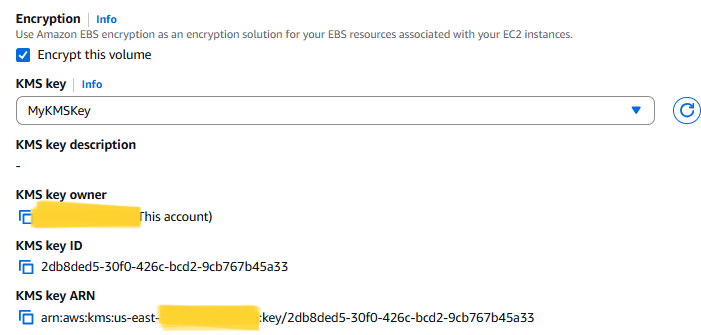
d. For Encryption, select Encrypt this volume.
e. For KMS key, choose MyKMSKey. Notice the details about the key that are displayed.
f. Choose Create volume.
Next, you attach the new volume.
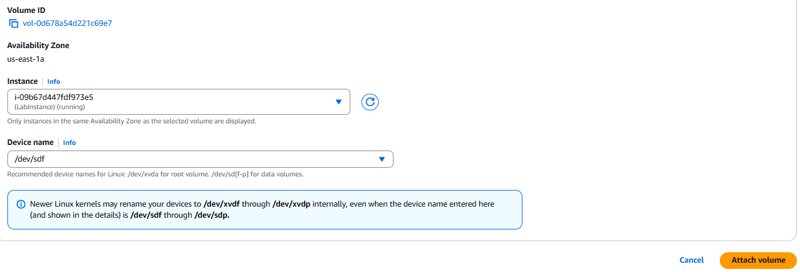
- Choose the link for the volume that you created.
- On the Attach volume page, for Instance, choose your EC2 instance from the dropdown list.
- A Device name is allocated and displayed similar to /dev/sdf.
- Choose Attach volume.
- Navigate to the Amazon EC2 console and choose Instances.
- Choose the Storage tab.
- Two volumes are attached to the instance:

Task 4: Disabling the encryption key and observing the effects
In this task, you temporarily disable the AWS KMS key that you previously used to encrypt the EBS volume. You then observe the effects that disabling the key has on accessing encrypted data.
First, you disable the AWS KMS key that you used to encrypt the EBS volume.
- Navigate to the AWS KMS console.
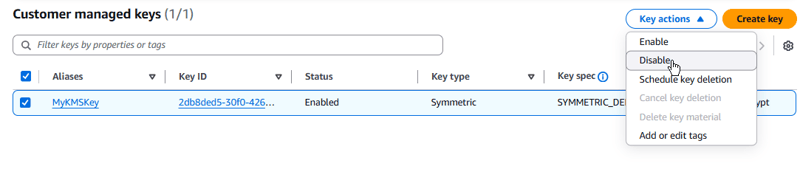
- In the navigation pane, choose Customer managed keys.
- Select MyKMSKey, and then choose Key actions > Disable.
Next, you detach the data volume from EC2 instance. It is necessary for this test to detach the instance. The encrypted data key is stored in memory and used to encrypt and decrypt all data going to and from the attached EBS volume. Amazon EBS retains the encrypted data key for later use in case the data key in memory is no longer available.
- Navigate to the Amazon EC2 console.
- Choose the link for the volume that you created.
- Choose Actions > Detach volume.
- Choose the Refresh button to refresh the page.
- Choose Actions > Attach volume.
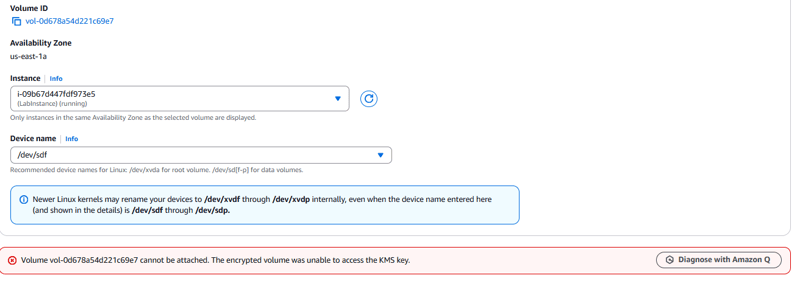
The operation fails as expected because the AWS KMS key used to encrypt the data volume is now disabled and can no longer be used to decrypt the data.
Next, you analyze the CloudTrail event history.
- Open the CloudTrail console and choose Event history.
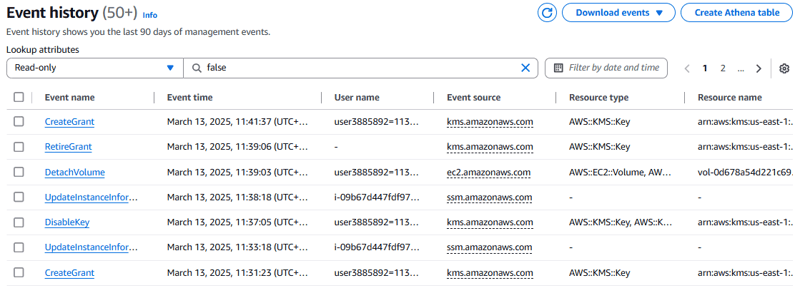
Note: CloudTrail provides an audit log of API calls that are made in the AWS account. The event history provides access to events from the last 90 days of account activity.
- Choose the link for the DisableKey event name.
- In the Event record section, review the details of the event.
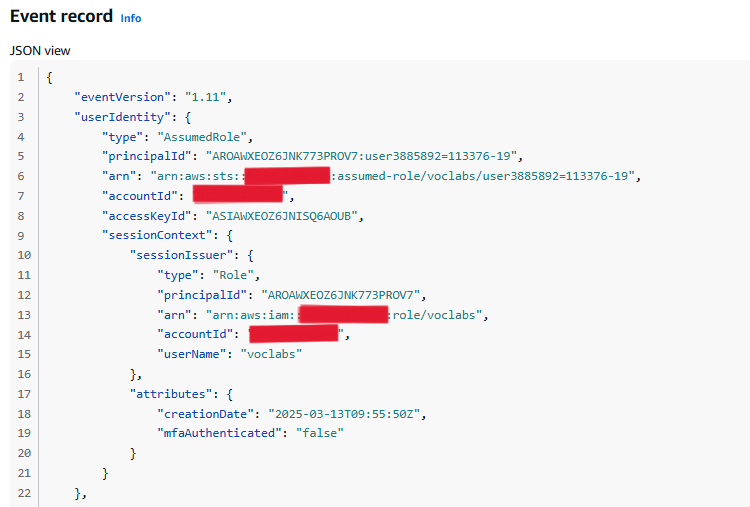
The Event time show that you disabled the AWS KMS key a few minutes ago.
Next, you examine the AttachVolume event, which occurred just after the **DisableKey **event.
- Choose the link for the **AttachVolume **event name.
- The details show that the request to attach the volume to the instance was unsuccessful.
This happened because the attach volume process noticed that the data volume was encrypted with the MyKMSKey, so Amazon EC2 contacted AWS KMS to provide the plaintext data key so it could decrypt the volume. AWS KMS denied the request because the AWS KMS key that was used to encrypt the data key that the EBS volume was encrypted with was disabled.
Task 5: Analyzing AWS KMS activity by using CloudTrail
In this task, you access the CloudTrail event history to find events that are related to your encryption operations. The CloudTrail audit log functionality provides an important security feature, and it's a good idea to monitor how AWS KMS keys are used in your account.
First, you access the CloudTrail event history.
- CloudTrail console, choose Event history.
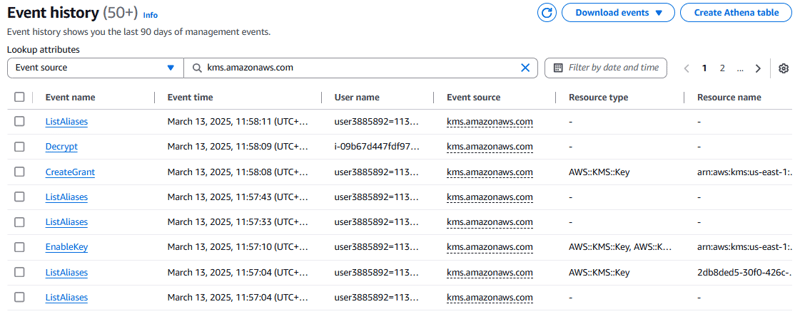
- In the Event history list, notice the column named Event source. Each time an API call to an AWS service occurs within the Region that you have selected, if that service reports such events to CloudTrail, then the event and the AWS service that reported the event are listed.
Next, you filter the event history to display only events that the AWS KMS service reported.
Task 6: Reviewing key rotation
AWS KMS supports automatic key rotation only for symmetric encryption KMS keys with key material that AWS KMS creates. Automatic rotation is optional for customer managed KMS keys.
In this task, you review the feature to enable automatic rotation for the key you created in this lab. However, you cannot see it in effect as the rotation would be effective after a year, once enabled.
- Open the AWS KMS console.
- Choose Customer managed keys.
- Choose MyKMSKey, the key you created for this lab.
- Choose Key rotation.
- Choose Save.

What I Learnt
- Reviewed the default encryption provided by Amazon S3
- Accessed the encrypted Amazon S3 object
- Created an AWS KMS customer managed key to encrypt and decrypt data at rest
- Created and attached an encrypted data volume on an existing EC2 instance
- Disabled and re-enabled an AWS KMS key and observe the effects on data access.
- Monitored encryption key usage by using CloudTrail event history.
- Reviewed key rotation.

Top comments (0)