Lab Scenario
The café staff members have created their Amazon Web Services (AWS) resources and manually configured their applications mostly by using the AWS Management Console. This approach worked well as a way for the café to get started with a web presence quickly. However, the staff members are finding it challenging to replicate their deployments to new AWS Regions so that they can support new café locations in multiple countries. They would also like to have separate development and production environments that reliably have matching configurations.
Lab overview
In this lab, you gain experience with creating AWS CloudFormation templates. You use the templates to create and update CloudFormation stacks. The stacks create and manage updates to resources in multiple AWS service areas in your AWS account. You practice by using AWS CodeCommit to control the version of your templates. You also observe how you can use AWS CodePipeline to automate stack updates.
Features
- Deploy a virtual private cloud (VPC) networking layer by using a CloudFormation template.
- Deploy an application layer by using a CloudFormation template.
- Use Git to invoke CodePipeline and to create or update stacks from templates that are stored in CodeCommit.
- Duplicate network and application resources to another AWS Region by using CloudFormation.
Setup Instructions
Challenge 1: Creating a static website for the café by using CloudFormation challenge 1
Task 1: Creating a CloudFormation template from scratch
In this task, you create a CloudFormation template that creates an S3 bucket. You then run an AWS Command Line Interface (AWS CLI) command that created the CloudFormation stack. (The stack is the resource that creates the bucket.)
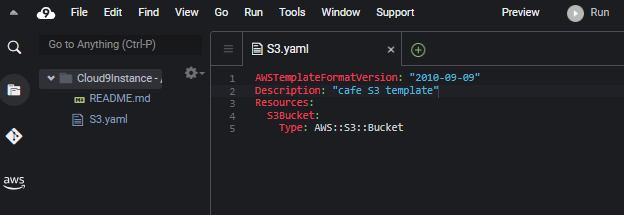
- In the AWS Cloud9 IDE, create and save a new file as
S3.yaml. - At the top of the file, add the following two lines:
AWSTemplateFormatVersion: "2010-09-09"
Description:
Resources:
  S3Bucket:
    Type: AWS::S3::Bucket
- Add a description, such as "cafe S3 template", on the Description line.
- In the Bash terminal, run the following two lines of code:
aws configure get region
aws cloudformation create-stack --stack-name CreateBucket --template-body file://S3.yaml
The first line of code returns the default AWS Region of the AWS CLI client that is installed on the AWS Cloud9 instance. You can modify the default AWS Region by running the aws configure command. However, for this lab, you should leave the default Region.
The second line of code creates a stack that uses the template you defined. Because you did not specify the Region in the command, the stack is created in the default Region.
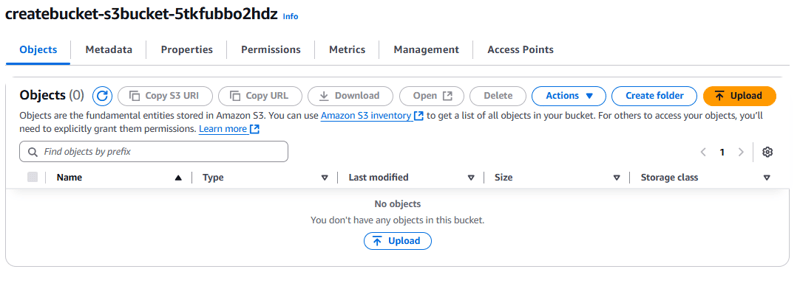
If the create-stack command ran successfully, you should see some output that is formatted in JSON. This output should indicate a StackId.

- Navigate to the Amazon S3 console to observe the bucket that your template created.
Task 2: Configuring the bucket as a website and updating the stack
In this next task, you update the CloudFormation template. The update configures the S3 bucket to host a static website.
Next, you set bucket ownership controls and public access and then upload the static website assets to the bucket.
- Run the following commands in the Bash terminal (replace with your actual bucket name):
#1. Download the website files
_wget https://aws-tc-largeobjects.s3.us-west-2.amazonaws.com/CUR-TF-200-ACACAD-3-113230/15-lab-mod11-challenge-CFn/s3/static-website.zip
unzip static-website.zip -d static
cd static_
#2. Set the ownership controls on the bucket
aws s3api put-bucket-ownership-controls --bucket <BUCKET-NAME> --ownership-controls Rules=[{ObjectOwnership=BucketOwnerPreferred}]
#3. Set the public access block settings on the bucket
aws s3api put-public-access-block --bucket <BUCKET-NAME> --public-access-block-configuration "BlockPublicAcls=false,RestrictPublicBuckets=false,IgnorePublicAcls=false,BlockPublicPolicy=false"
#4. Copy the website files to the bucket
aws s3 cp --recursive . s3://<BUCKET-NAME>/ --acl public-read

Next, you open the CloudFormation template documentation AWS Resource and Property Types Reference for defining S3 bucket resources.
- From the Service resource type list, choose Amazon S3.
- From the Resource types list, choose AWS::S3::Bucket.
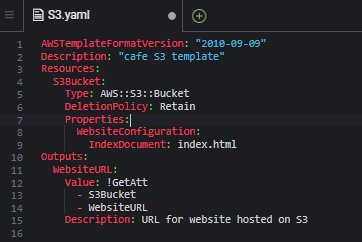
- By using the documentation as a reference, modify your
S3.yamltemplate to set the following characteristics on the S3 bucket resource:
a. Attach a deletion policy that retains the bucket.
b. Configure the bucket to host a static website with index.html set as the index document.
- To your CloudFormation template, add an output that provides the website URL.
- Save the changes to your S3.yaml file.
Next, you validate your template.
- In the Bash terminal, change the directory back to the location of the S3.yaml file and validate your template by running the following commands.
cd ../
aws cloudformation validate-template --template-body file://S3.yaml
- To update the stack, run the following command:
aws cloudformation update-stack --stack-name CreateBucket --template-body file://S3.yaml
- Browse to the CloudFormation console, and confirm that your stack update completed successfully.

- The Outputs tab list an output with a URL value? Open the link.
Challenge 2: Storing templates in a version control system
Task 3: Cloning a CodeCommit repository that contains CloudFormation templates
In this task, you clone a CodeCommit repository. The café team will use the repository to store and control the versions of the CloudFormation templates.
- Browse to the CodeCommit console, notice the repository that is named CFTemplatesRepo.
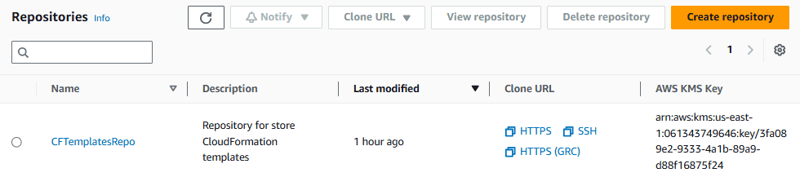
CodeCommit is a source control service that you can use to host Git-based repositories. It can be used in a way that's similar to GitHub repositories.
- Open the CFTemplatesRepo/templates/start-lab.yaml file, and analyze the contents.
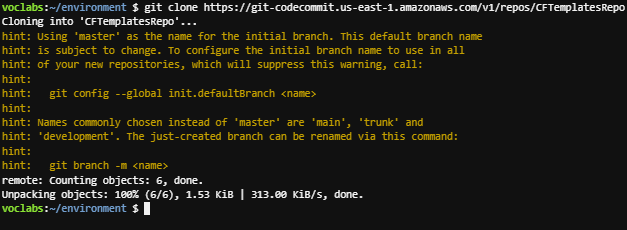
- Select CFTemplatesRepo, choose Clone URL, and then Clone HTTPS.
This action copies the CodeCommit repository's HTTPS clone URL to your clipboard.
- To clone the existing CodeCommit repository to your workspace, enter the following command into the Bash terminal. In the command, replace with the clone URL that you copied.
git clone <url>
This command clones a copy of the CodeCommit repository that you just observed. The command creates a CFTemplatesRepo directory that should now appear in the navigation pane, which is the left pane in the IDE.
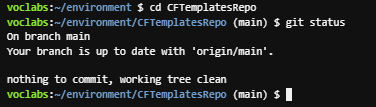
- To use the Git client software to analyze your local copy of the repository, enter the following commands:
cd CFTemplatesRepo
git status
The git status command shows what branch of the repository you are connected to. It also shows that your local copy is up to date with the source branch in CodeCommit.
Challenge 3: Using a continuous delivery service, create the network and application layers for the café
Task 4: Creating a new network layer with CloudFormation, CodeCommit, and CodePipeline
In this task, you use a CloudFormation template to create a VPC with a public subnet along with other network resources. You gain experience with using a CI/CD pipeline. When you use Git to push the template into a CodeCommit repository, it activates a pipeline that creates a CloudFormation stack.
- AWS Cloud9 IDE, duplicate and rename
template1.yamlascafe-network.yaml - In the text editor, open the
cafe-network.yamlfile, and for the description, enter Network layer for the cafe, and save your changes.
Next, you observe the CodePipeline details that were preconfigured in your account.
- Notice that two pipelines have been predefined for you:
a. CafeAppPipeline
b. CafeNetworkPipeline
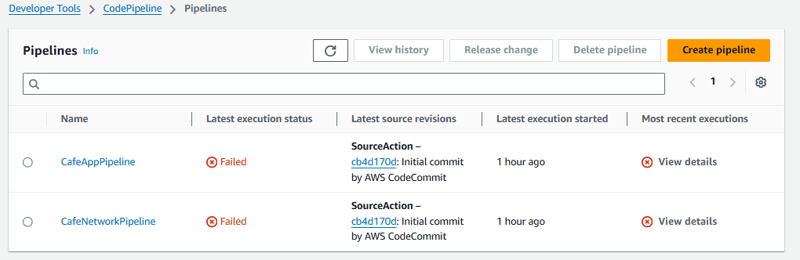
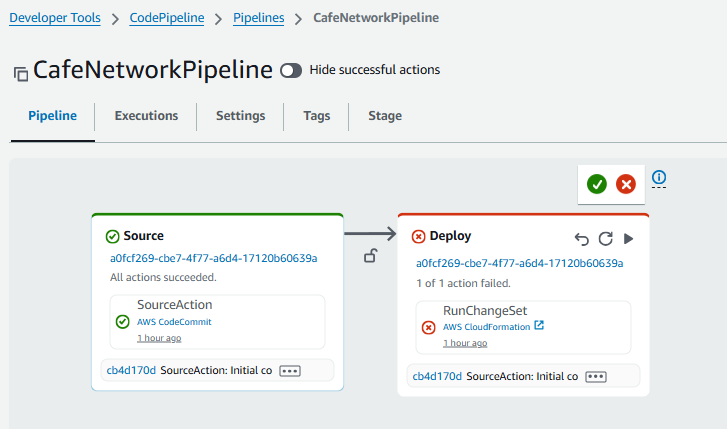
The status of the most recent attempt to run each pipeline shows that they Failed. However, this status is expected. The CloudFormation template files that the pipelines reference do not exist in their expected location.
- Analyze the source stage of CafeNetworkPipeline
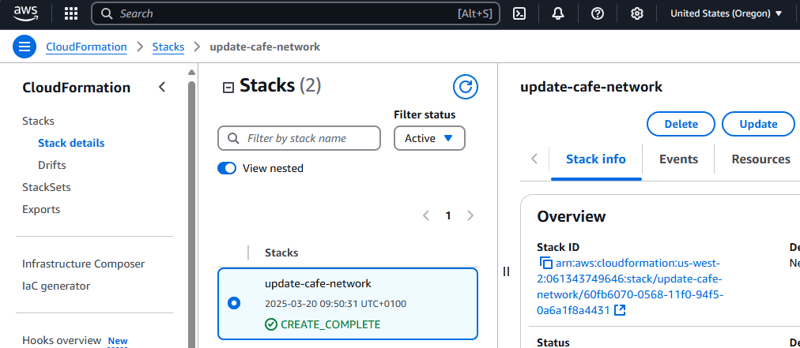
Next, you invoke the creation of the update-cafe-network by checking your CloudFormation template into CodeCommit.
- To observe how the local copy of the repository differs from the origin, in the Bash terminal, run:
git status
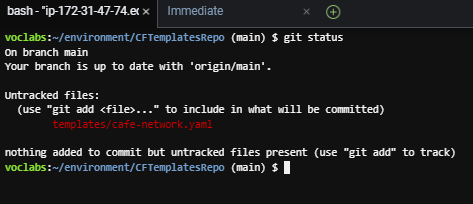 The output should show that the cafe-network.yaml file that you created is currently untracked in Git.
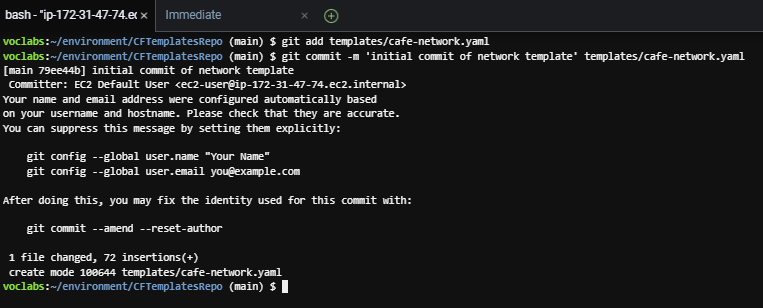
- To add the new file to the repository and then commit it to the repository with a comment, run the following commands:
git add templates/cafe-network.yaml
git commit -m 'initial commit of network template' templates/cafe-network.yaml
- To check the status of your local copy of the repository, run the following command:
git status
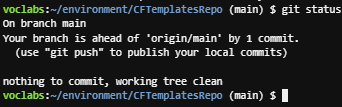
The information that is returned should report that your branch is ahead of origin/main by 1 commit.
- Finally, to push the commit to the remote repository, run the following command:
git push
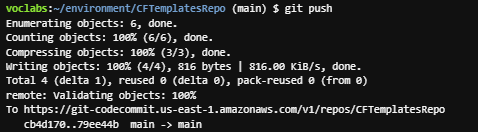
This command actually copies the file to CodeCommit.
- Return to the CodePipeline console, and choose CafeNetworkPipeline.
Observe that the creation of the stack is automatically activated.
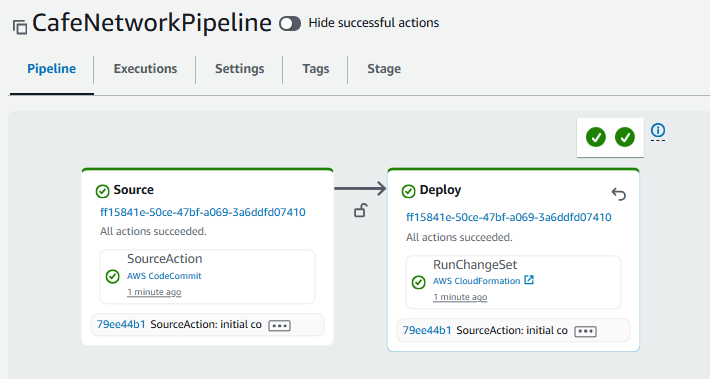
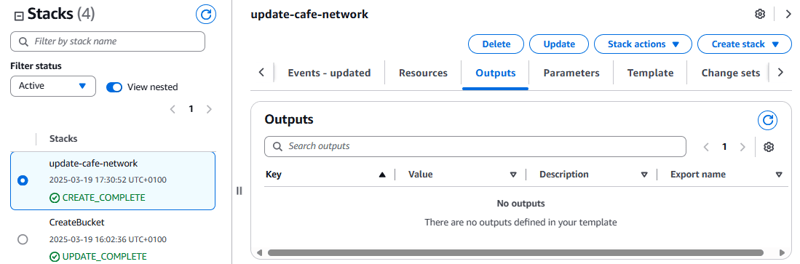
- In the CloudFormation console, confirm that the update-cafe-network stack ran. It should have a Status of CREATE_COMPLETE or UPDATE_COMPLETE.
Also, check the Outputs tab for the stack. It currently shows no outputs. Soon, however, you update the stack so that it creates outputs.
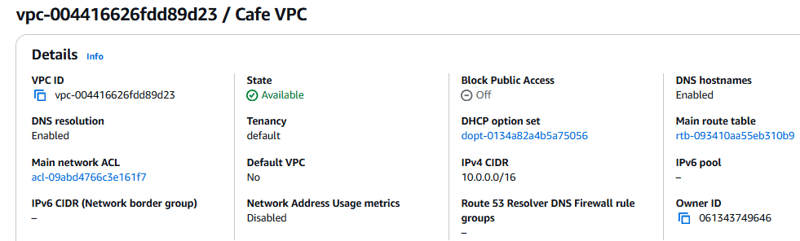
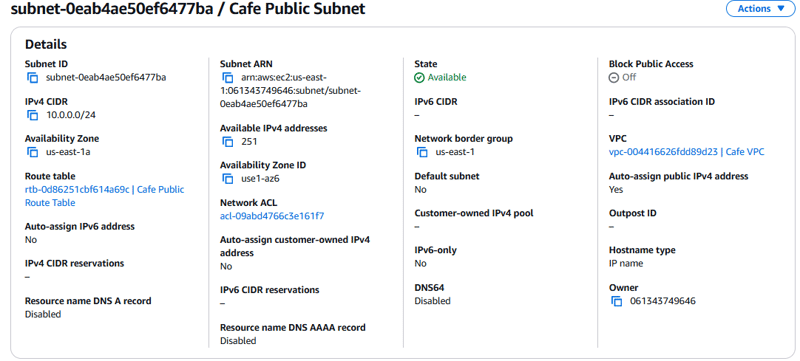
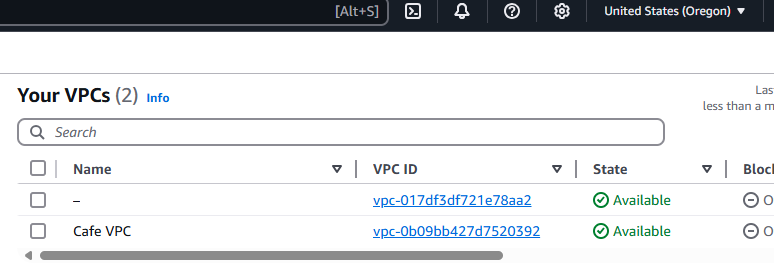
- Go to the Amazon VPC console, and observe that the resources defined in the
cafe-network.yamltemplate were created in the AWS account.
Task 5: Updating the network stack
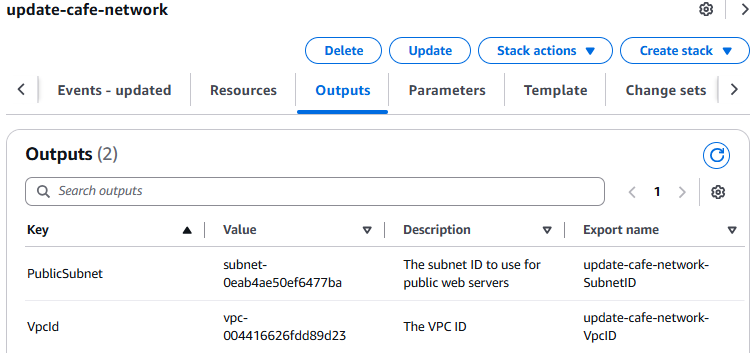
In this task, you update the network stack so that it exports essential information about two of the resources that it creates. These two outputs can then be referenced by the application stack that you create later.
- In the AWS Cloud9 IDE, add the following lines to the bottom of
cafe-network.yaml, and save your changes.
Outputs:
  PublicSubnet:
    Description: The subnet ID to use for public web servers
    Value:
      Ref: PublicSubnet
    Export:
      Name:
        'Fn::Sub': '${AWS::StackName}-SubnetID'
  VpcId:
    Description: The VPC ID
    Value:
      Ref: VPC
    Export:
      Name:
        'Fn::Sub': '${AWS::StackName}-VpcID'
- In the Bash terminal, commit the code, and then push it to CodeCommit by using Git.
- Verify that the Outputs tab now lists two keys with export names.
Task 6: Defining an EC2 instance resource and creating the application stack
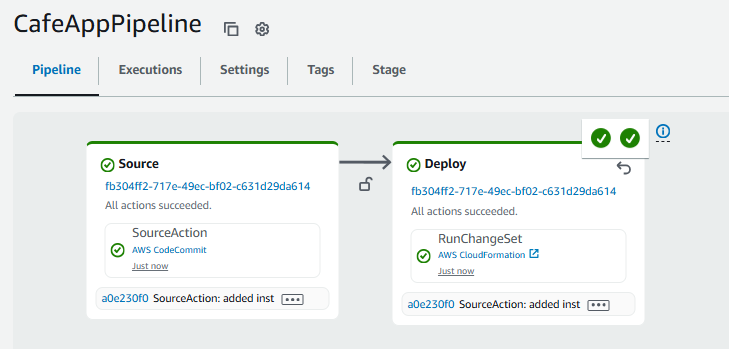
In this task, you create a new CloudFormation template that will be used to create a stack. The new stack deploys a dynamic website for the café. The CafeAppPipeline pipeline (which you observed earlier) creates or updates the update-cafe-app stack when you push the cafe-app.yaml template to the CodeCommit repository.
- In AWS Cloud9 IDE, duplicate and rename
template2.yamlascafe-app.yaml
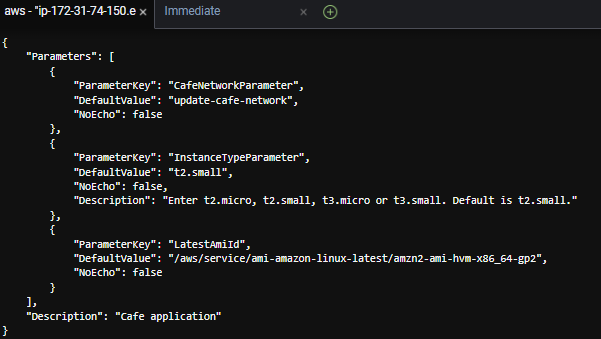
Next, in the cafe-app.yaml template, you define a third parameter so that a user can choose between different instance types when they launch an EC2 instance.
- In the AWS CloudFormation Documentation, in the Defining a parameter in a template section, copy the example YAML parameter.
- Paste the parameter into your template, make the following adjustments, and then save your changes.
a. Modify the parameter so that the permitted instance types are t2.micro, t2.small, t3.micro, and t3.small.
b. Change the default to t2.small.
- In a new browser tab, open the AWS CloudFormation Documentation, and use the information in that page as a reference for the next steps.
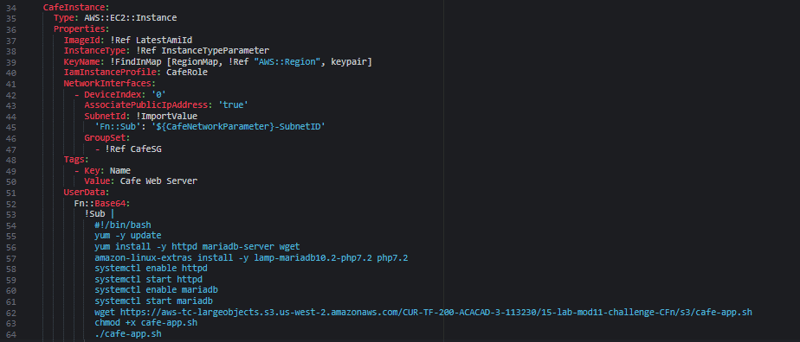
- In the
cafe-app.yamltemplate, create a new EC2 instance resource with the following configuration settings:
a. For Logical ID, enter CafeInstance.
b. Include an ImageId that references the LatestAmiId parameter.
c. For InstanceType, reference the instance type parameter that you defined in the previous step.
d. For KeyName, use the following line of code, which references the RegionMap mapping that is already defined in the template:
KeyName: !FindInMap [RegionMap, !Ref "AWS::Region", keypair]
e. For the IamInstanceProfile (the AWS Identity and Access Management, or IAM, role that is attached to the instance), specify CafeRole.
f. In the Properties section, include the following lines of code:
NetworkInterfaces:
  - DeviceIndex: '0'
    AssociatePublicIpAddress: 'true'
    SubnetId: !ImportValue
      'Fn::Sub': '${CafeNetworkParameter}-SubnetID'
    GroupSet:
      - !Ref CafeSG
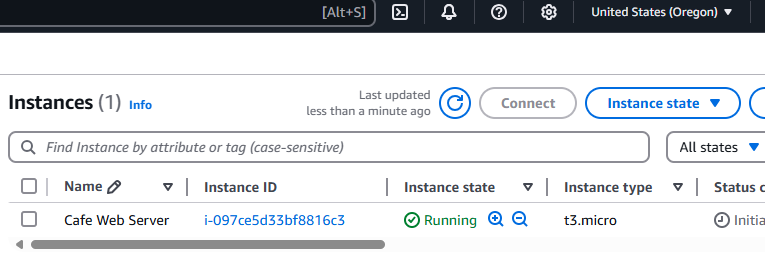
g. Set a Tag with a Key **of **Name and a Value **of **Cafe Web Server.
h. In the Properties section, include the following additional UserData code:
UserData:
    Fn::Base64:
      !Sub |
        #!/bin/bash
        yum -y update
        yum install -y httpd mariadb-server wget
        amazon-linux-extras install -y lamp-mariadb10.2-php7.2 php7.2
        systemctl enable httpd
        systemctl start httpd
        systemctl enable mariadb
        systemctl start mariadb
        wget https://aws-tc-largeobjects.s3.us-west-2.amazonaws.com/CUR-TF-200-ACACAD-3-113230/15-lab-mod11-challenge-CFn/s3/cafe-app.sh
        chmod +x cafe-app.sh
        ./cafe-app.sh
- To validate the template format in the Bash terminal, run the following command:
aws cloudformation validate-template --template-body file:///home/ec2-user/environment/CFTemplatesRepo/templates/cafe-app.yaml
If you receive a JSON-formatted response that includes the three parameters that were defined at the top of your template, then your template passed the validation.
- Add the file to CodeCommit.
- Return to the CodePipeline console, and choose CafeAppPipeline, the Deploy stage status should show Succeeded - Just now.
- In the Amazon EC2 console, observe that the EC2 instance and security group resources (which were defined in the cafe-app.yaml template) were created.
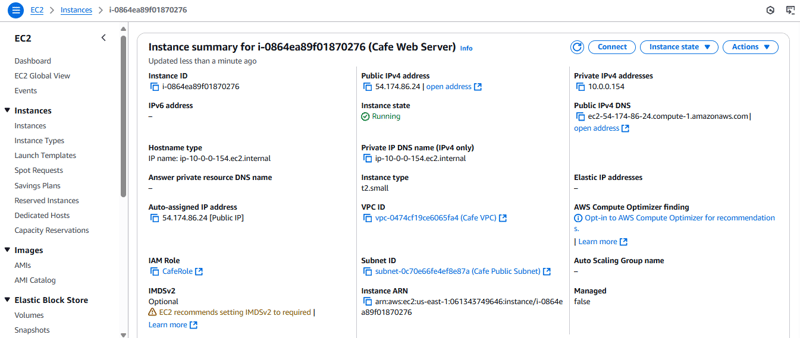
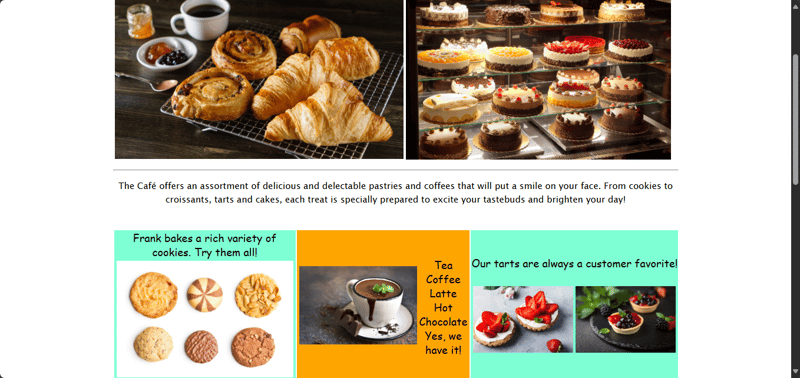
- In a browser tab, load the following URL, where is the public IPv4 address of the EC2 instance that you defined:
http://<public-ip-address>/cafe.

Challenge 4: Duplicating the network and application resources in a second AWS Region
Task 7: Duplicating the café network and website to another AWS Region
In this final lab task, you experience how quickly you can duplicate a deployment. A quick deployment is possible because you defined all your resources in CloudFormation templates.
- To duplicate the café network to another AWS Region, run the following command In the AWS Cloud9 IDE:
aws cloudformation create-stack --stack-name update-cafe-network --template-body file:///home/ec2-user/environment/CFTemplatesRepo/templates/cafe-network.yaml --region us-west-2
It should return a StackId. Notice that you could override the default Region for the creation of this stack by specifying the Region when you ran the command.

- Browse to the CloudFormation console and change the Region to US West (Oregon) us-west-2.
The update-cafe-network stack should be listed.
- Browse to the Amazon VPC console, and confirm that you are in the US West (Oregon) us-west-2 Region.
You should be able to observe the network resources that were created
- Next, you create an Amazon EC2 key pair
cafe-oregon
Revisit the application template details.
- Notice the KeyName property, the mapping indicates that if the instance is launched in the us-east-1 (N. Virginia) Region, it should use the vockey key pair. However, if the instance is launched in the us-west-2 (Oregon) Region, it should use the cafe-oregon key pair that you just created.
Next, you copy the template file to an S3 bucket.
- In the AWS Cloud9 IDE, enter the following command. In the command, replace <repobucket-bucketname> with the actual S3 bucket name in your account. Its name should contain the string repobucket
aws s3 cp templates/cafe-app.yaml s3://<repobucket-bucketname>/
- In the Amazon S3 console, select the object that you just uploaded, and copy the object URL of the file.
- In the CloudFormation console, ensure the Region is US West (Oregon) us-west-2. Configure the following:
a. Choose Create stack and then choose With new resources (standard).
b. On the Create stack page, for Amazon S3 URL, enter the object URL that you just copied.
c. On the Specify stack details page, configure the following options:
i. Stack name: Enter a name.
ii. InstanceType: t3.micro.
Continue through the remaining screens, accept all the default settings, and finish creating the stack.
- Verify that the stack was created successfully.
- Browse to the Amazon EC2 console and observe the created resources.
After the server has fully started, you should be able to access the website at http://<public-ip-address>/cafe where <public-ip-address> is the public IPv4 IP address of the EC2 instance.
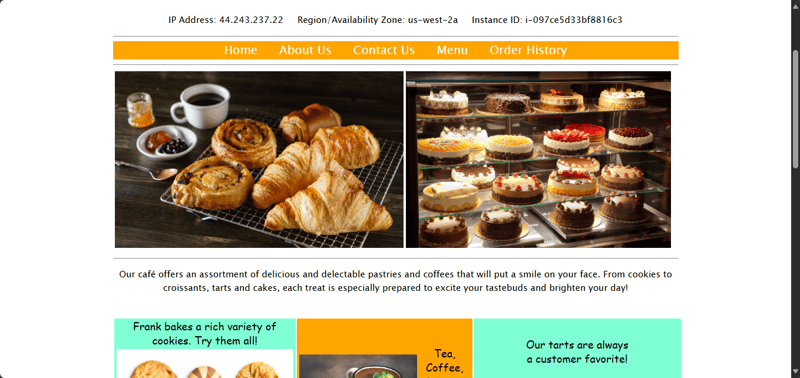
Notice that the server information on the website shows that this second instance of the café website is running in the us-west-2 Region.
What I learnt
- Deploying a virtual private cloud (VPC) networking layer by using a CloudFormation template.
- Deploying an application layer by using a CloudFormation template.
- Using Git to invoke CodePipeline and to create or update stacks from templates that are stored in CodeCommit.
- Duplicating network and application resources to another AWS Region by using CloudFormation.

Top comments (0)