Lab Scenerio
You have the Birds web application, which was built by using a NodeJs server running on an AWS Cloud9 instance and an Amazon Simple Storage Service (Amazon S3) bucket with static website hosting capability. The Birds application tracks students' bird sightings by using the following components:
- A home page
- An educational page that teaches students about birds
- The following three protected pages, which students can access only if they have been authenticated:
- A sightings page where students can view past bird sightings
- A reporting page where students report new bird sightings
- An administrator page where site administrators can perform additional operations
Lab overview
In this lab, you configure an Amazon Cognito user pool, which you use to manage users and their access to an existing web application. You also create an Amazon Cognito identity pool, which authorizes users when the application makes calls to the Amazon DynamoDB service.
Features
- Create an Amazon Cognito user pool.
- Add users to the user pool.
- Update the example application to use the user pool for authentication.
- Configure the Amazon Cognito identity pool.
- Update the example application to use the identity pool for authorization.
Architecture Diagram
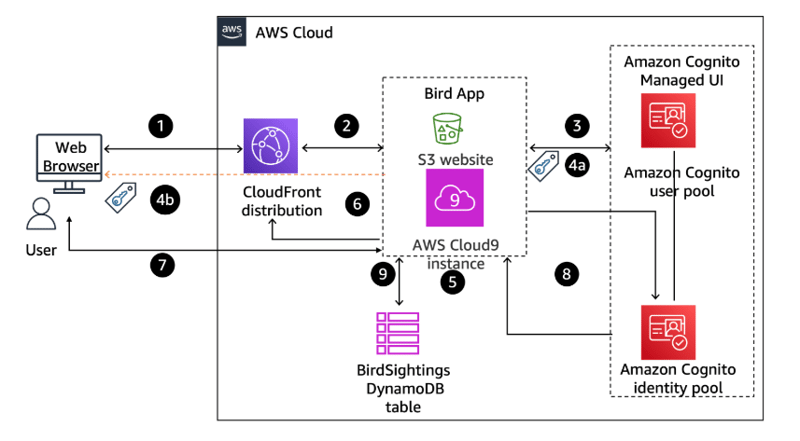
Architecture Steps and Explanation
Step 1: The user requests access to the administrator page from the browser.
Step 2: The request is routed to the NodeJs application server that is hosting the Birds application.
Step 3: The application redirects the request to the Amazon Cognito managed UI.
Step 4a: The user is authenticated by the Amazon Cognito user pool, and the access token is returned to the application.
Step 4b: The Amazon Cognito SDK also stores the access token in browser's local storage for subsequent use, with the default expiration of 3,600 seconds.
Step 5: The application validates the token and returns the administrator page as requested.
Step 6: The page is returned to the user's browser through the Cloudfront distribution.
Step 7: The user initiates a query to a DynamoDb table.
Step 8: The application sends the token to the Amazon Cognito identity pool and receives temporary AWS credentials upon validation.
Step 9: The application uses the received credentials to query the DynamoDB table and return data to the protected page. The page is returned to the user's browser through the Cloudfront distribution.
Setup Instructions
Task 1: Preparing the lab environment
Before you can work on this lab, you need to download files and run some scripts in the AWS Cloud9 integrated development environment (IDE)
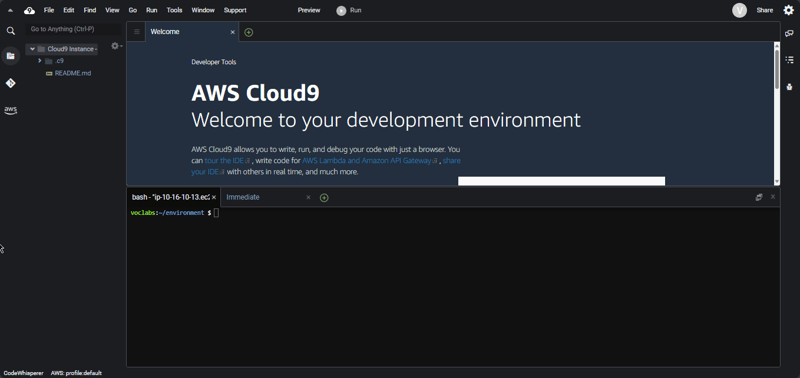
- Open and connect to the AWS Cloud9 IDE.
- In a text editor of your choice (outside the AWS Cloud9 IDE), copy and paste the following text. As you work through the lab, you use this file to store information that you need in later steps
S3 bucket:
CloudFront distribution domain:
User pool ID:
App client ID:
Amazon Cognito domain prefix:
Identity pool ID:
- In the AWS Cloud9 IDE, in the terminal window, run the following commands to retrieve the code and install the Birds application that you use in this lab:
wget https://aws-tc-largeobjects.s3.us-west-2.amazonaws.com/CUR-TF-200-ACACAD-3-113230/10-lab-mod9-guided-Cognito/code.zip
unzip code.zip
cd resources
. ./setup.sh
After the setup.sh script completes, you see the last four lines of output that are similar to the following:
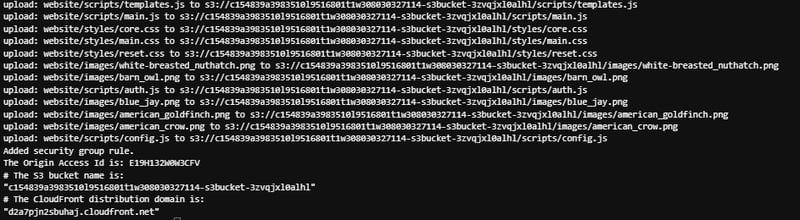
From this output, copy and paste the S3 bucket name and The CloudFront distribution domain into your text file. You need these values in later steps.
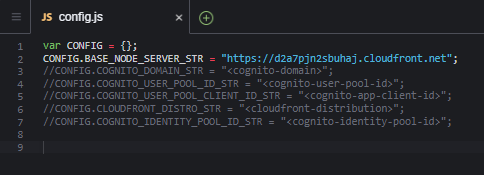
Next, you update the web application code to point to the node server's API endpoint.In the AWS Cloud 9 IDE, in the explorer window to the left of the terminal, expand the website/scripts folder.
Open the config.js file.
In the file, replace with the CloudFront distribution domain that you recorded into your text editor and save the file.
Because you are using an S3 bucket to host the website, you need to upload the application files to the S3 bucket:
- In the following command, replace with the name of the S3 bucket that you recorded into your text editor, and run the updated command in the AWS Cloud9 terminal:
cd /home/ec2-user/environment
aws s3 cp website s3://<s3-bucket>/ --recursive --cache-control "max-   age=0"
Because you also use the NodeJs server as part of application, you need to start the node server.
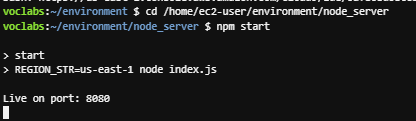
- To start the node server, run the following commands:
cd /home/ec2-user/environment/node_server
npm start
After the node server starts, you see the following output in the terminal:
Note As part of the setup script that you ran earlier, the CloudFront distribution is being created. This distribution is used to securely deliver the contents hosted on the S3 bucket.
- Next, you check the status of the CloudFront distribution.

Task 2: Reviewing the Birds website
In this task, you explore the Birds web application to understand how it behaves before you enable user authentication.
- In a new browser tab, enter the CloudFront distribution domain that you copied into your text file.
- The Birds web application opens. The home page includes a welcome message to students.
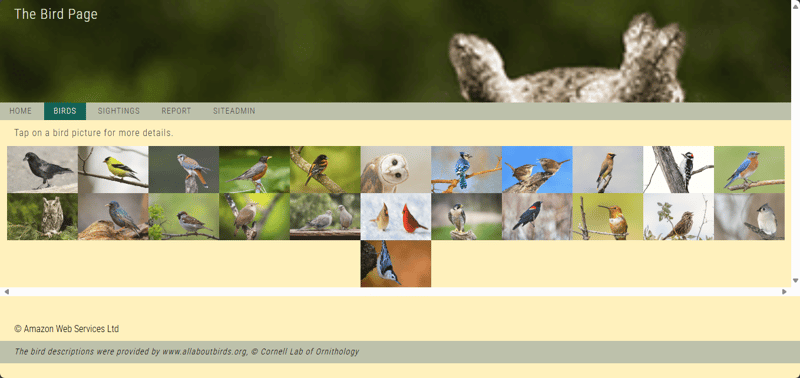
- Navigate to the BIRDS page to see pictures of birds
- Choose SIGHTINGS.
Note: This page requires users to log in before they can see the content.
- To try the login functionality, choose LOGIN.
A message indicates that you do not have access. This message appears because the identity provider, an Amazon Cognito user pool, still needs to be set up for the application.
Task 3: Configuring the Amazon Cognito user pool
In this task, you create an Amazon Cognito user pool, create users, and update the application to use the user pool.
Task 3.1: Creating a user pool
In this task, you create an Amazon Cognito user pool, which is used as the identity provider to create users and manage user passwords. The Birds web application uses the tokens generated by the Amazon Cognito user pool to help ensure that users have authenticated and have a valid session before they can access a protected page or perform a protected action. Tokens are also used to authenticate administrators and provide access to the site administrator page.
- On AWS Management Console, go to Cognito and create user pool. On the Set up your application page, configure the following options:
a. Application type - Traditional web application.
b. Name your application - bird_app_client
c. Configure options, choose Username
d. Required attributes for sign-up, choose email from the dropdown.
e. For Add a return URL - optional, enter https:///callback.html, and replace with the CloudFront distribution domain from your text editor.
- Choose Create
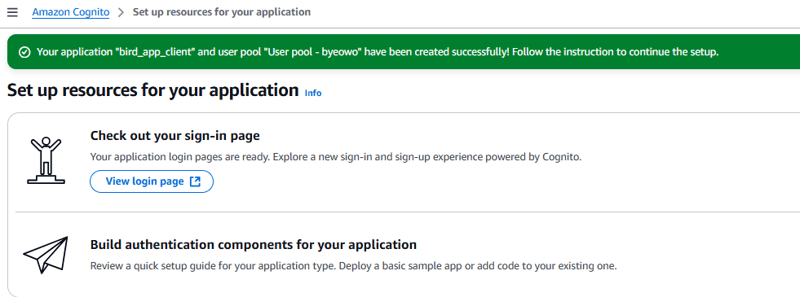
- Go back to the User pools and choose the pool you created.
- On the Overview: page, you notice the pool details and other configuration information.
- Choose Rename **and under **User pool name enter
bird_app, choose Save changes.
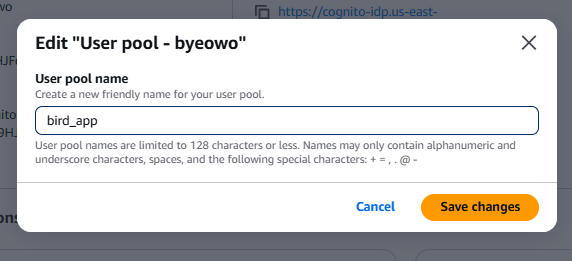
- Copy the value for User pool ID to the editor.
- From the bottom Recommendations pane, choose bird_app link.
- Go to Login pages
a. Managed login pages configuration choose edit.
b. OAuth 2.0 grant types, choose Authorization code grant.
c. From the dropdown list, choose Implicit grant.
d. OpenID Connect scopes, ensure that **Email **and **OpenID **are chosen
e. Choose Save changes.
- On the App client: bird_app page, copy the value for Client ID to the editor.
- Choose Edit.
- For Authentication flows, from the dropdown list, choose ALLOW_USER_PASSWORD_AUTH, and clear ALLOW_USER_SRP_AUTH.
- Choose Save changes.
- From the pane on the left, choose Domain
- From the Domain copy the part of the URL after // and before .auth.us-east-1.amazoncognito.com, paste it into your editor against Amazon Cognito domain prefix:.
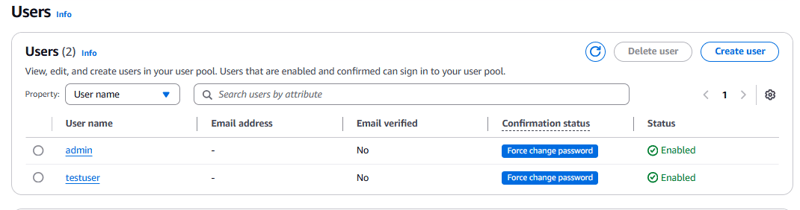
Task 3.2: Adding users to the user pool
- From the navigation pane on the left, choose Overview.
- Under User management choose Users
- Choose Create user with the following details.
a. User name - testuser.
b. Password - Lab-password1$.
- Choose Create user.
- Create another user with the following details:
a. User name, enter admin.
b. Password, enter Admin123$
- Choose Create user.
- From the navigation pane, under User management choose Groups.
- Choose Create group.
- On the Create group page for Group name, enter
Administrators. - Choose Create group.
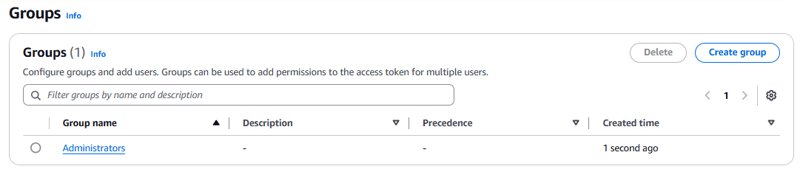
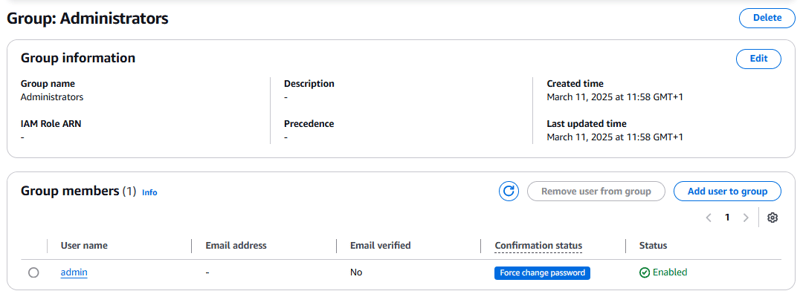
- Choose the Administrators group that you created.
- Choose Add user to group.
- From the list of users, select admin.
- Choose Add.
Task 4: Updating the application to use the user pool for authentication
In this task, you update the application to provide the information it requires to interact with Amazon Cognito. This information includes the user pool ID, application client ID, and Amazon Cognito domain prefix.
- Return to the browser tab with the AWS Cloud9 IDE.
- In the terminal, to stop the node server, press Ctrl+C.
Next, you update the config.js file to add your Amazon Cognito user pool information to the website code.
- In the explorer to the left of the terminal, expand the website/scripts folder.
- Open the config.js file.
- In the file, to uncomment the following lines of code, remove the two forward slashes (//) from the beginning of each line.
//CONFIG.COGNITO_DOMAIN_STR = "<cognito-domain>";
//CONFIG.COGNITO_USER_POOL_ID_STR = "<cognito-user-pool-id>";
//CONFIG.COGNITO_USER_POOL_CLIENT_ID_STR = "<cognito-app-client-id>";
//CONFIG.CLOUDFRONT_DISTRO_STR = "<cloudfront-distribution>";
- In this code, replace each placeholder with the values that you saved into your text editor and save. Note: Update the values for only the following parameters. Replace the entire string, including the brackets (<>).
Next, you push the updated website code to the S3 bucket.
- In the AWS Cloud9 IDE terminal, enter the following command, and replace with the name of the S3 bucket. Run your revised command.
cd /home/ec2-user/environment
   aws s3 cp website s3://<s3-bucket>/ --recursive --cache-control "max-age=0"
- To update the node server files, run the following commands:
Note: These commands update the JavaScript packages required for the application to use the Amazon Cognito user pool, along with other configuration changes made earlier.
cd /home/ec2-user/environment/node_server
cp package2.json package.json
cp libs/mw2.js libs/mw.js
Next, you update the package.json file to add the Amazon Cognito user pool information to the node server.
- In the explorer window to the left of the terminal, expand the node_server folder.
- Open the package.json file.
- Replace with the User pool ID from your text file.
- Save the file.
Task 5: Testing the user pool integration with the application
In this task, you test the updated application. First, you restart the node server so that it uses the updated configuration.
- To start the node server, run the following command at the prompt:
npm start
- Return to the browser tab with the Birds application, and refresh the page.
- Choose SIGHTINGS.
This time, the list of bird sightings from the students in the class is not displayed. The bird sightings are not displayed because the application is now integrated with Amazon Cognito and requires authentication!.
- Choose LOGIN.
- On the prompt, provide the credentials for testuser.
Note: You may be prompted to change password.
- After successfully logging in, the birds listing is displayed
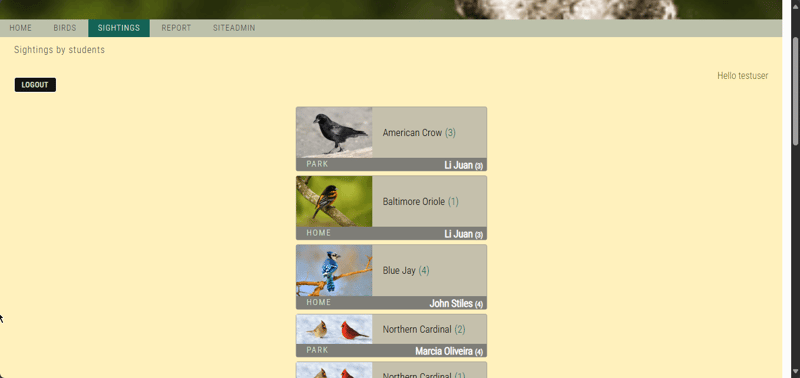
This test proves that only a user who has been authenticated by the Amazon Cognito user pool can access the protected pages of the application. The user pool centrally stores your application usernames and passwords, which makes your users and their authentication information more secure and convenient to manage.
- Choose SITEADMIN.
- On the SITEADMIN page, choose ADMIN LOGIN.
- On the login prompt, choose Sign in as a different user?
- Use the admin login credentials to log in.
After successfully logging in, navigate to SITEADMIN page. The message Admin page under construction is displayed
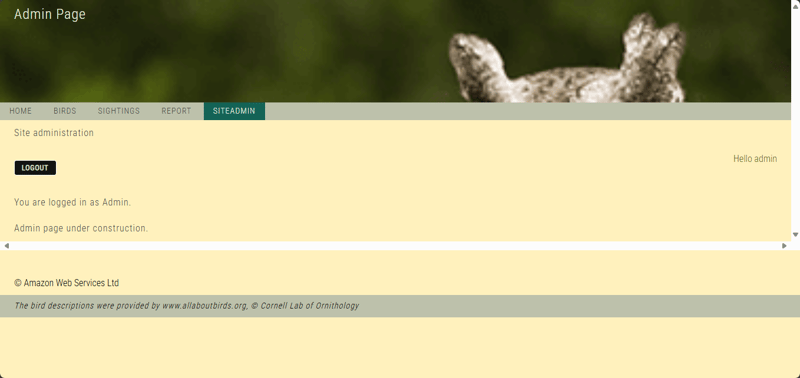
This test proves that the Amazon Cognito user pool can manage role-based access control to your application and provide secure access to the protected pages of the application based on the role.
Task 6: Configuring the identity pool
In this task, you configure the Amazon Cognito identity pool to work with the Birds application.
- On the Amazon Cognito console, in the navigation pane on the left, choose Identity pools.
- Choose the bird_app_id_pool link.
- Copy and paste the Identity pool ID into your text editor as the Identity pool ID for use later.
- From the lower pane, choose the User access tab.
- Choose Add identity provider.
- Choose Amazon Cognito user pool.
- For User pool ID, choose the user pool with the name bird_app.
- For App client ID, choose the application with the name bird_app_client.
- In the Role settings section, notice that Default authenticated roleis displayed.
- Choose Save changes.
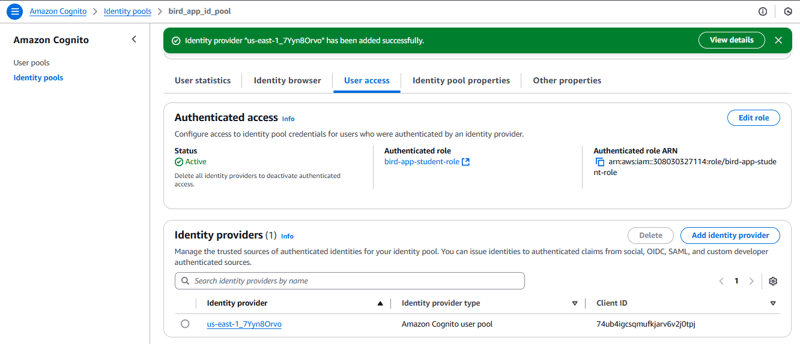
Notice that the Authenticated role has been configured to use the default role, which is assigned to users when they successfully log in. You could set up additional rules to assign different AWS Identity and Access Management (IAM) roles to different users. For this phase of application development, you only keep one role assigned to the users.
Task 7: Updating the application to use the identity pool for authorization
In this task, you make the necessary updates to the Birds application.
- Return to the browser tab where the AWS Cloud9 IDE is open.
- In the terminal window where the node server is running, press Ctrl+C to stop the NodeJs server:
- In the Explorer window, expand the website/scripts folder.
- Open the config.js file and replace with the identity pool ID that you saved earlier and save.
Next, you update the auth.js file.
- From the website/scripts folder, open the auth.js file.
- In the file, replace with the user pool ID. The placeholder is on or around line 91 in the file.
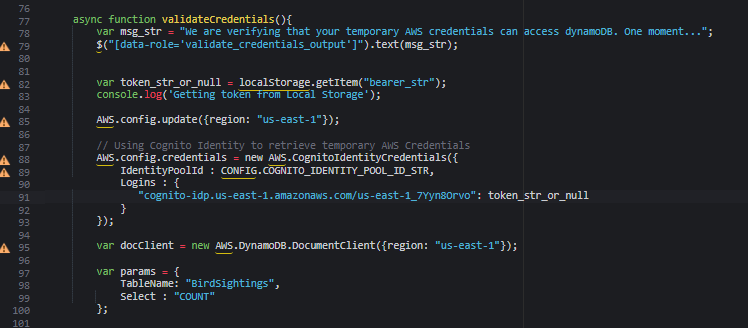
Note: This section of code uses the COGNITO_IDENTITY_POOL_ID_STR variable, which you set in the config.js file. The code uses this identifier to request credentials from the identity pool. Notice that this code block also passes the user pool ID and token_str_or_null, which holds the authentication token. The identity pool uses this information to verify the user in the user pool. If the user and token pass the validation, the identity pool sends AWS credentials back to the application.
- To save the file, choose File > Save.
Next, you push the updated website code to the S3 bucket.
- In the AWS Cloud9 IDE terminal, enter the following command and replace with the name of the S3 bucket. Run your revised command.
cd /home/ec2-user/environment
 aws s3 cp website s3://<s3-bucket>/ --recursive --cache-control "max-age=0"
- Ensure that the node server is still running. If it is not, run the following commands to start it again:
 cd /home/ec2-user/environment/node_server
  npm start
Task 8: Testing the identity pool integration with the application
In this task, you test the updated Birds application to ensure that you can access temporary AWS credentials. With these temporary credentials, you are able to access AWS services based on the roles that were defined when you set up the identity pool. Remember that your identity pool is configured to associate authenticated users with an IAM role that allows access to a DynamoDB table.
- Return to the browser tab where the Birds application is open.
- Choose HOME and refresh the page to ensure that your browser is using the updated code.
- Choose REPORT.
- Choose LOGIN and log in with the admin credentials that you created in the user pool.
- To verify that you now have access to the temporary AWS credentials that you can use to interact with a DynamoDB table, choose VALIDATE MY TEMPORARY AWS CREDENTIALS.
The application now uses the identity pool to generate temporary credentials and uses the same credentials to access the BirdSightings DynamoDB table. After successfully connecting to the database table, the application attempts to count the number of rows (0) and returns the following message: Your temporary AWS credentials have been configured.. Connecting to DynamoDB Table..BirdSightings Your Dynamodb Table has 0 rows..
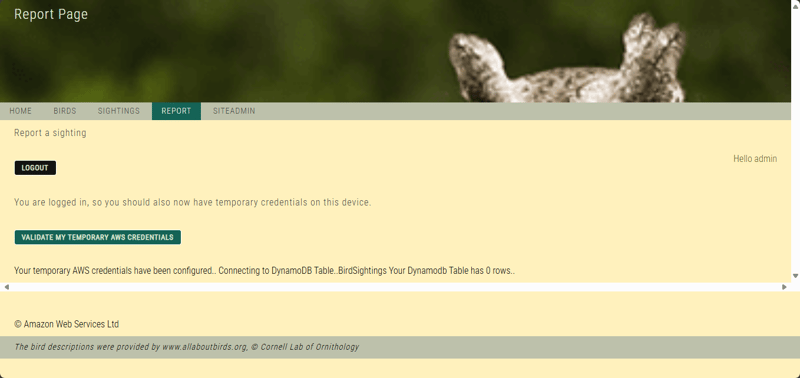
This test verifies that you have correctly configured the Amazon Cognito identity pool and the application. Users who are logged in are able to access temporary credentials to communicate with the DynamoDB database.
What I Learnt
- Creating an Amazon Cognito user pool
- Adding users to the user pool
- Updating the example application to use the user pool for authentication
- Configuring the Amazon Cognito identity pool
- Updating the example application to use the identity pool for authorization

Top comments (0)