DEV Community

Theo Jung for AWS Community Builders

Posted on

Automate AWS account creation(2)

Hello! All Developers!

Following the First Post Automate AWS account creation(1), I would like to cover the implementation method in the second article related to infrastructure automation.

I will explain it largely by dividing it into resources created with Terraform and implemented with Serverless Framework.

The architecture covered in Part 1 uses the Serverless Framework as a framework to conveniently implement AWS Lambda functions.

Remind

AWS Architecture

I hope those who read this will understand it completely :)

1. Implementation using Terraform

  • AWS IAM User and Role
resource "aws_iam_user" "user_test_com" {
name = "user@test.com"
tags = {
user = "user"
}
}
view raw iamuser.tf hosted with ❤ by GitHub

The organization I belong to uses IAM in a way that creates user accounts and maps them to groups. However, I can provide code examples specifically for creating user accounts as follows:

The 'name' section corresponds to the user account.

We use the 'mail' format so that Lambda can extract the user account and use it directly as an email address.

If you prefer to use a simple name like 'test,' you can include the email domain in Lambda.

The 'tags' field is not mandatory and is optional.

# IAM Roles
resource "aws_iam_role" "lambda_role_name" {
name = "lambda-role-name"
path = "/"
assume_role_policy = <<EOF
{
"Version": "2012-10-17",
"Statement": [
{
"Effect": "Allow",
"Principal": {
"Service": [
"lambda.amazonaws.com",
"events.amazonaws.com"
]
},
"Action": "sts:AssumeRole"
}
]
}
EOF
}
resource "aws_iam_role_policy" "lambda_role_policy_name" {
name = "lambda-role-policy-name"
role = aws_iam_role.lambda_role_name.id
policy = <<EOF
{
"Version": "2012-10-17",
"Statement": [
{
"Action": [
"logs:CreateLogGroup",
"logs:CreateLogStream",
"logs:PutLogEvents"
],
"Resource": "*",
"Effect": "Allow",
"Sid": "Logging"
},
{
"Effect": "Allow",
"Action": [
"logs:*"
],
"Resource": "arn:aws:logs:*:*:*"
},
{
"Effect": "Allow",
"Action": [
"lambda:InvokeFunction"
],
"Resource": [
"*"
]
},
{
"Effect": "Allow",
"Action": [
"xray:PutTraceSegments",
"xray:PutTelemetryRecords"
],
"Resource": [
"*"
]
},
{
"Effect": "Allow",
"Action": [
"iam:CreateLoginProfile"
],
"Resource": [
"*"
]
},
{
"Effect": "Allow",
"Action": [
"ses:SendEmail"
],
"Resource": [
"*"
]
}
]
}
EOF
}
view raw iam.tf hosted with ❤ by GitHub

The IAM Role used in Lambda is configured as shown above. It has been set up to allow Lambda and EventBridge to assume this IAM Role.

The next part pertains to the policy associated with the role. When events occur, it logs them, and it grants permissions for the API used in the Lambda execution process through policies.

  • AWS SNS Topic and Subscription
resource "aws_sns_topic" "user_create_topic" {
name = "user-create-topic"
policy = jsonencode(
{
Statement = [
{
Action = "sns:Publish"
Effect = "Allow"
Principal = {
Service = "events.amazonaws.com"
}
Resource = "*"
},
{
Action = [
"SNS:GetTopicAttributes",
"SNS:SetTopicAttributes",
"SNS:AddPermission",
"SNS:RemovePermission",
"SNS:DeleteTopic",
"SNS:Subscribe",
"SNS:ListSubscriptionsByTopic",
"SNS:Publish",
]
Effect = "Allow"
Principal = {
AWS = "*"
}
Condition = {
StringEquals = {
"AWS:SourceOwner" = "<Account-Id>
}
}
Resource = "*"
},
],
}
)
}

The SNS Topic is configured with two main policies:

Lines 6 - 13 define a policy that allows publishing events to the SNS Topic when events are triggered from EventBridge.

Lines 14 - 35 define a policy that enables certain SNS functionalities when the SourceOwner is a specific Account-ID.

resource "aws_sns_topic_subscription" "user_create_subscription" {
topic_arn = "<sns-topic-arn>"
protocol = "lambda"
endpoint = "<lambda-arn>"
}

So, when a specific event occurs in EventBridge and targets the SNS Topic, the first policy allows the event to be published.

Additionally, for SNS Subscriptions associated with a specific Account ID, they can subscribe to the SNS Topic identified by its ARN and trigger the associated Lambda function.

  • AWS SES
resource "aws_ses_domain_identity" "user_create" {
domain = "test.com"
}
view raw ses.tf hosted with ❤ by GitHub

To use the domain as mentioned above, you need to create a Domain Identity in SES. After creating the Domain Identity with the respective domain, when you go to the AWS Console, you will receive 3 address values for authentication.

Once you register these addresses in the route table of the domain you intend to use (or in AWS Route53), it will be authenticated.

However, registering these addresses alone does not mean that the domain is ready for use.

This domain exists in a sandbox environment.

The sandbox environment has the following constraints:

You can send a maximum of 200 messages within 24 hours.
You can send a maximum of 1 message per second.
You can only send messages from authenticated email addresses in SES.

To use this domain in a real production environment, you must create a Request-production-access and submit it to AWS Support.

The official documentation states that Request-production-access may take up to 24 hours to complete (see Reference below).

Therefore, the process of Request-production-access must be completed before you can finish creating resources using Terraform.

Next, we will explain Lambda and EventBridge using the Serverless Framework.

2. Implementation using Terraform

  • serverless.yml
service: service-name
frameworkVersion: "2"
provider:
name: aws
runtime: go1.x
lambdaHashingVersion: 20201221
memorySize: 256
region: us-east-1
role: <lambda-iam-role-arn>
package:
patterns:
- "!./**"
- ./bin/**
functions:
<function_name>:
handler: bin/<binary_name>
events:
- sns:
arn: <sns_topic_arn>
topicName: <sns_topic_name>
resources: # CloudFormation template syntax
Resources:
UserCreateAutomation:
Type: AWS::Events::Rule
Properties:
Description: <Event Description>
EventPattern:
source: ["aws.iam"]
detail-type: ["AWS API Call via CloudTrail"]
detail:
eventSource: ["iam.amazonaws.com"]
eventName: ["CreateUser"]
Name: "UserCreateAutomation"
Targets:
- Arn: <sns_topic_arn>
Id: <topic_id>
view raw serverless.yml hosted with ❤ by GitHub

The serverless.yml file can be broadly divided into three sections: provider, function, and resource.

The provider section represents the environment configuration for Lambda. It specifies details such as the region where the deployment will occur, the amount of memory to be used, and the IAM role to be used.

The function section is where the actual Lambda execution behavior is defined when triggered. Among the key names, the handler part maps to the actual binary or function name that will be executed. This part varies slightly depending on the programming language used. For JavaScript or Python, it specifies the function name in the executing file, while for Go, it specifies the binary.

The resource section represents the resources configured within the Serverless Framework, primarily specifying resources used by the functions. The provided example determines whether an event notification will be sent to an SNS topic when the CreateUser API is called via EventBridge.

  • main.go
package main
import (
"encoding/json"
"fmt"
"github.com/aws/aws-lambda-go/events"
"github.com/aws/aws-lambda-go/lambda"
"github.com/aws/aws-sdk-go/aws"
"github.com/aws/aws-sdk-go/aws/session"
"github.com/aws/aws-sdk-go/service/iam"
"github.com/aws/aws-sdk-go/service/ses"
"github.com/sethvargo/go-password/password"
)
const (
AwsRegion = "us-east-1"
Sender = "" //Sender Email
CharSet = "UTF-8"
HtmlBody = "" // The HTML body for the email.
)
func getAwsSession() *session.Session {
mySession := session.Must(session.NewSession(&aws.Config{Region: aws.String(AwsRegion)}))
return mySession
}
func generatePassword() string {
res, err := password.Generate(20, 5, 5, false, false)
fmt.Println(res)
if err != nil {
fmt.Println(err.Error())
}
return res
}
func getUserName(message map[string]interface{}) string {
userName := message["detail"].(map[string]interface{})["requestParameters"].(map[string]interface{})["userName"]
return fmt.Sprint(userName)
}
// Handler is our lambda handler invoked by the `lambda.Start` function call
func Handler(event events.SNSEvent) error {
eventMsg := event.Records[0].SNS.Message
fmt.Println(eventMsg)
var msgJson map[string]interface{} = make(map[string]interface{})
json.Unmarshal([]byte(eventMsg), &msgJson)
userName := getUserName(msgJson)
password := generatePassword()
session := getAwsSession()
iamsvc := iam.New(session)
sessvc := ses.New(session)
input := &iam.CreateLoginProfileInput{
UserName: aws.String(userName),
Password: aws.String(password),
PasswordResetRequired: aws.Bool(true),
}
_, err := iamsvc.CreateLoginProfile(input)
if err != nil {
fmt.Println(err.Error())
return err
}
admin := "admin@test.com"
title := "test"
content := password
sesInput := &ses.SendEmailInput{
Destination: &ses.Destination{
CcAddresses: []*string{
aws.String(admin), //account_admin email address
},
ToAddresses: []*string{
aws.String(userName),
},
},
Message: &ses.Message{
Body: &ses.Body{
Html: &ses.Content{
Charset: aws.String(CharSet),
Data: aws.String(content),
},
},
Subject: &ses.Content{
Charset: aws.String(CharSet),
Data: aws.String(title), // email title
},
},
Source: aws.String(Sender),
}
// Attempt to send the email.
result, err := sessvc.SendEmail(sesInput)
if err != nil {
fmt.Println(err.Error())
return err
}
fmt.Printf("success %s", result)
return nil
}
func main() {
lambda.Start(Handler)
}

When Lambda is triggered, the Handler function in the source code is invoked, which can be divided into four main parts:

  1. Parsing the incoming information from the Event (Lines 46 - 49):
    In this step, information like the user's account name is extracted from the Event.

  2. Generating a Password using the go-password library (Lines 31 - 36):
    This library is used to generate a password based on parameters such as the desired length, the number of special characters, and the number of digits.

  3. Creating a login profile with the parsed user account name and generated Password (Lines 58 - 68):
    In this part, the Terraform-created user account is enabled, and a password is specified. Additionally, there's an option to determine whether the user should be prompted to reset their password upon initial login, which is passed as a parameter when making the API call.

  4. Sending account information created to an email address using the SES API (Lines 70 - 99):
    In this step, if the user account wasn't created in the form of an email address, you need to concatenate the domain and user account to the ToAddress in Line 79. Then, by specifying the desired Title and Content, the SES API is called to send an email.

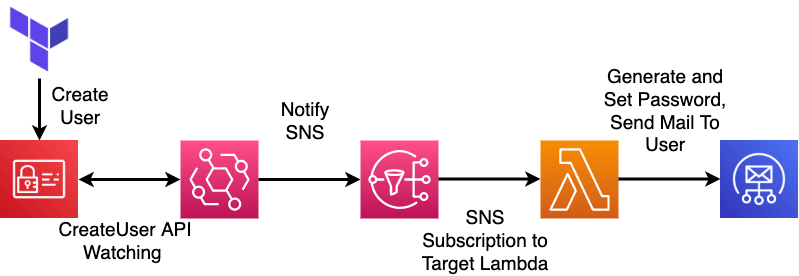
This automation process demonstrates how AWS IAM creates a user, sets their password, activates the account, and sends the account details to a specified email or user account.

AWS Security LIVE!

Join us for AWS Security LIVE!

Discover the future of cloud security. Tune in live for trends, tips, and solutions from AWS and AWS Partners.

Learn More

Top comments (1)

Collapse
 
softwaresennin profile image
Lionel♾️☁️

Wooow this is an amazing article. Thanks so much for this. I will do my best to implement this in our company as well.

Best Practices for Running  Container WordPress on AWS (ECS, EFS, RDS, ELB) using CDK cover image

Best Practices for Running Container WordPress on AWS (ECS, EFS, RDS, ELB) using CDK

This post discusses the process of migrating a growing WordPress eShop business to AWS using AWS CDK for an easily scalable, high availability architecture. The detailed structure encompasses several pillars: Compute, Storage, Database, Cache, CDN, DNS, Security, and Backup.

Read full post

👋 Kindness is contagious

Please leave a ❤️ or a friendly comment on this post if you found it helpful!

Okay