
Welcome back!
I hope you still have an appetite for learning more about CICD and how to secure your deployments. In Part 1, you built your first AWS CICD pipeline. Awesome job, but as any great chef knows, it’s not just about making a delicious dish; you must also keep your kitchen organized and safe.
Now that your pipeline is up and running, it’s time to take the next step: securing access to your private resources within a VPC and setting up proper permissions.
In this part, we’ll cover:
- What is a VPC and why does it matter?
- How to securely connect your pipeline to a production environment in a private subnet?
Let’s dive right in! 🍽️
What is a VPC and Why Does It Matter?
Before we start securing things, let’s talk about what a VPC (Virtual Private Cloud) is. Imagine your AWS environment as a massive restaurant kitchen. A VPC is like having separate workstations one for chopping, one for cooking, and one for plating. Each station (or subnet, I'll elaborate on this further shortly.) has its purpose, and you decide who gets access to each.
A VPC allows you to create an isolated section in AWS where you can launch your resources securely. It’s like having a private kitchen that only your team can enter, keeping unwanted guests or security risks out. Within a VPC, you can set up public and private subnets to control where traffic flows, ensuring that sensitive infrastructure like databases stays protected from the outside world.
Now that we’ve got a basic idea, let’s move on to securely connecting our pipeline to a private subnet. If you’re looking for a more technical explanation, I will include all the necessary documentation for further study in the sources section of this article series.
How to Securely Connect Your Pipeline to a Production Environment in a Private Subnet?
Let's imagine that your pipeline is like a chef sending prepared dishes to the right station. But what if the final plating area is in a private section of the restaurant? You need a secure way to get the food there without letting unauthorized people in. That’s where private subnets come in.
You might be wondering, "What is a private subnet?"
A private subnet is an isolated area within your VPC that doesn’t have direct internet access. To allow your pipeline to deploy into a private subnet, you’ll need:
- A NAT Gateway or VPC Endpoint, This acts like a secure delivery pass, letting the pipeline reach private resources without exposing them to the public internet.
- Proper Security Group Rules, Think of these as access control rules that decide which resources can talk to each other.
- IAM Roles and Policies, You don’t want just anyone making changes in your environment. IAM roles ensure only the right processes have access to deploy inside the VPC.
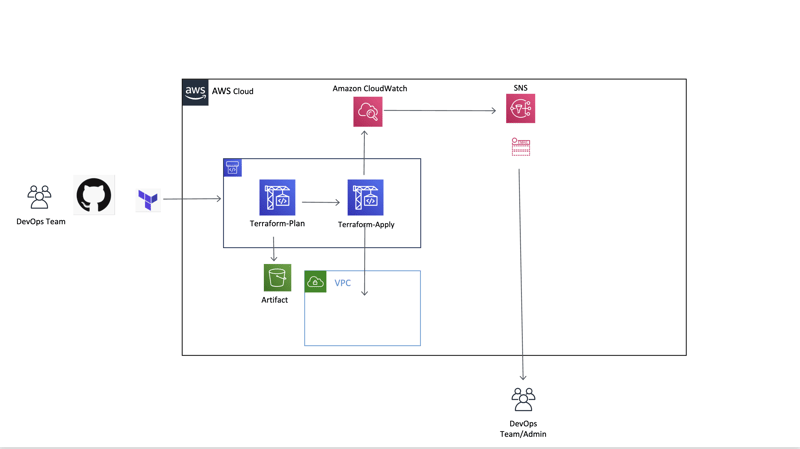
In this second part, we will focus on building and using a NAT Gateway to enable secure updates for an application within a Private Subnet.
So, your application lives in a private subnet, safe from the public internet, but wait, How do you update it? Private subnets don’t have direct internet access, which is great for security but tricky for getting updates. This is where a NAT Gateway comes in, acting like a controlled exit door.
Think of it like a high end restaurant’s storage room. Only authorized staff can go in and out, ensuring that only fresh ingredients (updates) make their way into the kitchen without letting unwanted visitors (security threats) sneak in.
By adding a NAT Gateway, your private instances can access the internet to download updates, pull dependencies, etc. while being shielded from direct exposure. Sounds exciting,Doesn't it? and here’s how it works:
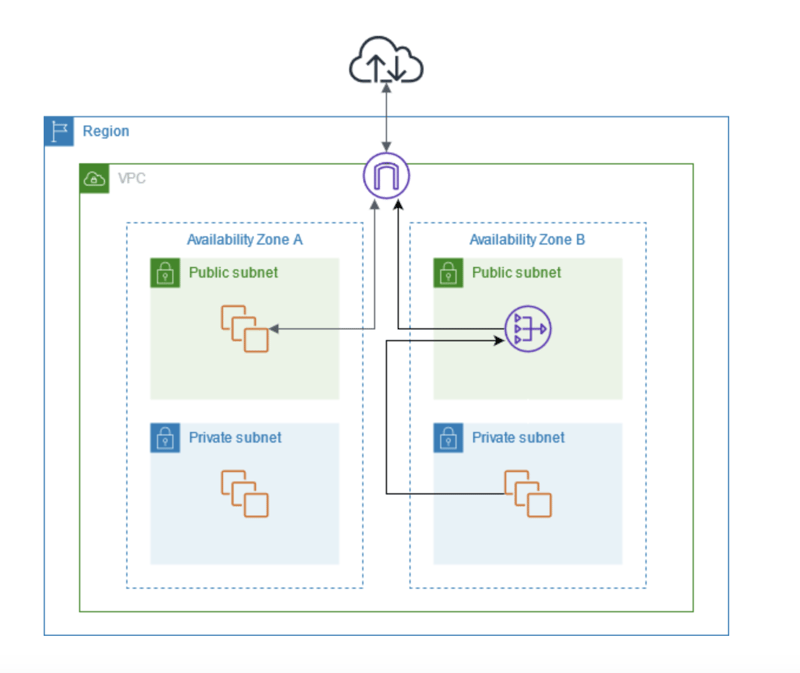
- The NAT Gateway sits in a public subnet and has an Elastic IP assigned to it.
- A route table is configured so that private subnets send outbound traffic to the NAT Gateway instead of directly to the internet.
- The pipeline (running in CodePipeline) can now deploy updates to your private resources securely.
Credits to AWS documentation[1].
At this point, you should have a solid high-level understanding of what a VPC is and how to protect your private resources. Now, let's explore how Terraform can enhance this configuration, making it even more secure with just a few lines of code.
Here’s what to expect when using this Terraform template:
✅ Sets up a VPC
✅ Creates public and private subnets
✅ Configures a NAT Gateway for internet access from private subnets
✅ Sets up route tables for proper traffic flow
✅ Specifies Security Groups
# Create a VPC
resource "aws_vpc" "main_vpc" {
  cidr_block = "10.0.0.0/16"
}

# Create Public and Private Subnets
resource "aws_subnet" "public_subnet" {
  vpc_id                  = aws_vpc.main_vpc.id
  cidr_block              = "10.0.1.0/24"
  map_public_ip_on_launch = true
}

resource "aws_subnet" "private_subnet" {
  vpc_id     = aws_vpc.main_vpc.id
  cidr_block = "10.0.2.0/24"
}

# Create an Internet Gateway for Public Subnet
resource "aws_internet_gateway" "gw" {
  vpc_id = aws_vpc.main_vpc.id
}

# Create a NAT Gateway for Private Subnet
resource "aws_eip" "nat_eip" {}

resource "aws_nat_gateway" "nat_gw" {
  allocation_id = aws_eip.nat_eip.id
  subnet_id     = aws_subnet.public_subnet.id
}

# Route Table for Public Subnet (Direct Internet Access)
resource "aws_route_table" "public_rt" {
  vpc_id = aws_vpc.main_vpc.id

  route {
    cidr_block = "0.0.0.0/0"
    gateway_id = aws_internet_gateway.gw.id
  }
}

resource "aws_route_table_association" "public_assoc" {
  subnet_id      = aws_subnet.public_subnet.id
  route_table_id = aws_route_table.public_rt.id
}

# Route Table for Private Subnet (Internet Access via NAT Gateway)
resource "aws_route_table" "private_rt" {
  vpc_id = aws_vpc.main_vpc.id

  route {
    cidr_block = "0.0.0.0/0"
    nat_gateway_id = aws_nat_gateway.nat_gw.id
  }
}

resource "aws_route_table_association" "private_assoc" {
  subnet_id      = aws_subnet.private_subnet.id
  route_table_id = aws_route_table.private_rt.id
}
What’s Next?
With this setup, your CICD pipeline can securely deploy updates to resources in a private subnet while still having controlled internet access via a NAT Gateway. This means your private environment stays protected while getting the latest updates just like a top tier restaurant keeping its ingredients fresh without letting anyone walk in off the street.
Want to see it all in action?
Complete this architectural deployment utilizing the full GitHub Repository - Create a CICD Pipeline with Terraform AWS-Pipeline-Step-by-Step-Guide-to-VPC-Integration. You're welcome to browse through other projects I've worked using this link. And don’t forget to:
✅ Follow me on X and YouTube for more AWS, DevOps, and Terraform tips
✅ Comment below with any questions or suggestions
✅ Check out the GitHub repo for the full Terraform setup
🚀 Happy building!
Sources:
[1] https://docs.aws.amazon.com/vpc/latest/userguide/nat-gateway-scenarios.html
[2] https://docs.aws.amazon.com/vpc/latest/userguide/what-is-amazon-vpc.html

Top comments (0)