
In my previous post, we built the autopilot feature, using various event triggers from GitHub Actions and Azure Bicep. Throughout this post, I'm going to build the revised autopilot feature using Azure Bicep Deployment Scripts resource without GitHub Actions.
You can download the sample code from this GitHub repository below.
devkimchi / APIM-OpenAPI-Sample
This provides sample Azure Functions apps that integrate with Azure API Management, and expose Swagger UI through it.
APIM OpenAPI Integration Sample
This provides sample Azure Functions apps that integrate with Azure API Management, and expose their respective Swagger UI pages through it.
Getting Started
Click the button below to autopilot all instances and apps on Azure. Make sure that you don't forget the app name you give.
Visit the following URLs to check whether all the apps have been properly provisioned and deployed.
https://apim-<APP_NAME>.azure-api.net/azip/swagger/uihttps://apim-<APP_NAME>.azure-api.net/azoop/swagger/uiKnown Issues
- Due to the fact that Azure CLI has an error to deploy .NET-based out-of-proc function app, the autopilot feature only takes care of the in-proc function app. However, manual deployment of both in-proc and out-of-proc function apps is fine.

Solution Architecture
Let's say you're building a microservices architecture. It typically consists of an API gateway and many API apps, which are Azure API Management (APIM) and Azure Functions API in this example. The microservices architecture might be more complex depending on the requirements, but it's way too far from our topic. Therefore, let's build a minimal structure that is working. Here's the diagram.

Azure Resources Provisioning
There are five resources to provision:
- Azure Storage 👉 View Bicep code
- Application Insights 👉 View Bicep code
- App Service Plan 👉 View Bicep code
- Function App 👉 View Bicep code
- Azure API Management 👉 View Bicep code
As you can see, each resource has its corresponding Bicep module. For example, it's required to provision Azure Storage, Application Insights and App Service Plan (Consumption) before creating an Azure Functions app. Therefore, the provision_functionapp.bicep file takes care of this orchestration. In addition to that, Azure API Management also needs Application Insights as a dependency, so the provision_apimamagement.bicep file looks after this orchestration.
After deploying the function app, the provision_apimanagementapi.bicep registers the function app to APIM.
NOTE: I used the modularisation approach while writing the Bicep files. But it may differ from your situation, and writing one big Bicep file could be more efficient in some circumstances.
Once you complete writing the Bicep file, you might expect the following processes in that order.
- Provision the function related resources 👉
provision_functionapp.bicep - Provision the APIM related resources 👉
provision_apimamagement.bicep - ➡️ Deploy the function app ⬅️
- Integrate the function app with APIM 👉
provision_apimanagementapi.bicep
When #1 and #2 are over, you can see the following resources provisioned.
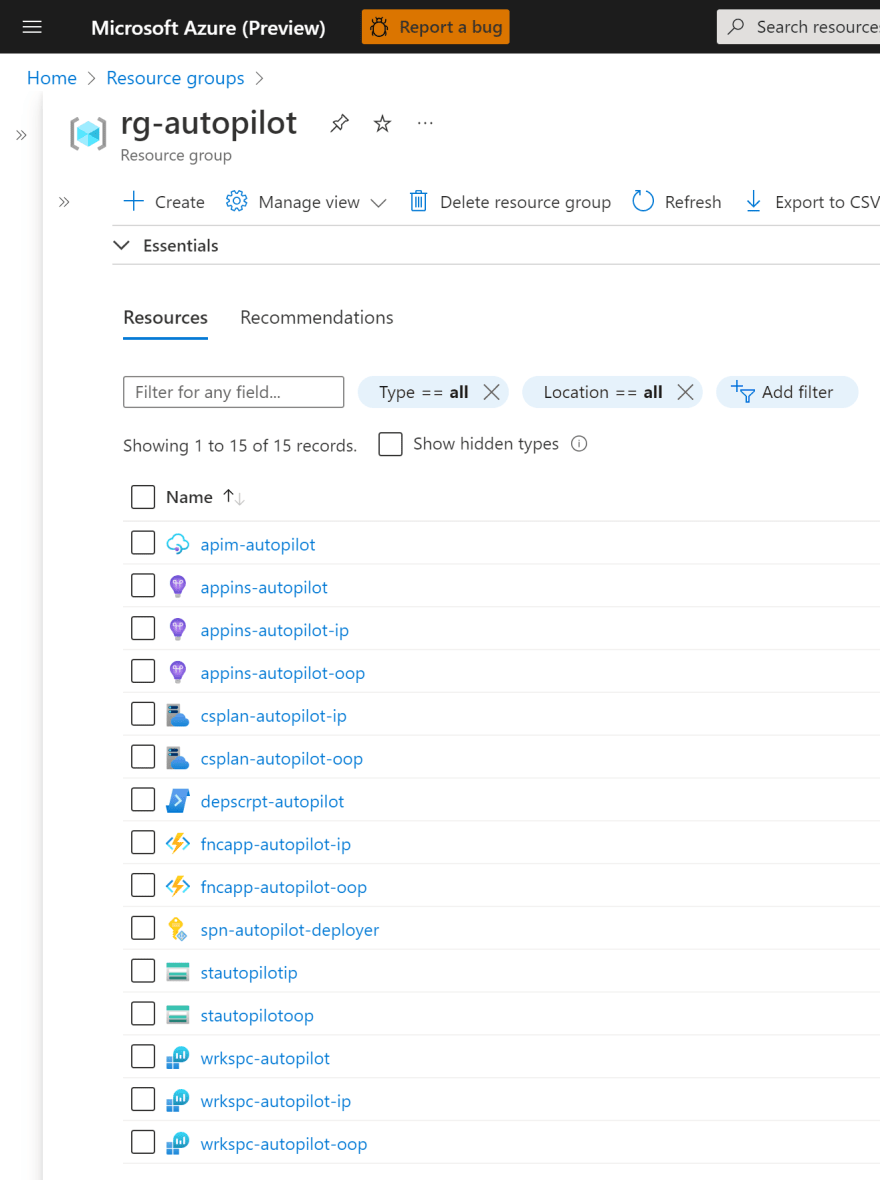
By the way, #4 can't be provisioned until the function app is deployed at #3. Moreover, #3 is not related to resource provisioning but app deployment. What if we can convert this app deployment experience into resource provisioning? Then, all processes from #1 to #4 can be done within the resource provisioning pipeline, which means the whole "autopilot" feature is set.
Azure Bicep – Deployment Scripts
Azure Resource Manager (ARM) has introduced the concept of deployment script. Through this deployment script, ARM can include PowerShell scripts or bash scripts as a part of the resource provisioning pipeline. In other words, the deployment script resource can run Azure PowerShell or Azure CLI. How is that possible? Here's the Bicep file declaring the deployment script.
resource ds 'Microsoft.Resources/deploymentScripts@2020-10-01' = {
    name: 'my-deployment-script'
    location: resourceGroup().location
    kind: 'AzureCLI'
    identity: {
        type: 'UserAssigned'
        userAssignedIdentities: {
            '<user-assigned-identity-id>': {}
        }
    }
    properties: {
        azCliVersion: '2.33.1'
        containerSettings: {
            containerGroupName: 'my-container-group'
        }
        environmentVariables: [
            {
                name: 'RESOURCE_NAME'
                value: '<resource-name>'
            }
        ]
        primaryScriptUri: '<bash-script-url>'
        retentionInterval: 'P1D'
    }
}
- The
kindattribute explicitly declares that it uses Azure CLI. You can declare "AzurePowerShell" if you like. - The bash script needs the login credentials to run Azure CLI commands. Therefore, it uses the user-assigned identity.
- The bash script uses the Azure CLI of
v2.33.1in this example. It's recommended to use a specific version instead of the latest version, discussed later. - The bash script uses the environment variable of
RESOURCE_NAME, which is declared and has the value assigned in the Bicep file. - The
primaryScriptUriattribute declares the publicly accessible bash script URL.
NOTE: The Bicep file only shows the necessary bits and pieces. If you want to know more details, please take a look at this Bicep file.
So, what does this deployment script resource do? It temporarily provisions both Azure Container Instance and Storage Account to handle the script. According to this document, using the Azure CLI version older than 30 days from the day running the script is recommended. Therefore, at the time of this writing, v2.33.1 is the closest one. Of course, you can use the az upgrade command within the script to get the latest version, but it's totally up to you.
Deployment Script – Bash Script
Take a look at the bash script that runs the series of Azure CLI commands. Let's say the artifact name is api.zip, and the following script gets the artifact URL stored in the GitHub repository at the beginning.
# Get artifacts from GitHub
urls=$(curl -H "Accept: application/vnd.github.v3+json" \
  https://api.github.com/repos/devkimchi/APIM-OpenAPI-Sample/releases/latest | \
  jq '.assets[] | { name: .name, url: .browser_download_url }')

apizip=$(echo $urls | jq 'select(.name == "api.zip") | .url' -r)
As the artifact URL is set as the environment variable, $apizip, Azure CLI uses this artifact URL to deploy the function app. The environment variable, $RESOURCE_NAME, comes from the deployment script Bicep file.
# Deploy function apps
ipapp=$(az functionapp deploy \
  -g rg-$RESOURCE_NAME \
  -n fncapp-$RESOURCE_NAME-api \
  --src-url $apizip \
  --type zip)
Once we complete deployment, it should be registered to APIM through the OpenAPI document. How can we do that? Another Bicep file, provision-apimanagementapi.bicep, can also be run within the bash script through Azure CLI. But make sure that, if you want to provision resources through URL, you MUST convert the Bicep file to an ARM template of the JSON type.
# Provision APIs to APIM
az deployment group create \
  -n ApiManagement_Api \
  -g rg-$RESOURCE_NAME \
  # MUST be ARM template, not Bicep
  -u https://raw.githubusercontent.com/devkimchi/APIM-OpenAPI-Sample/main/Resources/provision-apimanagementapi.json \
  -p name=$RESOURCE_NAME
Now, we've got the bash script to run within the deployment script resource.
Overall Resource Orchestration
As the final step, everything written above should be composed into one. Here's the main.bicep file that orchestrates resources and deployment scripts. The deployment script resource should always come last after all other resources are provisioned by using the dependsOn attribute.
// Provision API Management
module apim './provision-apimanagement.bicep' = {
    name: 'ApiManagement'
    params: {
        ...
    }
}

// Provision function app
module fncapp './provision-functionapp.bicep' = {
    name: 'FunctionApp'
    dependsOn: [
        apim
    ]
    params: {
        ...
    }
}]

// Provision deployment script
module uai './deploymentScript.bicep' = {
    name: 'UserAssignedIdentity'
    dependsOn: [
        apim
        fncapp
    ]
    params: {
        ...
    }
}
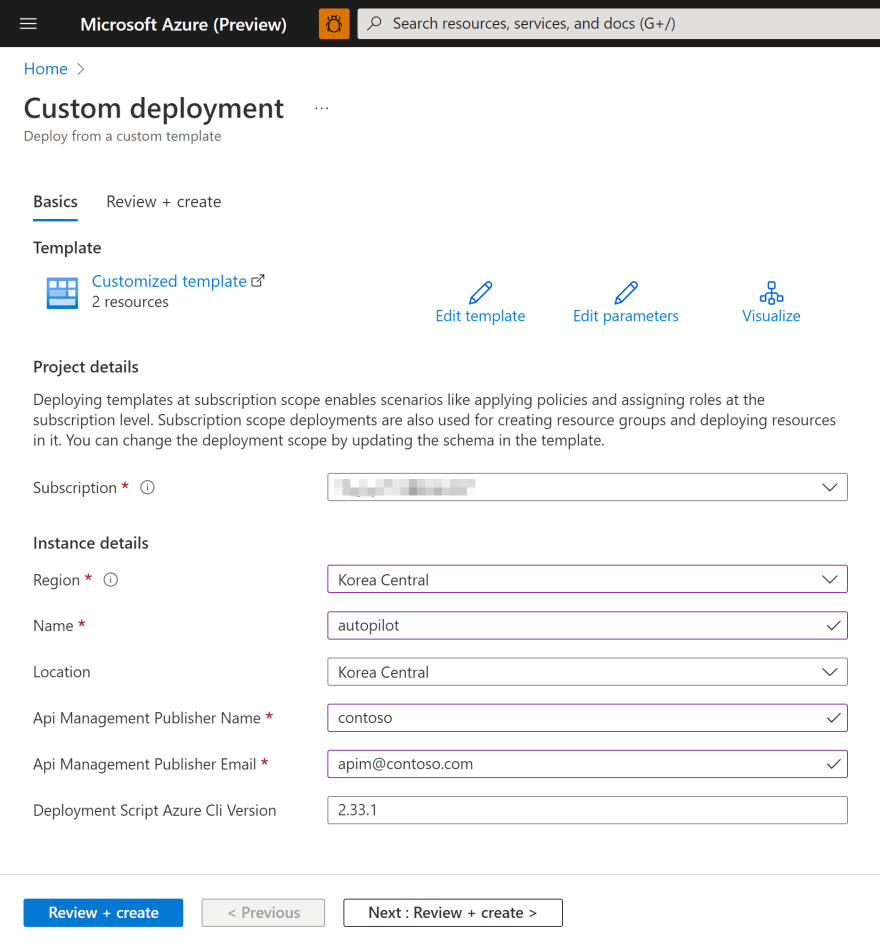
Once everything is done, convert the last Bicep file into the ARM template and link it to the image button below. Then, just click the button and put in the necessary information. It will automatically provision resources, deploy apps and do the rest of the provisioning process within one single pipeline, and the app is ready to use.
![]()
If you actually click the button above, you will be able to see the Azure Portal screen like below:
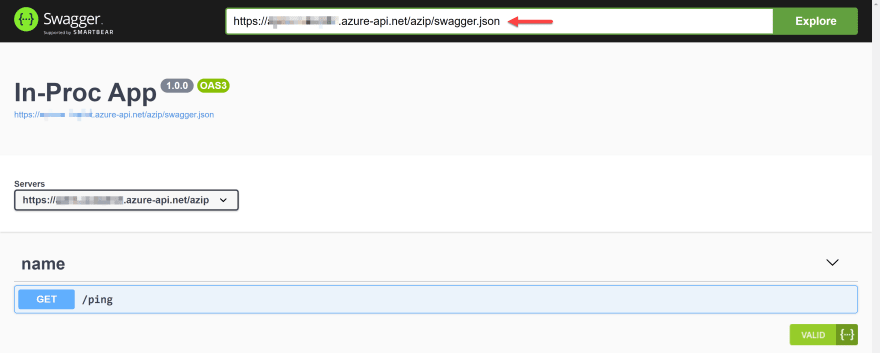
Did you complete all the steps? Then go to APIM and visit one of the function app's Swagger UI endpoint.
So far, we've walked through the Azure Bicep's deployment script resources and revised the autopilot feature without needing to rely on GitHub Actions, as mentioned in the previous post. Now, you can hand over your repository to your tech-sales representatives to demo for their clients or other dev units to take a look with no prior knowledge of your application set-up. How easy is that?

Top comments (0)