
Update 3/4: Frank Boucher has an excellent resource for this that offers a few additional options and code. He also has a video explaining this as well. Go and check it out!
Keeping your Azure subscription clean
Most teams that work in an Azure subscription forget to delete unused resources. These are, for instance, Azure services that are used to run experiments with or that are no longer used. Unused Azure services and Resource Groups make your Azure subscription messy, making it harder to see which services are actively being used and which ones aren't. And more importantly, unused resources cost money. They add to your monthly Azure invoice. That's why it is a good idea to clean your Azure subscription regularly. Better yet, why not automate this process?
In this post, we'll explore a way to automatically remove unused Azure resources from your subscription.
Prerequisites
If you want to follow along, you'll need the following:
- An Azure subscription (If you don't have an Azure subscription, create a free account before you begin)
Automatically remove unused resources from your Azure subscription
Let's automate this! Unfortunately, there is no easy way to determine if an Azure resource is being used or not, so this needs to be indicated by a user. A good way to indicate that an Azure resource is no longer needed is to add a tag to it. For instance, a tag that says expireOn, with a date as its value. Using tags like this, you can indicate when a resource is due to expire. And the process that we'll create, will clean it up automatically.
1. Tag resources to be cleaned up
You can easily add tags to resources from the Tags menu that you can find in any resource, like in the image below. For our process, the date value of the tag should be formatted like this: YYY-mm-dd.
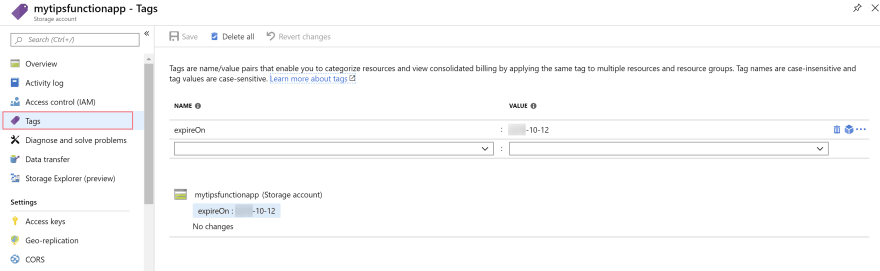
(Add a Tag to a Storage Account in the Azure portal)
You can also add tags to resources using PowerShell, the Azure CLI and from an Azure Resource Manager (ARM) template.
2. Create a script that cleans up resources
Resources that need to be cleaned up will have an expireOn tag with a date earlier than today. With the PowerShell script below, we can query those resources and delete them. Save this script in a .ps1 file.
$connectionName = "AzureRunAsConnection"
try
{
    # Get the connection "AzureRunAsConnection "
    $servicePrincipalConnection=Get-AutomationConnection -Name $connectionName

    Connect-AzAccount `
        -ServicePrincipal `
        -Tenant $servicePrincipalConnection.TenantId `
        -ApplicationId $servicePrincipalConnection.ApplicationId `
        -CertificateThumbprint $servicePrincipalConnection.CertificateThumbprint
}
catch {
    if (!$servicePrincipalConnection)
    {
        $ErrorMessage = "Connection $connectionName not found."
        throw $ErrorMessage
    } else{
        Write-Error -Message $_.Exception
        throw $_.Exception
    }
}

$expResources= Search-AzGraph -Query 'where todatetime(tags.expireOn) < now() | project id'

foreach ($r in $expResources) {
    Remove-AzResource -ResourceId $r.id -Force
}

$rgs = Get-AzResourceGroup;

foreach($resourceGroup in $rgs){
    $name=  $resourceGroup.ResourceGroupName;
    $count = (Get-AzResource | Where-Object{ $_.ResourceGroupName -match $name }).Count;
    if($count -eq 0){
        Remove-AzResourceGroup -Name $name -Force
    }
}
The first thing that this script does, is to log into Azure. It does this using an Azure service principal. We'll create one of those in the next step when we automate this script with Azure Automation.
After logging in, the script queries all Azure resources in my subscription for the expireOn tag with Azure Resource Graph and looks for tags that have a date before today. The query automatically turns the text in the tag into a valid date value. Next, the script loops over the expired resources and deletes them using Remove-AzResource.
Azure Resource Graph queries don't include Resource Groups that are tagged. The final code in the script addresses this issue. This retrieves all Resource Groups and loops over them to see if any Resource Groups are empty. If they are, they are removed.
3. Automatically run the script every day
To automate the cleaning process, we need to run the cleaning script automatically, on a schedule. We can do that with Azure Automation. To use it, we first need to create an Azure Automation Account:
- Go to the Azure portal
- Click the Create a resource button (the plus sign in the top left corner)
- Search for Automation and click on the result to start creating an Azure Automation Account a. This brings you to the create blade of Azure Automation b. Fill in a Name for the Automation Account c. Select a Resource Group (or create a new one) d. Select a Location e. Make sure to leave the Create Azure Run As account setting to Yes. This creates the service principal that the script uses to log into Azure f. Click Create to create the Azure Automation account

(Create Azure Automation Account)
The script uses some PowerShell modules that aren't installed in Azure Automation by default. So we have to add them before we can run the script. We need to import three modules:
- Az.Accounts
- Az.ResourceGraph
- Az.Resources
- In the Azure Automation Account, go to the Modules menu
- Click Browse gallery to browse the available PowerShell modules
- Search for Az.Accounts. And click on the result.
- Click Import to import the module. This can take a few minutes. You need to wait for this to complete, before importing the next module, because it depends on the Az.Accounts module. You can check if the module is imported by going back to the Modules menu and searching for Az
- Repeat the same process for the Az.ResourceGraph and Az.Resources modules

(Import modules in the Azure portal)
Once the modules are imported, we can create a Runbook to run our script.
- In the Azure Automation Account, go to the Runbooks menu
- Click Create a runbook
- Fill in a Name for the runbook
- Select PowerShell for the Runbook type
- Click Create to create the runbook
- The runbook will now be created and the PowerShell editor opens. Paste in the complete script that we've created before
- Click Save
- Click Publish and confirm

(Create Azure Automation runbook)
We are almost there. The runbook can run the script. Now we have to attach a schedule to it so that it runs every day.
- Click Link to schedule in the top menu of the runbook that we've just created.
- Click Link a schedule to your runbook
- Next, click Create a new schedule
- Give the schedule a Name
- Set the starts time to tomorrow 07:00 AM
- Select your Time Zone
- Click Recurring
- And select Recur every 1 Day
- Click Create to create the schedule for the runbook
That's it! Your Azure subscription will be cleaned automatically, every day.
To test if the runbook works, you can click the Start button in the runbook. This will run the script and remove any resources that have an expireOn tag that is set to a date before today.

(Azure Automation runbook ran successfully)
Conclusion
It is important to remove unused Azure resources to keep your costs in check and your Azure subscription clear. A good way to do that is by tagging resources with a tag that states when they are no longer needed and running a PowerShell script that uses that tag to remove those resources. You can use Azure Automation to automatically run the script every day to clean your subscription. Go and try it out!
Stay connected with me on various social platforms for daily software development news.

Top comments (2)
Very useful thank you!
Happy it helped!