Prerequisites:
- Any computer.
- Source-code editor (Visual Studio Code used during this book; Sublime Text is another option)
- Python 3
- Database (PostgreSQL is used during this book; however, any other database works just fine. In fact, Django already uses SQLite3 database, so no need to make changes if you want to use that database.)
PostgreSQL Database Installation
Download and install PostgreSQL database: https://www.postgresql.org/download/
Download and install PgAdmin4(We'll use this one towards the end of the book):
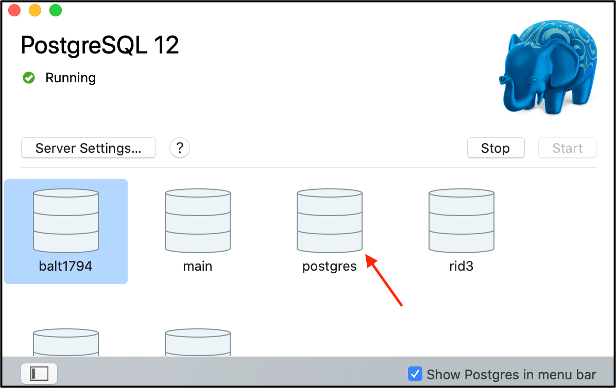
https://www.pgadmin.org/download/Open PostgreSQL database and click on the postgres database (red arrow).
- The command window will appear after you complete the previous step, issue the following commands.
Visual Studio and Packages Installation
Start by creating a folder where you would store all your project files. I created my folder in the Documents folder of my computer. You can create it anywhere on your computer.
Go to Visual Studio Code and open the folder created on the previous step by clicking on File > Open. Inside that folder create another folder with the name of your project.
Open the terminal window by going to Terminal > New Terminal. A new terminal will appear at the bottom of VS code. Make sure you are inside the first folder you created ('EXAMPLE') by looking at the path in the command line. After you have checked this, go into the folder for your project ('project') by issuing the cd command as shown below.
Virtual Environment
A virtual environment (venv) helps us maintain our individual projects relatively contained in order to avoid installing Python packages globally on our computer which might cause problems between conflicting files and packages.
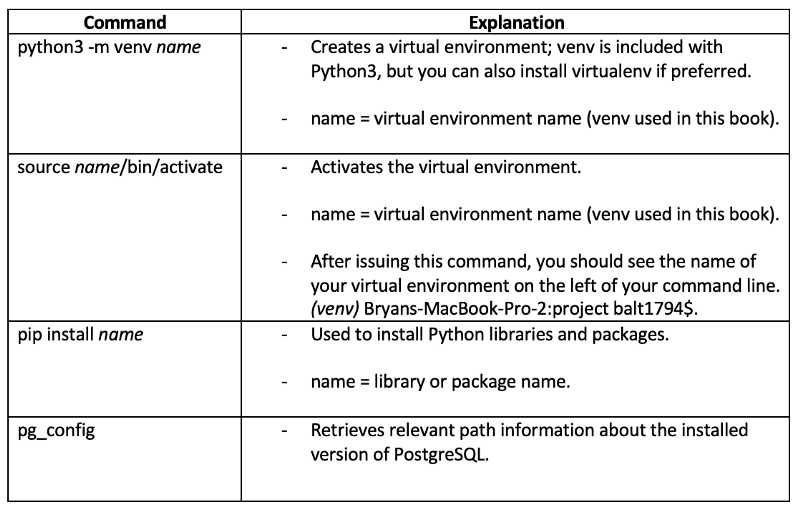
We need to create a virtual environment and activate it. In order to do this, we issue the following commands.
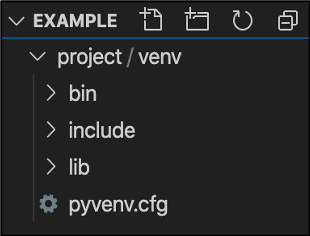
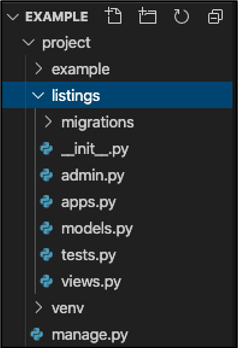
After these commands have been issued, check that your folder tree looks like the screenshot below.
Now that we are confident that the virtual environment (venv) has been created successfully, let's start installing the packages needed for our project. There are multiple ways to install packages, we will use the pip install command.
Pip
Pip is the standard package-management system for Python. Pip handles the installation of packages from the command-line interface.
Let's issue the following commands in the terminal window.

Django
Django is a Python web framework used to develop web applications in a fast and secure way. Django is free and open source. It allows for rapid prototyping while maintaining a secure and reliable structure. It's also good for scalability.
Pillow
Pillow is a Python library that allows us to manipulate, upload, and save different image file formats. This library adds the basic image processing capabilities for any website to handle image files.
Psycopg2 & Psycopg2-binary
These libraries help us connect to the PostgreSQL database. Psycopg2-binary is ideal for development and testing, if you don't want to move this project to Heroku by the end of the book, you can install this library only. I will move this project to Heroku, so I will also need the psycopg2 library.
If you're using the SQLite3 database, then you don't need to install these packages.
Troubleshooting Psycopg2 Installation
If after issuing pip install psycopg2 you get an error like the one below, please follow the next steps to troubleshoot.
Issue the pg_config command and copy the LDFLAGS path (copy everything after the equal sign) and then paste it between quotes on the following command as shown below.
I have shortened my LDFLAGS path since it is very long and it would be different for each person, but make sure you copy the whole path. Also, don't forget to add pip install psycopg2 after the path. Check for extra spaces. Sometimes an extra space can mess up the entire installation.
The problem with psycopg2 arises because of the path to where PostgreSQL was installed. I experienced this problem using a Mac, I'm not sure if it is the case with Windows too.
Listings App
In order to create our Django web app, we need to implement a few things. Let's start by issuing the following commands.
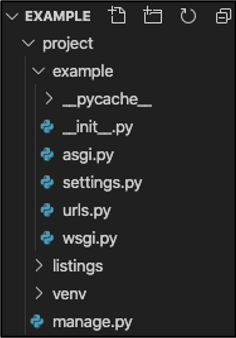
The first command creates a folder with the main Python files needed for our project. I chose the same name as the very first folder that we created ('example'). Don't forget the dot (.) at the end of the command. The dot (.) creates the folder inside our current working directory ('project').
The second command creates an app which contains models.py and other Python files also needed. You can think of apps like small moving parts that we put together to create an entire machine, in this case, a website. In this project, we will have two apps; one for users which will register on our website and the other for listings posted by these users.
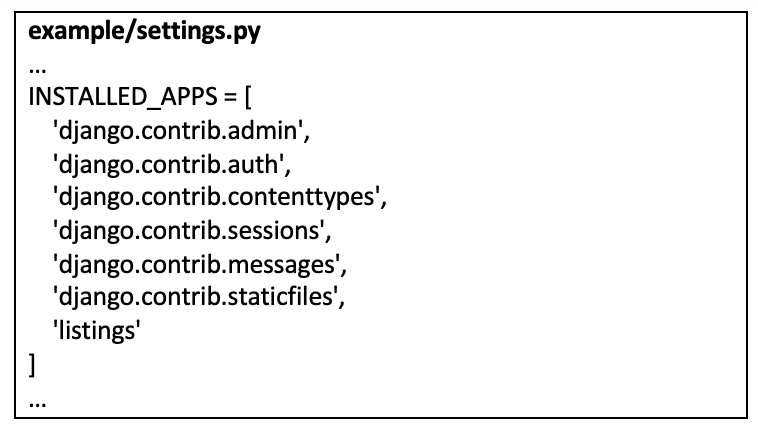
Let's start modifying some settings before we run our project. Go to settings.py of your project's folder and make the following changes.
Every time that you create a new app or install some particular packages which are treated like apps, you have to register these apps in settings.py. Some examples are django-rest-framework, django-allauth, and others.
If you have installed an app or package and you're not sure about whether it belongs to the installed apps section, check the online documentation for that package.
Database Setup
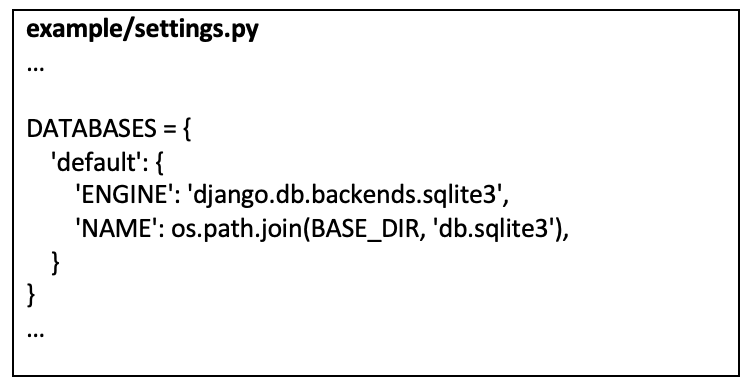
SQLite 3 Database Setup
The current default database used by Django is the SQLite3 database. If you are planning to use this database, don't edit the code below.
PostgreSQL Database Setup
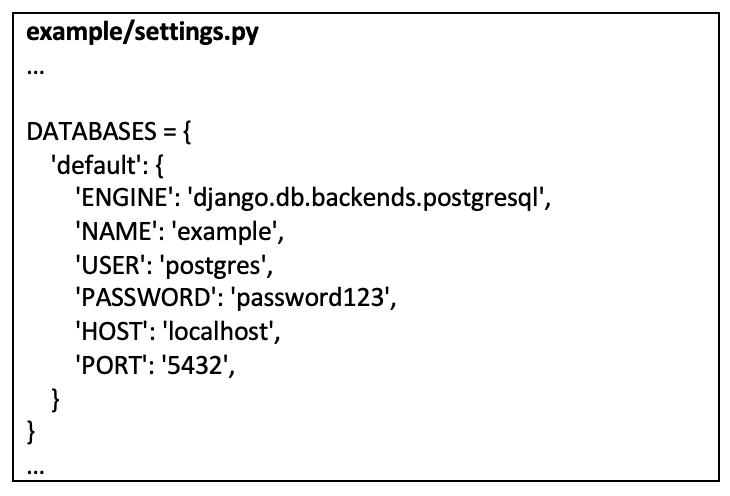
If planning to use PostgreSQL, make the following changes.
ENGINE
Refers to the database component used to perform CRUD (create, read, update, delete) operations on the database data.
NAME
Name of the database. The name 'example' refers to the name given to the database when it was created back in the PostgreSQL Database Installation section. If you gave the database a different name, replace it here.
USER
Username of the database. I haven't changed the username for this project. As you can see the username is 'postgres'. If you changed the username when creating the database, include it here.
PASSWORD
This is the database password. The password that I created was 'password123'. Include your own password if different. Refer to the PostgreSQL Database Installation section if you are having problems.
HOST
Refers to the host Django will use when connecting to the database. Since we are using our local machine, we put 'localhost'. If that doesn't work, try '127.0.0.1'. If the HOST field is left empty, Django will connect using the localhost by default.
PORT
Refers to which port to use when connecting to the database. In my case, the port is '5432'. If the PORT field is left empty, Django will connect using the default port.
Static and Media Files Setup
Static Files
These files could be images, logos, JavaScript code, CSS files, and more.
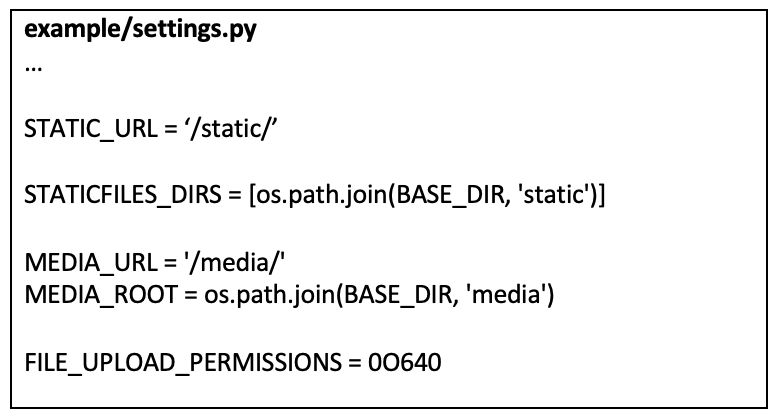
Scroll all the way down to the end of settings.py. You will see that the STATIC_URL is already there. We need to add the following code as well.
STATIC_URL
Django will use this path and append it to the base URL of your website. For example, (http://websitename/static/style.css). It's a reference to the static files during development.
STATICFILES_DIRS
Refers to the location of static files in our project. You can have different paths listed if you have any additional directories that contain static files. It tells Django to look into the paths specified for extra static files that might exist in the project.
STATIC_ROOT
Refers to the absolute path which Django will collect static files from during production. It's not recommended to serve static files from your own local project, that is why we need to include this path when in production.
Media Files
These are files uploaded by users.
MEDIA_URL
Similar to STATIC_URL but refers to media files instead.
MEDIA_ROOT
Refers to the absolute path that points to the directory that will hold user-uploaded files.
FILE_UPLOAD_PERMISSIONS
Sometimes Python throws an error regarding what users can do when an image is uploaded. In order to avoid inconsistencies with file permisions, please set FILE_UPLOAD_PERMISSIONS = 0O640.
Linter Setup (Optional)
A code linter analyses your code for potential errors such as syntax, structural, and best practice errors. If you're not bothered by the red line under your code, you can skip this setup. On the other hand, code linters are useful tools when it comes to learning programming languages.
Try opening a different file such as urls.py from the project directory. Check for problems in the lower part of the screen. If one of the problems shows pylint(import-error), follow the next steps to solve it.
Go to View > Command Palette > Python:SelectLinter > pylint. (Make sure the option Enable Linting is on, by default VS code enables pylint for Python code).
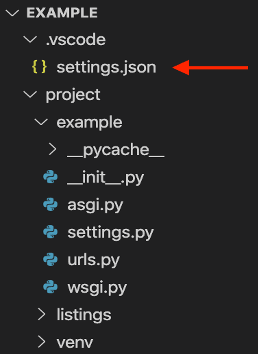
After you select pylint, a .vscode folder will appear on the left side of VS code.
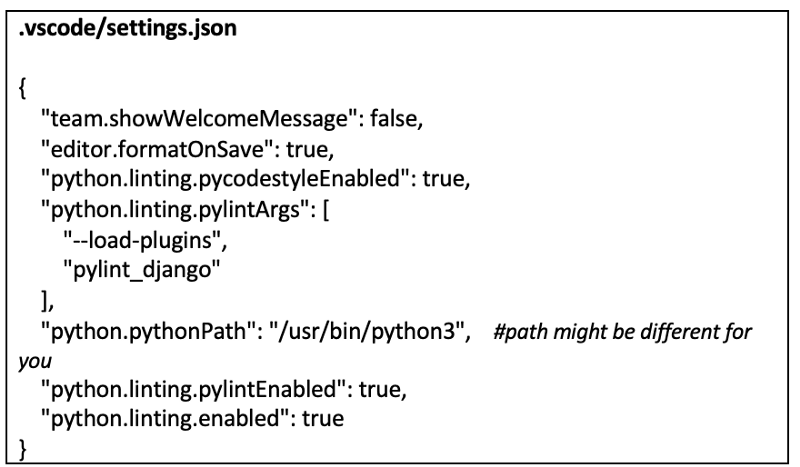
Open the settings.json file that is inside the .vscode folder and make the following changes.
Old settings.json (You might have different content in the file).
New settings.json.
- After you save settings.json, the red line under your code should go away.
Django Simple Web App
We have covered a lot up to this point. It can be overwhelming, but the best way to deal with this huge amount of information is to take it step by step.
Run the following commands to see your first Django web app in action.
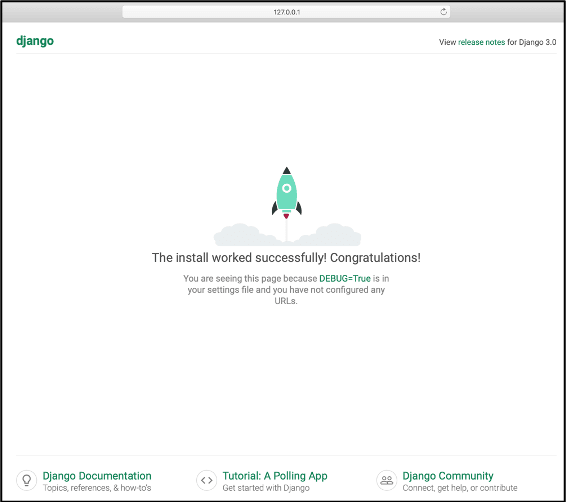
If everything went well, you should see a message like the one below. If not, please read the error in the terminal and troubleshoot accordingly.
Go to http://127.0.0.1:8000, you should see the following.
Projects vs Apps
A project is made up of the different apps and Python files needed to create and run a website. On the other hand, an app is a web application which is a part of a website. Apps perform a function or task on a website. For example, in our case, the listings app will take care of posts on the website and the users app will register new users.
If you're enjoying the series, you can find the entire book below.












Top comments (0)