Hey there 👋,
You may have seen some of our posts from Bearer here on DEV. We love the community, so we try to cross-post many of our relevant blog posts here after they've been live on our own Bearer Blog.
DEV has support for RSS cross-posting built-in. It is pretty great and will handle pulling in new posts for you. We use Ghost for our blog so this was certainly an option for us, but we wanted a little more control over the experience. As a result, let's cross-post to DEV the hard way!
In this post, we will:
- Set up a webhook in Ghost.
- Build a Node.js and Express server to consume a webhook.
- Make changes to the blog content programmatically.
- Post to DEV with the DEV API.
This post assumes some basic familiarity with javascript, as well as Node.js and setting up a project with NPM. Let's get started.
Note: Want to jump right to the end result? Remix the source on Glitch.
Ghost webhooks
Ghost offers "integrations" as its main way to interact with other services. There are a few built-in integrations, but you can configure your own custom integration.

Custom integrations give you a dedicated set of API keys to use when accessing your Ghost blog. We won't use them for what we're building, but we will need to set up a webhook as part of the custom integration.
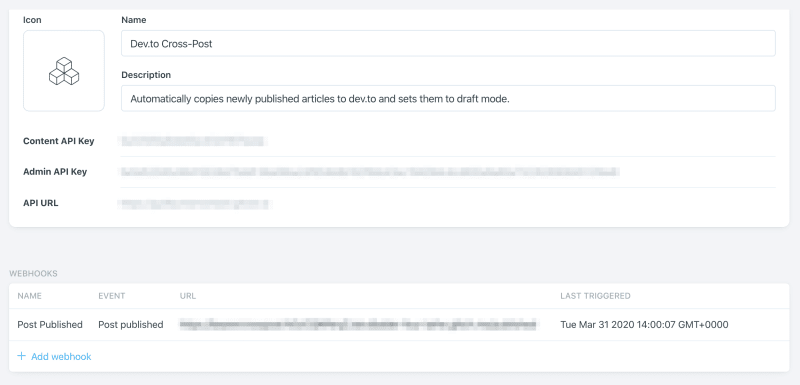
Webhooks in Ghost require a name, event type, and webhook URL. For our needs, we want the "Post Published" event. To test out the webhook, you can use a service like Hookbin to create a temporary URL, or use a tool like ngrok to set up a local tunnel to test localhost apps.
A few notes about webhooks and Ghost:
- There is little to no documentation on the shape of the payload. You'll need to do some testing to discover the shape.
- There are no security measures built-in. Some APIs offer a key on both ends you can check against. Ghost doesn't do this, so your only option is to use basic authentication in the URL, and then have your server check for it. This looks something like
https://user:password@api.example.com/webhook. - With minimal docs, it is unclear exactly how Ghost retries failed webhooks. I've found that it will sometimes randomly send multiples of the same event in a row.
- You cannot trigger a "test" event from within Ghost. Because of this, I'd recommend running a local Ghost instance and toggling "published/unpublished" on a post to test your webhook.
With Ghost configured, let's move on to the Node and express server.
Configure Node.js and Express to accept a webhook
If you haven't configured a webhook before, might I suggest my earlier post on consuming webhooks with Node.js and Express. Otherwise, here's a brief look at how the structure of our node server. Make sure to npm install express body-parser if you haven't already.
// server.js
//
// Require express and body-parser
const express = require("express")
const bodyParser = require("body-parser")

// Initialize express and define a port
const app = express()
const PORT = 3000

// Tell express to use body-parser's JSON parsing
app.use(bodyParser.json())

// Establish a route to accept POST requests to /publish
app.post("/publish", (req, res) => {
  res.status(200).send("OK") // Responding quickly important
  console.log(req)
})
// Start express on the defined port
app.listen(PORT, () => console.log(`🚀 Server running on port ${PORT}`))
This code establishes the server and sets up a route on /publish.
While we're here, let's also handle the security issue mentioned earlier. In express, we can add basic authentication using the express-basic-auth package. You shouldn't use this authentication type for real apps, but we don't have much of a choice in this instance. To configure it, npm install express-basic-auth and adjust the above code to include the following:
const express = require("express")
const bodyParser = require("body-parser")
const basicAuth = require("express-basic-auth") // ++

const app = express()
const PORT = 3000

app.use(bodyParser.json())
// ++
app.use(
  basicAuth({
    users: {
      ["USERNAME"]: "PASSWORD"
    }
  })
)
//

app.post("/publish", (req, res) => {
  res.status(200).send("OK")
  console.log(req)
})

app.listen(PORT, () => console.log(`🚀 Server running on port ${PORT}`))
Make sure to match the username and password with the user:pass@api.example.com from your webhook URL.
Note: In these examples, I've included a username and password directly in the code. Preferably you would use environment variables and instead substitute process.env.AUTH_USER and process.env.AUTH_PASS or something similar.
Next, we need to process the incoming payload from Ghost. As mentioned earlier, these aren't documented. To get the content of the post that was published when the Post Published event fired, you can access post.current on the body of the request. Let's sub that into the console log inside the route from our previous code.
// ...
console.log(req.body.post.current)
//...
Note: If you're using something like Hookbin or ngrok to test, you can also view the logs in their web UI to see the full payload.
The resulting object provides all the information about the post. For cross-posting to DEV, we want a few key properties:
-
title: The title of the blog post. -
url: The full URL of the original post (on our blog). -
feature_image: The Featured, or "cover" image URL. -
html: The full HTML of the original blog post.
With that in mind, let's move on to processing the incoming data before sending it off to DEV.
Manipulating HTML into Markdown
There's one problem with the properties listed above. Ghost outputs HTML. DEV's API for creating articles accepts markdown. To get around this, we can leverage unified. Unified is a set of tools and plugins for processing content into syntax trees, and then back into a new format. For us, that means HTML -> Markdown -> String. Unified is really powerful, but we will rely on a few plugins to handle all of the work. Start by installing some dependencies:
npm install unified rehype-parse rehype-remark remark-stringify
Let's break down what each of these does:
-
unifiedis the core and the ecosystem of plugins. -
rehype-parseparses the HTML. -
rehype-remarktransforms the parsed HTML into markdown. -
remark-stringifytakes the markdown and turns it into a string that we can use.
Let's turn this all into a function to make more sense of it. In your server.js or app entry point, require the new packages. The new "require block" should look something like the following:
const express = require("express")
const basicAuth = require("express-basic-auth")
const bodyParser = require("body-parser")
const unified = require("unified")
const html = require("rehype-parse")
const remark = require("rehype-remark")
const stringify = require("remark-stringify")
I've named the variables so they are a little closer to how we'll be using them.
Next, let's create a function to take in our HTML from Ghost and pass it through unified.
function htmlToMarkdown(data) {
  return unified()
    .use(html)
    .use(remark)
    .use(stringify)
    .process(data)
}
This might look a little strange. That's because it is specific to unified's use. What it is saying is: The function htmlToMarkdown takes in an argument data and returns a unified process. unified() is using each plugin, in order, before finally running the whole process on the data we pass in. We return unified so we can make use of promises since this processing is asynchronous. While we're at it, let's make a function to handle all of this and live inside our route.
function handlePublished(req) {
  const { html, url, feature_image, title } = req.body.post.current

  htmlToMarkdown(html).then(file => {
    // do stuff with the result
  })
}
The handlePublished function takes the request, destructures the properties we want, then passes the HTML into the new htmlToMarkdown function. It returns a promise, so we can chain then. I'm using the name file for the argument because that is the convention in unified, but you can call it anything you prefer.
Now we have a markdown string we can pass on to DEV. Before we do that, I want to make a quick little modification. If you view one of our posts, like What developers say when they say "API", you'll notice a line at the top that mentions where the post was originally published
![]()
That happens automatically with this project by prepending it onto the markdown that we just created.
function handlePublished(req) {
  const { html, url, feature_image, title } = req.body.post.current

  htmlToMarkdown(html).then(file => {
    let blurb = `_📣 This post originally appeared as [${title}](${url}) on [The Bearer Blog](https://blog.bearer.sh)._ \n`
    let content = blurb + String(file)
    // do more stuff
  })
}
With a little string interpolation, emoji, and markdown we now have a new content variable that holds the full post. The \n at the end creates a new line. The String(file) ensures that the data coming back from our processing is a String—this isn't really necessary, but it can be a good idea if you want to make sure you aren't accidentally sending another data type.
Shape the data and send it to DEV
With the post content in the right format, we can build the body to send it to DEV. The endpoint we are targeting is POST /articles. You can view the full docs here. I'm going to focus on the article's title, published, body_markdown, canonical_url, organization_id, and main_image properties. The next iteration of handlePublished will look like the following:
function handlePublished(req) {
  const { html, url, feature_image, title } = req.body.post.current

  htmlToMarkdown(html).then(file => {
    let originalBlurb = `_📣 This post originally appeared as [${title}](${url}) on [The Bearer Blog](https://blog.bearer.sh)._ \n`
    let content = originalBlurb + String(file)
    let devBody = {
      article: {
        title: title,
        published: false,
        body_markdown: content,
        canonical_url: url,
        // Replace with your ORG ID if you post to an org.
        // Otherwise remove the organization_id property.
        organization_id: 9999,
        main_image: feature_image
      }
    }
  })
}
There are a few key areas here that may be different for everyone. The published property is set to false. We do this so we can double-check the post on DEV before publishing, and assign any tags. Since we post to the Bearer Organization, we sub the organization_id for ours. You can find your organization's ID in the URL of the dashboard (https://dev.to/dashboard/organization/XXXX). If you aren't part of an org, feel free to remove the property from the article object. One other important part is the canonical_url property. This ensures that our cross-post references the original post for search engines. Otherwise, there is a chance it may compete in search results.
The final step is to POST the devBody to DEV's /articles endpoint. For ease, I'll use axios. Make sure to npm install axios and require it in your require block. Then, expand the handlePublished function to include the request.
// ...
const axios = require("axios")
// ...
function handlePublished(req) {
  const { html, url, feature_image, title } = req.body.post.current

  htmlToMarkdown(html).then(file => {
    let originalBlurb = `_📣 This post originally appeared as [${title}](${url}) on [The Bearer Blog](https://blog.bearer.sh)._ \n`
    let content = originalBlurb + String(file)
    let devBody = {
      article: {
        title: title,
        published: false,
        body_markdown: content,
        canonical_url: url,
        organization_id: 1287,
        main_image: feature_image
      }
    }

    axios({
      method: "POST",
      url: "https://dev.to/api/articles",
      headers: {
        "api-key": "XXXXXXXX"
      },
      data: devBody
    })
      .then(({ data }) => {
        console.log(data)
      })
      .catch(console.error)
  })
}
The new portion of code includes an axios call. As mentioned earlier, moving the API key to an environment variable like DEV_API_KEY and accessing it via process.env.DEV_API_KEY is a good idea. Axios will automatically stringify the body, so we don't need to worry about that. I've included a then and catch block for debugging, but you won't need these in practice unless you want to do something once the call completes or fails. 💡Maybe set up a Slack notification.
With that set up, let's go back to our route and drop the function in.
//...

app.post("/publish", (req, res) => {
  res.status(200).send("OK")
  handlePublished(req)
})
//...
We're all set! Now, whenever Ghost publishes a post our webhook will trigger, the HTML will convert to markdown, and it will post with the DEV API. You can deploy it however you like, but we used Glitch to make it easy.
Extras and fixes
Log and manage API calls with Bearer
To keep track of the API calls, I implemented the Bearer Agent as I do on all my apps. After installing and requiring the agent, I can add it to the code like this:
// npm install @bearer/node-agent
const Bearer = require("@bearer/node-agent")
// ...
// ...
Bearer.init({secretKey: process.env.BEARER_SECRET })
  .then(() => console.log('Bearer Initialized'))
  .catch(console.log)
  .finally(() => {
    app.listen(PORT, () => console.log(`🚀 Server running on port ${PORT}
  })
You can read more on setting up Bearer on our docs. I'm initializing the Bearer Agent, then moving the express app.listen into the finally block so that it runs once the promise completes.
Now if a call to the DEV API fails I can receive notifications, view the request and response, and even set up remediations to retry the call.
Further customize the content
If you want to dive deeper into unified, there is an opportunity to customize the content even further. You can:
- Change all the URLs to include some tracking value for your analytics.
- Insert related links by querying ether the DEV or Ghost API and fetching posts matching the same tag.
- Convert code blocks to gists with the GitHub API.
- Add a byline to the content to mention the author if your blog has multiple authors.
Simplify the route
Avid express users are probably saying: "Why don't you refactor handlePublished so you can just pass it to the route?" That is definitely an option. This would result in the route looking like app.post("/publish", handlePublished) and moving the response logic over to handlePublished. Definitely a great refactor!
Localhost problems
If you are testing this out locally with a "localhost" install of Ghost, you may receive errors from DEV saying your canonical URL is incorrect. This is because Ghost is sending https://localhost/path-to-your-post as the URL and DEV has some logic to make sure that doesn't happen. You can hard-code in a URL during testing, or change your local setup to avoid this.
Avoid repeated requests
One issue I ran into when building this was a quirk between Ghost's events and my pseudo-serverless Glitch app. Ghost was sending the hook at least 3 times in production, causing three drafts to show up in the DEV dashboard. To get around this, I set up a check before calling handlePublished to make sure the process would only trigger once every 5 seconds. This looks like:
//...
let lastRequest = 0
app.post("/publish", (req, res) => {
  res.status(200).send("OK")
  if (Date.now() - 5000 > lastRequest) {
    lastRequest = Date.now()
    handlePublished(req)
  }
})
// ...
Wrapping up
Not too bad for only 70-ish lines of code and a little help from node, express, and unified. If you want to get this up and running quickly, you can remix the project on Glitch. Make sure to update the environment variables mentioned in the README.
Let us know if you're using this for your own blogs. Check out what we're building at Bearer and connect with us here on DEV or @BearerSH.

Top comments (1)
After these 3 years, did you still have a problem with the webhook in Ghost? Did you find any better alternatives? :p Additionally, how has that solution worked out for you over the years?