
Written by Ogundipe Samuel✏️
JAMstack has been a buzz word for a while now. In online forums and chat channels, you’ll frequently see similar questions on the subject:
What’s the idea behind it? What makes up the JAM? Why is it useful? Is it specific to certain frameworks? How can I build a JAMstack website?
We’ll answer these questions in this tutorial. We’ll also build an e-commerce website by applying the techniques learned with the Next.js framework.
N/B: To follow this tutorial, you’ll need a basic understanding of React and Node.js. Please ensure that you have Node and npm/yarn installed before you begin.
What is JAMstack?
The JAMstack is a modern architectural pattern for building web applications. The JAM stands for Javascript, APIs, and Markup. It’s based on the idea of separating your frontend presentation layer from any dynamic functionality.
With JAMstack, you ship all your webpage presentation markup so the user is presented with information as soon as the site is loaded.
Then you use Javascript to dynamically add functionalities to your application — usually through APIs.
Using the JAMstack saves developers time and effort because it takes away the need to set up servers or backend.
With serverless platforms and APIs, such as Firebase, 8base, and Amazon Lambda, which enable connections from the front-end frameworks, developers can now leverage these platforms alongside other reusable APIs for adding back-end, data storage and processing, authentication, and other dynamic capabilities into their applications.

Why use JAMstack?
There are a lot of benefits that come with using JAMstack. When implemented, it can save you time and overhead costs.
With JAMstack, you get:
- Better performance
Typically, with JAMstack, pre-built markup and assets are served over a CDN. This means that as soon as your code is deployed, the CDN gets updated. This guarantees a faster loading speed because nothing beats pre-built files served over a CDN.
- Higher security
Technically — since there’s no database— it can’t be hacked. JAMstack takes away the need to worry about server or database vulnerabilities. You can also leverage the domain expertise of specialist third-party services.
- Cheaper, easier scaling
The hosting of static files is cheap or even free. Since your files can be served anywhere via a CDN, scaling is a matter of serving those files in more places. CDN providers will scale up to account for the amount of traffic it receives.
- Better developer experience
Developers can focus on working on parts of the application that suits their skillset without having to deal with setting up anything else. It allows for more targeted development and debugging, and the expanding selection of CMS options for site generators removes the need to maintain a separate stack for content and marketing.
Building a JAMstack application
Over time, numerous open-source static website generators have become available: GatsbyJS, Hugo, Nuxt.js, Next.js, Jekyll, Hexo, VuePress, etc — all of which can be used for generating prebuilt markup, which can serve your website as static HTML files.
Most of the time, the content is managed through static (ideally Markdown) files or a content API.
We’d use Next.js to build a JAMstack website to illustrate some of the points above.
Next.js is a React framework built by Zeit, and according to nextjs.org:
With Next.js, you can build server-side rendering and static web applications using React. There is absolutely no need for any configuration with webpack or anything similar. Just install it and start building.
Here are some other cool features Next.js brings to the table:
- An intuitive page-based routing system (with support for dynamic routes)
- Automatically statically optimizes page(s) when possible
- Server-side renders page(s) with blocking data requirements
- Automatic code splitting for faster page loads
- Client-side routing with optimized page prefetching
- API routes to build your API with serverless functions, with the same simple router used for pages
Getting Started
To start, create a sample project by running the following commands:
mkdir nextjs-shopping-cart
cd nextjs-shopping-cart
npm init -y
npm install --save react react-dom next
We need to add commands to start up Next.js. Open your package.json and update the scripts object with the following code:
// ./package.json
"scripts": {
    "dev"  : "next",
    "build": "next build",
    "start": "next start"
}
We’d start by creating the base components necessary to give our website a good look.
In the root of your application, create a components folder with the following files:
// components/Navbar.js
const Navbar = (props) => {
  return (
    <nav className="navbar navbar-light bg-light">
      <h3>Shoppr</h3>
        <a className="btn btn-outline-success my-2 my-sm-0">Cart</a>
    </nav>
  );
};
// components/Footer.js
const Footer = () => {
  const mystyle = {
      "position": "absolute",
      "bottom": "0",
      "width": "100%",
      "backgroundColor": "#333",
      "color":"#fff",
  };
  return (
      <footer style={mystyle} className="page-footer font-small bg-blue pt-4">
        <div className="container text-center text-md-left">
          <div className="row">
            <div className="col-md-6 mt-md-0 mt-3">
              <h5 className="text-uppercase font-weight-bold">Contact Us</h5>
              <p>You can contact us on 234-8094-34033-33</p>
            </div>
            <div className="col-md-6 mb-md-0 mb-3">
              <h5 className="text-uppercase font-weight-bold">Return Policy</h5>
              <p>We accept returns after 7 days max</p>
            </div>
          </div>
        </div>
        <div className="footer-copyright text-center py-3">© 2019 Copyright:
          <span> Shoppr</span>
        </div>
      </footer>
  );
};
export default Footer;
Now, we need to create a shared layout for our application. Our application will need a head section that will contain CSS links, meta-tags, and other related info.
Create a Layout.js file inside the components folder and add the following code to it:
// components/Layout.js
import Head from 'next/head'
import Navbar from './Navbar.js'
import Footer from './Footer.js'

function Layout(props) {
  return (
    <div>
      <Head>
        <title>Shopping Cart</title>
        <meta name="viewport" content="initial-scale=1.0, width=device-width" />
        <link href="https://stackpath.bootstrapcdn.com/bootstrap/4.3.1/css/bootstrap.min.css" rel="stylesheet" integrity="sha384-ggOyR0iXCbMQv3Xipma34MD+dH/1fQ784/j6cY/iJTQUOhcWr7x9JvoRxT2MZw1T" crossorigin="anonymous"/>
      </Head>
      <Navbar/>
       <div className="container-fluid">{props.children}</div>
      <Footer/>
    </div>
  )
}
export default Layout
Here, we’ve created a universal layout component that would add an HTML head section to all its children components. We also added the Navbar and Footer since both components would be the same across all pages.
Creating our home page
So far, we’ve created the basic components and universal layout for our app. We need to see this in action by creating a page that utilizes them. The page would also be responsible for fetching and displaying our products.
To fetch data from an API we would make use of isomorphic-unfetch library. Run the following command in your terminal to install it:
npm install --save isomorphic-unfetch
After installation, create a pages directory and an index.js file inside it, then add the following code:
// pages/index.js
import Products from '../components/Products.js'
import fetch from 'isomorphic-unfetch'

const Index = (props) => (
      <Products products={props.products}/>
)

Index.getInitialProps = async function() {
  const res = await fetch('https://my-json-server.typicode.com/mood-board/demo/products');
  const data = await res.json();
  return {
    products: data
  };
};
export default Index
To fetch data from a remote source for a component, you’ll use the getInitialProps function that comes out of the box with Next.js.
In our code, we receive our product list from an API and set it to the product props. We then populate our product listing by passing it down to the products component as props.
Before we try it out on the browser, create two new components: products.js, product.js and add the following code to it:
// components/products.js
import React, { Component } from 'react';
import Product from './Product';

class Products extends Component {
  constructor(props) {
    super(props);
  }
  render() {
      return (
        <div>
          <div className="container mt-4">
            <div className="row">
       {this.props.products.map(item => <Product key={item.id} product={item}/>)}
            </div>
          </div>
        </div>
      )
  }
};
export default Products;
Here, we pass down the item to be displayed by the product component. Create a Product.js file and add the following code to it:
// components/product.js
import Link from "next/link";
const Product = (props) => {
return (
<div className="col-sm-4">
<div className="card" style={{width: "18rem"}}>
<img src={props.product.image} className="card-img-top" alt="shirt"/>
<div className="card-body">
<h5 className="card-title">{props.product.name}</h5>
<h6 className="card-title">$ {props.product.price}</h6>
<Link href="/products/[id]" as={`/products/${props.product.id}`}>
<a>View Item →</a>
</Link>
</div>
</div>
</div>
);
}
export default Product;
Now visit https://localhost:3000 in your browser and you will see the following:

Dynamic Routing in Next.js
Our homepage displays all our products. We need to create individual pages for each of the products so we can get more information about them before adding them to our cart.
From our API structure, we can retrieve a single product with the URL /api/products/{id}. However, we do not know the ids of our products beforehand so we cannot manually create pages for them. We need a way to dynamically generate the pages on the fly.
Next.js allows us to do this in a unique way. In your pages folder, create a sub product folder and a file name [id].js then add the following code to it:
// pages/products/[id].js
import fetch from 'isomorphic-unfetch';
import ProductItem from '../../components/ProductItem'
const Productitem = props => {
  return (
        <ProductItem product={props.product}/>
  )
};
Productitem.getInitialProps = async function(context) {
  const { id } = context.query;
  const res = await fetch(`https://my-json-server.typicode.com/mood-board/demo/products/${id}`);
  const product = await res.json();
  return { product };
};
export default Productitem;
Next.js allows us to automatically grab URL values through a special object called context.
Once we grab the id from the URL, we query the API to get the product and pass it to our component as initial props.
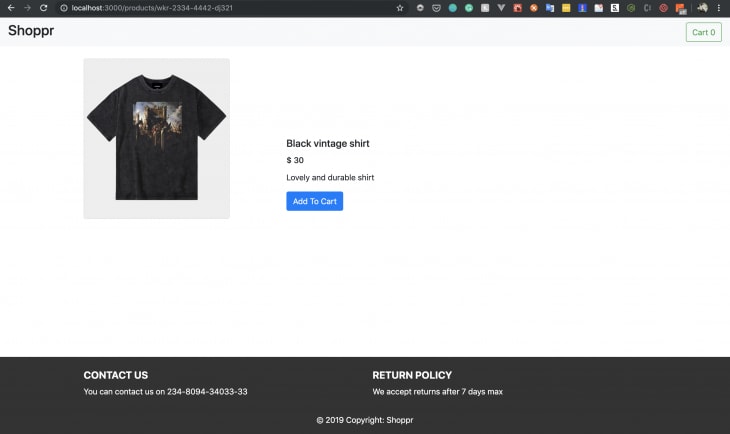
Before we check it on the browser, create a ProductItem.js in the components folder and add the following code:
// components/productitem.js
const ProductItem = (props) => {
   return (
      <div className="container mt-4">
      <div className="row">
        <div className="col-sm-4">
            <div className="card" style={{width: "18rem"}}>
              <img src={props.product.image} className="card-img-top" alt="shirt"/>
            </div>
        </div>
         <div className="col-sm-4 ">
              <div className="card-body" style={{marginTop: "135px"}}>
                <h5 className="card-title">{props.product.name}</h5>
                <h6 className="card-title">$ {props.product.price}</h6>
                <p>{props.product.description}</p>
                <button className="btn btn-large btn-primary">Add To Cart</button>
              </div>
        </div>
        </div>
      </div>
   );
}
export default ProductItem;
Now, when you click on the link from the homepage you’ll see this:
Adding the cart functionality
To wrap up, we need to add the cart functionality to our application using react context api and the browser’s local storage.
Context makes it possible to pass data through the component tree without having to pass props down manually at every level.
To be able to share state globally via context, the whole application needs to be wrapped in the context provider. Next.js allows us to override the default wrapper for an application using a special file called _app.js .
First, let’s create our context file. Inside the components directory create a file called cartContext.js and add the following code to it:
// components/cartcontext.js
import { createContext } from 'react';

const CartContext = createContext();

export default CartContext;
Here, we import the createContext function from React. To create a new context all we need to do is call createContext() and attach it to a variable. A context can also be initialized with a default value but we won’t need that in our case.
Next, in the pages directory create a file called _app.js and add the following code:
// pages/_app.js
import App from 'next/app'
import Layout from '../components/layout.js'
import cartcontext from '../components/cartContext';

export default class MyApp extends App {

  state = {
      cart : [],
      carttotal : 0
  }

  componentDidMount = () => {
    const cart = JSON.parse(localStorage.getItem('cart'));
    const carttotal = JSON.parse(localStorage.getItem('total'));
    if (cart) {
      this.setState({
         cart,
         carttotal
      });
    }
  };

  addToCart = (product) => {
    this.setState({
        cart: [...this.state.cart, product]
    });
    localStorage.setItem('cart', JSON.stringify(this.state.cart));
  }

  calculateTotal = (price) => {
    this.setState({
      carttotal: this.state.carttotal + price
    });
    localStorage.setItem('total', JSON.stringify(this.state.carttotal));
  }

  render () {
    const { Component, pageProps } = this.props
    return (
      <cartcontext.Provider value={{cart: this.state.cart, addToCart: this.addToCart, total: this.calculateTotal, carttotal: this.state.carttotal}}>
        <Layout>
          <Component {...pageProps} />
        </Layout>
      </cartcontext.Provider>
    )
  }
}
Here, we’ve wrapped our entire application with our newly created context provider. This gives all our components access to the values stored in the context.
Along with the context provider, we sent two values (cart, carttotal) to hold the cart items and the total cost.
We’ve also passed down two methods (addToCart, total) to enable adding to cart and calculating the total price.
When our component mounts (via componentDidMount()), we retrieve the values stored in our local storage and set the state of our cart and total price.
We also update the records stored in our local storage whenever the addToCart and calculateTotal functions are triggered.
To use the data in different parts of the application, we can import the CartContext component inside any other component that needs it using a single line of code:
const { cart } = useContext(CartContext);
We need to access our components in two places: Our navbar to update the cart item count, and our product-item to add the item to the cart.
Open the Navbar.js and update it with the following code:
// components/Navbar.js
import React from 'react';
import { useContext } from 'react';
import CartContext from './cartContext';

const Navbar = (props) => {
  const { cart } = useContext(CartContext);
  return (
    <nav className="navbar navbar-light bg-light">
      <h3><a href="/">Shoppr</a></h3>
      <a href="/cart" className="btn btn-outline-primary my-2 my-sm-0">Cart {cart.length}</a>
    </nav>
  );
};
export default Navbar;
Through the useContext Hook provided by React, we retrieved the cart items and can display the count whenever it increases. That way the shopper can see the number of items in the cart at any time.
Next, open the ProductItem.js and update it with the following code:
// components/ProductItem.js
import Link from "next/link";
import { useContext } from 'react';
import CartContext from './cartContext';

const ProductItem = (props) => {
  const { addToCart, total } = useContext(CartContext);
   return (
      <div className="container mt-4">
        <div className="row">
          <div className="col-sm-4">
            <div className="card" style={{width: "18rem"}}>
            <img src={props.product.image} className="card-img-top" alt="shirt"/>
            </div>
          </div>
          <div className="col-sm-4 ">
              <div className="card-body" style={{marginTop: "135px"}}>
                <h5 className="card-title">{props.product.name}</h5>
                <h6 className="card-title">$ {props.product.price}</h6>
                <p>{props.product.description}</p>
                <button className="btn btn-large btn-primary" onClick={() => {addToCart(props.product); total(props.product.price); }}>Add to Cart
                </button>
              </div>
          </div>
          </div>
      </div>
   );
}
export default ProductItem;
Here, we’ve retrieved the functions needed for adding to the cart and calculating our prices. We trigger them when the user clicks the ‘add to cart’ button.
Finally, we need a page to display our cart items. Inside the pages directory, create a file called cart.js and add the following code to it:
// pages/cart.js
    import { useContext } from 'react';
    import CartContext from '../components/cartContext';

    const Cart = () => {
       const { cart, carttotal } = useContext(CartContext);
       return(
         <div>
          <h3 >Cart Items</h3>
          <div className="pb-5">
            <div className="container">
              <div className="row">
                <div className="col-lg-12 p-5 bg-white rounded shadow-sm mb-5">
                  <div className="table-responsive">
                    <table className="table">
                      <thead>
                        <tr>
                          <th scope="col" className="border-0 bg-light">
                            <div className="p-2 px-3 text-uppercase">Product</div>
                          </th>
                          <th scope="col" className="border-0 bg-light">
                            <div className="py-2 text-uppercase">Price</div>
                          </th>
                        </tr>
                      </thead>
                      <tbody>
                        {cart.map(item =>
                        <tr>
                          <th scope="row" className="border-0">
                            <div className="p-2">
                              <img src={item.image} alt="product" width="70" className="img-fluid rounded shadow-sm"/>
                              <div className="ml-3 d-inline-block align-middle">
                              <h5 className="mb-0"> <a href="#" className="text-dark d-inline-block align-middle">{item.description}</a></h5>
                              </div>
                            </div>
                          </th>
                          <td className="border-0 align-middle"><strong>$ {item.price}</strong></td>
                        </tr>
                        )}
                      </tbody>
                    </table>
                  </div>
                 <ul className="list-unstyled mb-4">
                    <li className="d-flex justify-content-between py-3 border-bottom"><strong className="text-muted">Total</strong>
                      <h5 className="font-weight-bold">$ {carttotal}</h5>
                    </li>
                  </ul>
                  <a href="#" className="btn btn-dark rounded-pill py-2 btn-block">Procceed to checkout</a>
                </div>
              </div>
            </div>
          </div>
         </div>
       )
    }
    export default Cart;
Here, we retrieve and display the items in our cart through the cart context.

Deploying to Netlify
In this section, we will deploy our app to Netlify.
If you don’t already have an account with Netlify, you can create a new site from [here].
From the dashboard, click on new site from git:

Next, add your GitHub account by clicking on the link:

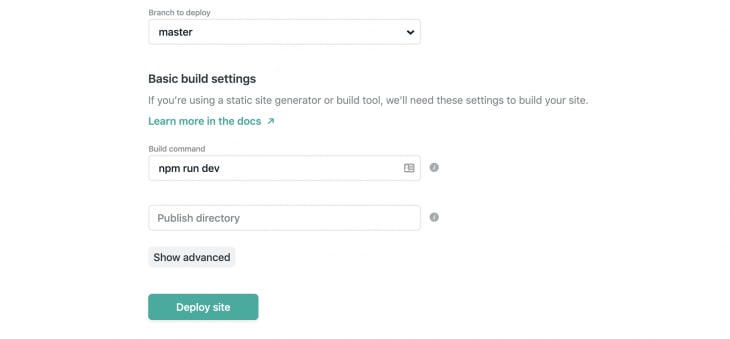
In the next step, we need to add the command that would start our application:
Once the site is deployed, we can view it live at https://focused-agnesi-b7664a.netlify.com/. In your case, the URL will be different. We can view the URL of our site from our project’s overview section:

Now, whenever you push new code to your GitHub repository, Netlify will auto-deploy your site and update it’s CDN leading to a very fast load time for your website.
Conclusion
In this tutorial, we talked about the JAMstack and built a sample application with it. You should note that the JAMstack is still a growing concept and only works best in certain cases.
In many cases, having a full-stack application with a properly created backend is necessary. To read more about JAMstack, check out the docs here.
The sample application can be found here.
Editor's note: Seeing something wrong with this post? You can find the correct version here.
Plug: LogRocket, a DVR for web apps

LogRocket is a frontend logging tool that lets you replay problems as if they happened in your own browser. Instead of guessing why errors happen, or asking users for screenshots and log dumps, LogRocket lets you replay the session to quickly understand what went wrong. It works perfectly with any app, regardless of framework, and has plugins to log additional context from Redux, Vuex, and @ngrx/store.
In addition to logging Redux actions and state, LogRocket records console logs, JavaScript errors, stacktraces, network requests/responses with headers + bodies, browser metadata, and custom logs. It also instruments the DOM to record the HTML and CSS on the page, recreating pixel-perfect videos of even the most complex single-page apps.
Try it for free.
The post Building a JAMstack e-commerce website appeared first on LogRocket Blog.

Top comments (3)
The link to your site is broken.
Just what I'm looking for , Thanks !
OK soo I followed you article, even though my Navbar and Footer are no where visible.