

Original: https://www.builder.io/blog/mitosis-a-quick-guide
I have worked for several companies, both as a full-time employee and as a contractor. One thing has always remained true: There are multiple languages and frameworks being used across their frontend applications. (Well, okay, there was that small startup that only had one, but this still applies.) Often several teams have people with different skill sets, and they might decide that it’s easier to go with React. Another team might go with Vue because they feel it’s the next great framework.
You might be thinking, "What’s the big deal? It’s all just JavaScript anyway." Sure, you’re right, but the real challenge here is when each of these teams need to coexist within a single brand that has a very specific design system. This is where Builder.io's Mitosis can help you create a single source of truth for all of the reusable components within your Design System.
What is Mitosis?
Mitosis is a compile-time framework that allows you to write components in JSX and compile to vanilla JavaScript, Angular, React, Vue and more.
Mitosis uses a static subset of JSX, inspired by Solid. This means we can parse it to a simple JSON structure, then easily build serializers that target various frameworks and implementations.
This might sound very similar to the work the Ionic team did with Stencil. The one main difference is that we're not just outputting web components. Rather full framework-ready JavaScript. You can even compile the output to Stencil as well.
As of April 2022, Builder.io's Mitosis supports
- Vue
- React
- Angular
- Svelte
- React Native
- Swift
- SolidJs
- Stencil
- Web Components
- HTML
- Liquid
- Template Literals
- JSON
- Builder (JSON)
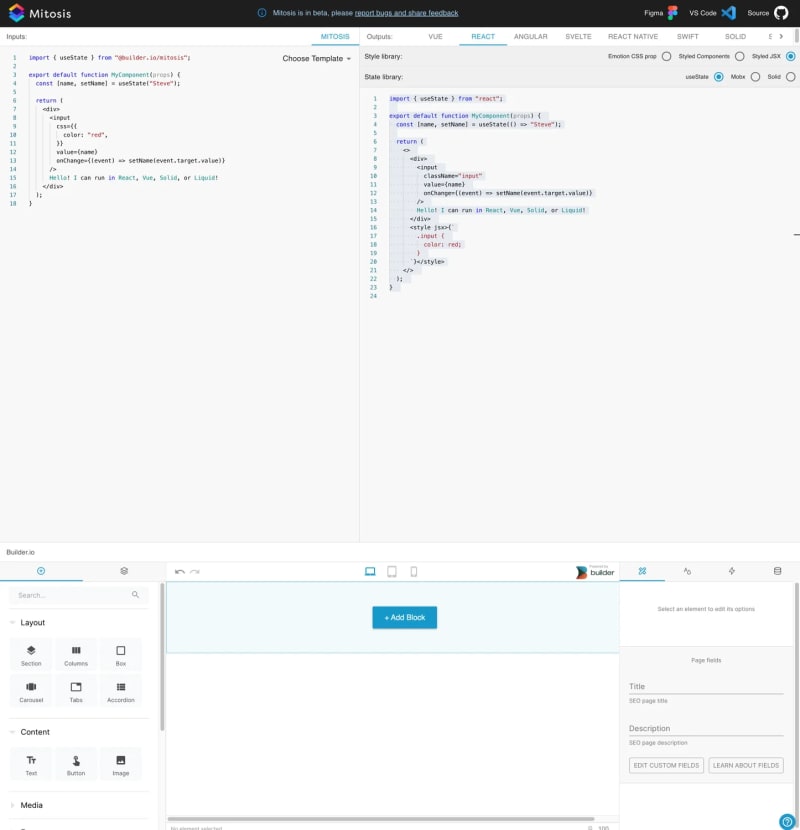
You can try this yourself in Builder.io's Mitosis Fiddle pictured below.
How does this compare to other compile time frameworks?
Two very popular compile-time frameworks are Svelte and SolidJS. Mitosis is very similar to these in terms of it being a compile time framework which makes it very fast. Where it differs is that it lets you produce multiple frameworks, allowing for the most flexibility.
Similar to SolidJS, Mitosis uses a version of JSX that compiles the components to JSON. Plugins then compile the components to different targets, enabling you to create tooling in two directions:
- Code that can be converted into Mitosis JSON
- Plugins that compile or serialize JSON to target frameworks
Mitosis is supported by Builder.io, because Mitosis also supports no-code tools. It does this by following the above serialization to Builder.io's JSON format. This makes Mitosis a very stable product because we will need to continue updating and improving the code base so that Builder.io remains successful.
How to install the CLI
First install the CLI by opening your terminal and executing:
npm install -g @builder.io/mitosis-cli
The mitosis CLI has simple commands to follow but if you ever forget, you can run mitosis --help. Which will show you the usage and examples.
  USAGE
    mitosis compile --to=<format> [options] [files]
    mitosis compile -t=<format> [options] [files]

    If no [input-files] are specified or when [files] is "-", input
    is read from standard input.

  EXAMPLES
    mitosis compile -t react component.tsx
    mitosis compile -t react < component.tsx
    cat component.tsx | mitosis compile -t html -
    mitosis compile -t react --out-dir build -- src/**/*.tsx
It is important to remember that Mitosis is just the compiler here. We'll still need to create the JSX files that represent our component, which Mitosis will then output.
How to create a Mitosis Project
First create a new directory and change into it:
mkdir mitosis-example && cd mitosis-example
Now create an npm project so that we can use the @builder.io/mitosis package:
I would also highly recommend initializing this directory with git (this is optional):
git init
If you're using git make sure to create a .gitignore file with the following:
node_modules/
Install the Builder.io Mitosis package into the local project:
npm install @builder.io/mitosis
Add JSX Mitosis File
The file name should end with lite.jsx this allows the VSCode extension to be used.
touch component.lite.jsx
Open your project in VSCode:
code .
Your project should look like this in VSCode:
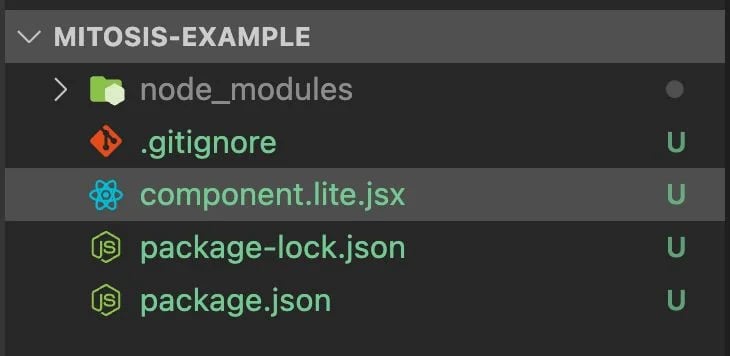
Add JSX to the component.lite.jsx file:
import { useState } from "@builder.io/mitosis";

    export default function MyComponent(props) {
    const [name, setName] = useState("Alex");

    return (
        <div>        <input            css={{            color: "red",
            }}
            value={name}            onChange={(event) => setName(event.target.value)}
        />
        Hello! I can run in React, Vue, Solid, or Liquid!
        </div>    );
    }
If you've ever written in React, this should feel very familiar to you.
State Comparison
Before you output our component.lite.jsx to any available language, take a close look at how state is used. The useState hook will be the same as how you use it in React. Below you can see a few of the frameworks and how they use this definition to appropriately assign the state variable for each input.
As you can see the state variable name used within the JSX, is correctly compiled in the other frameworks below.
Angular
<input class="input" :value="name" @input="name = $event.target.value" />
Svelte
<input class="input" bind:value={name} />
Vue
<input class="input" :value="name" @input="name = $event.target.value" />
Mitosis Compilation
Now that you have the Mitosis CLI setup, your component.lite.jsx file created, and a better understanding of how state works, it's time to generate your own framework files.
I like to keep my output files in a separate folder. To create that folder execute:
mkdir output
To start compiling open a terminal in the same directory as your component.lite.jsx file and run the below command:
mitosis compile --to=react component.lite.jsx > output/component.jsx
The --to= flag sets the framework that you compile your Mitosis component output to, followed by the location of your Mitosis input file component.lite.jsx, > represents where the output will be placed, and finally the output file location including any directory output/component.jsx.
After running the above example you will get the below React code.
React
Command:
mitosis compile --to=react component.lite.jsx > output/component.jsx
output/component.jsx
/** @jsx jsx */ import { jsx } from "@emotion/react";
import { useLocalObservable } from "mobx-react-lite";

export default function MyComponent(props) {
  const state = useLocalObservable(() => ({ name: "Alex" }));

  return (
    <div>
      {" "}
      <input
        css={{ color: "red" }}
        value={state.name}
        onChange={(event) => (state.name = event.target.value)}
      />
      Hello! I can run in React, Vue, Solid, or Liquid!
    </div>
  );
}
Angular
mitosis compile --to=angular component.lite.jsx > output/component.tsx
output/component.tsx
import { Component } from "@angular/core";

  @Component({
    selector: "my-component",
    template: `
      <div>
        <input
          class="input"
          [value]="name"
          (input)="name = $event.target.value"
        />
        Hello! I can run in React, Vue, Solid, or Liquid!
      </div>
    `,
    styles: [
      `
        .input {
          color: red;
        }
      `,
    ],
  })
  export default class MyComponent {
    name = "Alex";
  }
Svelte
mitosis compile --to=svelte component.lite.jsx > output/component.svelte
output/component.svelte
<script>
  let name = "Alex";
</script>

<style>
  .input {
    color: red;
  }
</style>
<div>
  <input class="input" bind:value="{name}" /> Hello! I can run in React, Vue,
  Solid, or Liquid!
</div>
Vue
mitosis compile --to=vue component.lite.jsx > output/component.vue
output/component.vue
<template>
  <div>
    <input class="input" :value="name" @input="name = $event.target.value" />
    Hello! I can run in React, Vue, Solid, or Liquid!
  </div>
</template>
<script>
  export default {
    name: "my-component",
    data: () => ({ name: "Alex" }),
  };
</script>
<style scoped>
  .input {
    color: red;
  }
</style>
Conclusion
Mitosis is the easiest way to future-proof your current development. If you're starting a new greenfield project, it will be even more important to future-proof, as well as far simpler to start writing from scratch rather than converting your current components.
Mitosis allows multiple teams to work on a single unified language no matter what framework they're using. This reduces the amount of duplicate components and lowers technical debt.
Have more questions? See the Mitosis Docs.
Full example can be found at https://github.com/codercatdev/mitosis-example

Top comments (0)