
After a long day of shooting bad guys and completing quests, our player deserves to go home and take a nice, long nap. Before they can do this, however, we need to give them a house with a bed. In this part we’re going to be doing that, as well as adding the ability for our Player to transition between scenes. We’re also going to be adding a “saloon” that the player can enter and exit as well as a day and night cycle that will change the color of our game depending on the time of the day!
WHAT YOU WILL LEARN IN THIS PART:
· How to trigger node visibilities via the Area2D node.
· How to change game scenes in the code.
· How to work with the CanvasModulate node.
· How to access the systems time.
This section will show you two ways of having your Player explore more of the world. One will show/hide nodes to simulate us entering existing buildings, and the other one will change the scene that your player is in — like what you’d get in Stardew Valley.
WORLD TRANSITIONS OPTION 1
Since our Player will be sleeping, we need to create a new scene for our player’s house. Create a new scene with a Node2D node as its root node. We used this node for our EnemySpawner and Main scene, so you should already be familiar with it. It’s the base node for Godot nodes, so it can contain any nodes. Rename the root node as “PlayerHouse” and save this scene under your Scenes folder.

This scene will have a TileMap node for the floor, and a Sprite2D node for the image of the roof. When our player enters the house, the roof will be hidden and the floor and furniture inside the house will be shown. When the player exits the house, the roof will be made visible again.
Let’s add a Tilemap node and rename it “Interior”. Then add a Sprite2D node and rename it “Exterior”.

You can assign the Exterior sprite node an image of the exterior of our house. This image can be found in your Assets > Buildings > House.png directory.

Temporarily change your Exterior node’s Alpha (A) modulate value to “20” so that we can see through our roof to draw in our floor. You can change the modulate value underneath Visibility > Modulate in your Inspector Panel.


Now we have the size of our house, we can assign a Tilesheet resource to our TileMap node so that we can draw in our floor and add our furniture. In your Tilemap’s Inspector panel, add a new tileset resource. In your Tileset panel below, add two new tilesheets: Interior and Atlas. These timesheets can be found in the root of your Assets folder.
Now draw in your floor using the wood tiles in your Atlas tilesheet. You don’t have to draw in terrains for this if you don’t want to — you can just draw them freely.

Then, reset your Exterior’s modulate value to display your roof with full visibility again. It should look like this:

Now, let’s add some furniture. You can add collisions to these tiles as we did in our Terrains part, but I’m going to do it another way today using pure collision shapes — just to speed things up! You should however add layers for your tiles so that we can draw our furniture on top of our floor.

Now, paint some furniture using the Furniture tilesheet. You can add any objects you want here — just make sure there’s enough space for your player to get to their bed.

Next, we need to add those collisions I talked about. We want our player to collide into each of our walls — as well as our furniture. To do this, we’ll add StaticBody2D nodes that will hold the collisions for our walls and furniture. A static body is a simple body that doesn’t move under physics simulation, i.e. it can’t be moved by external forces or contacts, but its transformation can still be updated manually by the user. It is ideal for implementing objects in the environment, such as walls or platforms. We’ll use this node as the container for our sky.

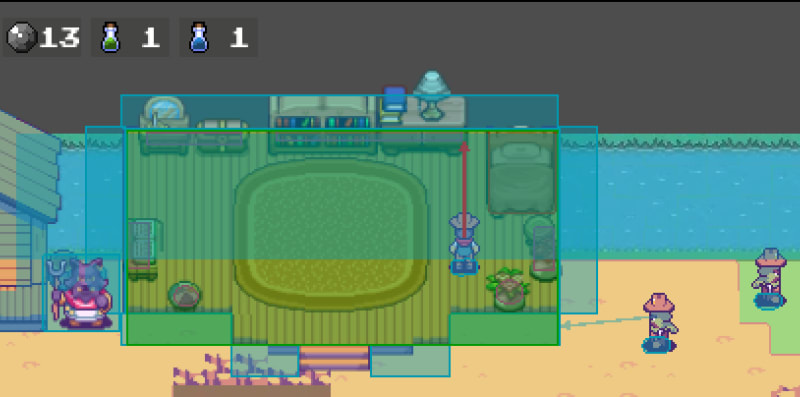
Add five StaticBody2D nodes and two Area2D nodes. Rename them as indicated in the image below.

You will see a warning appear next to each of these new StaticBody2D and Area2D nodes. That is because they need a collision area.
Let’s start with our Wall_Top node. Add a CollisionShape2D node to it. Make it a rectangle shape and draw it to be above the top of your TileMap node. This will ensure that our player does not go beyond this “wall”.

Do the same for the rest of your walls.

Now, for your furniture, add CollisionShapes2D nodes to them too (except your bed). This would’ve been quicker via physics layers, but I’m giving you creation options here! My collisions are highlighted in pink below.

Add a collision to your bed. Mine is highlighted in red below.

Now, let’s add a collision to our TriggerArea. The TriggerArea will trigger the exterior and interior to be shown or hidden. Make this area big enough to cover your entire floor. Mine is highlighted in green below.

Let’s add a script to our scene. Save it underneath your Scripts folder.

In this script, we want to show/hide our interior and exterior. We’ll have to connect our TriggerArea node’s body entered/exited signals to our script. If the player enters the trigger area, the interior will be made visible & exterior hidden — and vice versa for when they exit the trigger area.

    ###PlayerHouse.gd

    extends Node2D

    # Node refs
    @onready var exterior = $Exterior
    @onready var interior = $Interior

    func _on_trigger_area_body_entered(body):
        if body.is_in_group("player"):
            interior.show()
            exterior.hide()

    func _on_trigger_area_body_exited(body):
        if body.is_in_group("player"):
            interior.hide()
            exterior.show()
Hide your Interior node by default so that our furniture does not stick out on game load.

Instance your PlayerHouse node in your Main scene, and make sure that you put the node above your Player node in your scene tree so that your Player node shows in front of it. Please don’t place your house over any collision bodies — such as your water.

Now if you run your scene, and you run through the front door the roof should collapse and the interior should show. If you run out by the stairs, the roof should show, and the interior should be hidden. You should also not be able to run through your walls or furniture.

We have a problem now — anybody can enter our player’s house, especially enemies! To fix this, we’ll need to update our code to block our Enemy bodies. If they happen to stumble into our house, our code needs to redirect their movement back to the outside. We do this by redirecting their rotation every 4 seconds until they are out of our house.
    ###PlayerHouse.gd

    extends Node2D

    # Node refs
    @onready var exterior = $Exterior
    @onready var interior = $Interior

    func _on_trigger_area_body_entered(body):
        if body.is_in_group("player"):
            interior.show()
            exterior.hide()
        #prevent enemy from entering our direction
        elif body.is_in_group("enemy"):
            body.direction = -body.direction
            body.timer = 16
With our house set up, we can go ahead and tell our player to sleep if they interact with our bed. We can use the RayCast node to see if it hits any bodies named “Bed” (which will be our Bed StaticBody2D node). If it does, we’ll play an animation and restore our player’s stats. We already have the input for this setup underneath *ui_interact *— meaning we will press TAB close to our bed to go to sleep.
Let’s create our sleeping animation before we update our Player’s code. In your Player scenes AnimationPlayer, add a new animation called “sleeping”.

Before we add our animation track, we need to create the UI for it. We want our screen to show a “Sleeping” screen when we sleep. Underneath your UI layer in your Player scene, add a new ColorRect with a Label as its child. Rename the ColorRect to “SleepScreen”.

Change the SleepScreen node’s anchor preset to “Full Rect”, and its color to #d6c376.

Change the label’s text to “Snoozing…”. Change its font to “Schrödinger”; font size (20), and vertical and horizontal alignment (center). Its anchor-preset should be center.

Now back in our AnimationPlayer’s “sleeping” animation, we want to add an animation that makes our sleeping screen visible. We’ve done something like this before with our Game Over screen. Add a property track, connect it to your SleepScreen node, and select the property to be our modulate property.

We want our sleep screen to show for 3 seconds, so change the time to 3. Also add three keys at the following timestamps (0, 0.5, 2.5, 3).

Change the Alpha(A) value of your keyframe 0 and 3 to 0 (invisible). We want it to flow as invisible -> visible -> invisible. If you play your animation, it should flow as desired.


Set your SleepScreens visibility to be hidden.

Now in your Player script, underneath your ui_interact input, let’s check if the Raycast is hitting our Bed. If it is, we will play our sleepscreen animation, and restore our player’s health and stamina values.
    ### Player.gd

    func _input(event):
        #older code
        #interact with world
        elif event.is_action_pressed("ui_interact"):
            var target = ray_cast.get_collider()
            if target != null:
                if target.is_in_group("NPC"):
                    # Talk to NPC
                    target.dialog()
                    return
                #go to sleep
                if target.name == "Bed":
                    # play sleep screen
                    animation_player.play("sleeping")
                    health = max_health
                    stamina = max_stamina
                    health_updated.emit(health, max_health)
                    stamina_updated.emit(stamina, max_stamina)
                    return
For this to work, we need to enable our RayCast2D node to be able to collide with bodies (such as our Area2D body).

If you were to run your scene now and press TAB near your bed, your animation will play and your stats will refill!

WORLD TRANSITIONS OPTION 2
Now, let’s start on our second world transition. In this one, we’ll create a new scene for our saloon — you can make it an entirely different map if you want. This scene can be anything. It could be a beach area, a cave, a mansion — anything, but we’re going to create a simple saloon that will show us how to change complete areas via scene transitions.
We can duplicate our Main scene for this. Rename this scene as “Main_2” and detach the signals and the script. Also, remove all the painted tiles in your tilemap. We want this scene to be a blank sheet.

Now, it is here where you can go crazy and create the Saloon of your dreams — or if you don’t want to create a Saloon and you instead want your Player to travel to a new area such as a forest, go ahead and create that. Just remember to add Collisions (Physics Layers) to your tilemap if you are creating a new world map, just like we did in our Map creation tutorial.
I’m going to go ahead and make a Saloon.

Now that we have our new area, we need to add our collisions to our walls.

Next, we’ll need to add collisions to our furniture. To speed up this process, I’m going to add collisions to my furniture via the Physics Layers from the TileMap resource. You can do the same. If you forgot how, please refer to the documentation or our previous tutorial (part 4) on this.

Then add the TriggerArea collision by the exit or door to your scene. If our player runs through this, they’ll be transported back to our Main scene’s map.

Do the same in your Main scene so that we can go to the Main_2 scene.

In our Main_2 Scene, we also need to instance our Player scene again because this is where our player will “Spawn” if they enter the scene.

Next, let’s attach a new script to the root now of our Main_2 scene.

In this script, we want the player to be able to go back to the Main scene if they run through our Trigger Area. You might already have guessed that we will have to connect our body_entered() signal from our TriggerArea node to our Main_2 script to do this.

Also connect your Main scene’s TriggerArea body_entered signal to your Main script.

Okay now to change our scenes, we’ll need to keep track of the current scene that our player is in so that we can dynamically change our scene references. Currently, we are referencing our Main scene everywhere, so we will get errors when we go to our Main_2 scene.
For example, previously we had this path referencing in our scenes:
player = get_tree().root.get_node("/Main/Player")
What if we wanted to reuse this node in our Main_2 scene? Our game would crash because Main/Player does not exist in that tree! But with the help of our Global script, we can dynamically change the name of the scene based on the current scene that our player is in.
We will end up using something like this:
player = get_tree().root.get_node("%s/Player" % Global.current_scene_name)
Now, in our Global script, let’s set the name of our current loaded scene in our ready function. This could be “MainMenu”, “Menu”, or “Main_2”. We’ll change this later on in its own custom function.
    ### Global.gd

    extends Node

    # Scene resources
    @onready var pickups_scene = preload("res://Scenes/Pickup.tscn")
    @onready var enemy_scene = preload("res://Scenes/Enemy.tscn")
    @onready var bullet_scene = preload("res://Scenes/Bullet.tscn")
    @onready var enemy_bullet_scene = preload("res://Scenes/EnemyBullet.tscn")

    # Pickups
    enum Pickups { AMMO, STAMINA, HEALTH }

    # TileMap layers
    const WATER_LAYER = 0
    const GRASS_LAYER = 1
    const SAND_LAYER = 2
    const FOLIAGE_LAYER = 3
    const EXTERIOR_1_LAYER = 4
    const EXTERIOR_2_LAYER = 5

    # current scene
    var current_scene_name

    #set current scene on load
    func _ready():
        current_scene_name = get_tree().get_current_scene().name
Now in our other scripts, we can switch out all of our static “/Main/” paths to reference our current_scene_name variable instead. We’ll do this by formatting our path string using the % operator to insert the value of Global.current_scene_name. The %s is a placeholder for a string value, such as “Main”.
    ### Bullet.gd
    extends Area2D

    # Node refs
    @onready var tilemap = get_tree().root.get_node("%s/Map" % Global.current_scene_name)
    @onready var animated_sprite = $AnimatedSprite2D
    ### Enemy.gd

    # Node refs
    @onready var player = get_tree().root.get_node("%s/Player" % Global.current_scene_name)

    #will damage the enemy when they get hit
    func hit(damage):
        health -= damage
        if health > 0:
            #damage
            animation_player.play("damage")
        else:
            #death
            #stop movement
            timer_node.stop()
            direction = Vector2.ZERO
            #stop health regeneration
            set_process(false)
            #trigger animation finished signal
            is_attacking = true
            #Finally, we play the death animation
            animation_sprite.play("death")
            #add xp values
            player.update_xp(70)
            death.emit()
            #drop loot randomly at a 90% chance
            if rng.randf() < 0.9:
                var pickup = Global.pickups_scene.instantiate()
                pickup.item = rng.randi() % 3 #we have three pickups in our enum
                get_tree().root.get_node("%s/PickupSpawner/SpawnedPickups" % Global.current_scene_name).call_deferred("add_child", pickup)
                pickup.position = position

    # Bullet & removal
    func _on_animated_sprite_2d_animation_finished():
        if animation_sprite.animation == "death":
            get_tree().queue_delete(self)
        is_attacking = false
        # Instantiate Bullet
        if animation_sprite.animation.begins_with("attack_"):
            var bullet = Global.enemy_bullet_scene.instantiate()
            bullet.damage = bullet_damage
            bullet.direction = new_direction.normalized()
            # Place it 8 pixels away in front of the enemy
            bullet.position = player.position + new_direction.normalized() * 8
            get_tree().root.get_node("%s" % Global.current_scene_name).add_child(bullet)
    ### EnemyBullet.gd
    extends Area2D

    # Node refs
    @onready var tilemap = get_tree().root.get_node("%s/Map" % Global.current_scene_name)
    @onready var animated_sprite = $AnimatedSprite2D
    ###EnemySpawner.gd

    extends Node2D

    # Node refs
    @onready var spawned_enemies = $SpawnedEnemies
    @onready var tilemap = get_tree().root.get_node("%s/Map" % Global.current_scene_name)
    ### NPC
    extends CharacterBody2D

    # Node refs
    @onready var dialog_popup = get_tree().root.get_node("%s/Player/UI/DialogPopup" % Global.current_scene_name)
    @onready var player = get_tree().root.get_node("%s/Player" % Global.current_scene_name)
    @onready var animation_sprite = $AnimatedSprite2D
    ### PickupSpawner.gd

    extends Node2D

    # Node refs
    @onready var map = get_tree().root.get_node("%s/Map" % Global.current_scene_name)
    @onready var spawned_pickups = $SpawnedPickups
    ### Player.gd

    # Reset Animation states
    func _on_animated_sprite_2d_animation_finished():
        is_attacking = false

        # Instantiate Bullet
        if animation_sprite.animation.begins_with("attack_"):
            var bullet = Global.bullet_scene.instantiate()
            bullet.damage = bullet_damage
            bullet.direction = new_direction.normalized()
            # Place it 4-5 pixels away in front of the player
            bullet.position = position + new_direction.normalized() * 4
            get_tree().root.get_node("%s" % Global.current_scene_name).add_child(bullet)
    ### QuestItem.gd

    extends Area2D

    #npc node reference
    @onready var npc = get_tree().root.get_node("%s/SpawnedNPC/NPC" % Global.current_scene_name)
Let’s create a function that will allow us to change scenes in our Global script. This will update our scene name to be the current scene that our player is in. In this function, we will get the current scene and then free it. So if our current scene is our Main scene, and we are moving to the Main_2 scene, it will get our Main and free it from our scene tree. Then it will load and instantiate our new scene and add our new scene as a child of the root node. Finally, it will set the new scene as the current scene.
This sequence of operations effectively replaces the current scene with the new one. We’ll also later on load the player’s data (such as their health, coins, pickup amounts, etc.) when the player enters their new scene after we’ve added our saving & loading system. This will fix the issue of the data not persisting when our player changes areas. Then, when the player leaves an area it will save their data so that it can be loaded when they enter the new area.
    ### Global.gd

    extends Node

    # Scene resources
    @onready var pickups_scene = preload("res://Scenes/Pickup.tscn")
    @onready var enemy_scene = preload("res://Scenes/Enemy.tscn")
    @onready var bullet_scene = preload("res://Scenes/Bullet.tscn")
    @onready var enemy_bullet_scene = preload("res://Scenes/EnemyBullet.tscn")

    # Pickups
    enum Pickups { AMMO, STAMINA, HEALTH }

    # TileMap layers
    const WATER_LAYER = 0
    const GRASS_LAYER = 1
    const SAND_LAYER = 2
    const FOLIAGE_LAYER = 3
    const EXTERIOR_1_LAYER = 4
    const EXTERIOR_2_LAYER = 5

    # current scene
    var current_scene_name

    # ----------------------- Scene handling ----------------------------
    #set current scene on load
    func _ready():
        current_scene_name = get_tree().get_current_scene().name

     # Change scene
    func change_scene(scene_path):
        # Get the current scene
        current_scene_name = scene_path.get_file().get_basename()
        var current_scene = get_tree().get_root().get_child(get_tree().get_root().get_child_count() - 1)
        # Free it for the new scene
        current_scene.queue_free()
        # Change the scene
        var new_scene = load(scene_path).instantiate()
        get_tree().get_root().call_deferred("add_child", new_scene)
        get_tree().call_deferred("set_current_scene", new_scene)
Now in our Main and Main_2 scripts we can change our scene via this Global function by calling it and passing the scene path that we want to change to as a parameter. We’ll then queue_free the scene so that Main or Main_2 is effectively removed from our scene tree.
    ### Main.gd

    extends Node2D

    # Change scene
    func _on_trigger_area_body_entered(body):
        if body.is_in_group("player"):
            Global.change_scene("res://Scenes/Main_2.tscn")

    queue_free()
    ### Main_2.gd

    extends Node2D

    # Change scene
    func _on_trigger_area_body_entered(body):
        if body.is_in_group("player"):
            Global.change_scene("res://Scenes/Main.tscn")
            queue_free()
In our Main scenes, we now free our scene resources directly after changing our scene. When you call queue_free(), it doesn’t immediately delete the node. It schedules the node to be deleted at the end of the current frame or later when it’s safe to do so.
Hence, there’s a chance that our old scene will still be present before the new scene is properly set. The queue_free() function is asynchronous for good reasons, to prevent situations where nodes get deleted while they are still in use. To avoid this potential race condition between scene switching and auto-saving, we can use a signal in our Global script that gets emitted once a scene has fully transitioned.
    ### Global.gd

    # older code

    #notifies scene change
    signal scene_changed()
Then, we emit this signal in our change_scene function after we’ve loaded the new scene.
    ### Global.gd

    # older code

     # Change scene
    func change_scene(scene_path):
        # Get the current scene
        current_scene_name = scene_path.get_file().get_basename()
        var current_scene = get_tree().get_root().get_child(get_tree().get_root().get_child_count() - 1)
        # Free it for the new scene
        current_scene.queue_free()
        # Change the scene
        var new_scene = load(scene_path).instantiate()
        get_tree().get_root().call_deferred("add_child", new_scene)
        get_tree().call_deferred("set_current_scene", new_scene)
        call_deferred("post_scene_change_initialization")

    func post_scene_change_initialization():
        scene_changed.emit()
Then, in Main.gd and Main_2.gd, you connect to this signal and queue_free when it’s emitted:
    ### Main.gd

    extends Node2D

    # Change scene
    func _on_trigger_area_body_entered(body):
        if body.is_in_group("player"):
            Global.change_scene("res://Scenes/Main_2.tscn")
            Global.scene_changed.connect(_on_scene_changed)

    #only after scene has been changed, do we free our resource
    func _on_scene_changed():
        queue_free()
    ### Main_2.gd

    extends Node2D

    # Change scene
    func _on_trigger_area_body_entered(body):
        if body.is_in_group("player"):
            Global.change_scene("res://Scenes/Main.tscn")
            Global.scene_changed.connect(_on_scene_changed)

    #only after scene has been changed, do we free our resource
    func _on_scene_changed():
        queue_free()
Now if you run your scene and you run into your trigger areas, your scenes should change and your player and other entities should spawn! Remember to place your Player node in an area where they can spawn in both scenes.


REALTIME DAY/NIGHT CYCLE
Now that our Player can travel to other areas, and they aren’t homeless anymore, let’s add some realism to these new areas by giving our game some “time”. We’ll do this via a real-time day/night cycle. This means that the color of our scenes will change to match the current time that the Player is playing. So, if you’re playing the game in the afternoon, it will be afternoon time in the game, and so forth!
You can skip this if you don’t want such a system in your game, but if you want to stick around and see how this works, let’s get started.
In our project, let’s create a new scene with a Node2D node as its root. This is the base node for our 2D games, and we’re using it because it can contain and call any other node. Rename this node as “Sky” and save the scene under your Scenes folder.

For our Sky, we’ll tint the sky according to the colors of our sky when we transition from day to night. I’ll be using this color palette as my reference for this. We want to tint our entire screen. Now you can do this with a normal ColorRect node that you drag to be the size of your screen, or you can take the easier route and add a CanvasModulate node. This node tints the entire canvas element using its assigned color.

Add a CanvasModulate node to your Sky scene.

You’ll see that it only has a Color property that you can change in the Inspector panel.

Now, we want this canvas to change color according to the time of the day. You might be thinking of using a Timer node with a few conditionals for this, but for a smooth transition between our colors, we need to use an AnimationPlayer node instead. We’ll add a bunch of color tracks to the CanvasModule node in an animation, and according to the time of the day, the color would slowly transition on the animation timeline.
This might sound complex, but don’t worry — you’ll get it in a minute! Add an AnimationPlayer node to your Sky scene.

In your AnimationPlayer node, add a new animation called “day_night_cycle”.

In real life, our day-to-night cycle lasts 24 hours, so set the animation length to also be 24. We’ll add code later on that will seek the second on the timeline and assign a color to that in relation to our time in real life. So if it is 5 AM in real life, then the animation player will return the color that is set on the 5-second mark in our timeline.

We want to change the color property of our CanvasModulate node, so let’s add a Property Track that’s connected to our canvas node and select “Color” as the property to change.

Okay, so for our day_night_cyle we have six colors that we need to assign to six timeslots:
early morning -> between 12 AM — 3 AM
morning -> between 3 AM — 5 AM
day -> between 6 AM — 3 PM
afternoon -> between 3 PM — 5 PM
late afternoon -> between 5 PM — 7 PM
night -> between 7 PM — 12 AM
Change these times to suit the area that you live in, but in my country, that is the approximate time that the color of the sky would change. Let’s assign these timeslots to our animation timeline. Assign six keys to where you want the time to change.

Now in the Inspector panel, assign the values from our color palette to each of these times. Remember to start with the night color and end with the night color.
early morning -> between 12 AM — 3 AM -> #292965
morning -> between 3 AM — 5 AM -> #6696ba
day -> between 6 AM — 3 PM -> #e2e38b
afternoon -> between 3 PM — 5 PM -> #e7a553
late afternoon-> between 5 PM — 7 PM -> #7e4b68
night -> between 7 PM — 12 AM -> #292965

Now if you add a Sprite2D node into your scene and you run your animation, the color should change according to where the timeline’s keyframe is currently at. Remember to delete this Sprite2D node afterward because this Sky scene will be instanced in our Main scene!

Let’s add a script to our Scene. Save it under your Scripts folder.

We want our current time in hours, minutes, and seconds to be calculated constantly throughout the game so that we can assign the current time to the *day_night_cycle *animation’s **timeline. Let’s define a few variables to store our current time, our current time in seconds, and then the value of our seconds mapped to our value on our animation timeline.
    ### Sky.gd

    extends Node2D

    #time variables
    var current_time
    var time_to_seconds
    var seconds_to_timeline
This will make more sense in a minute. We simply want to do a calculation that gets our current time. Then with that current time, we convert it into seconds. And then with those seconds, we play the animation at that keyframe range on our animation timeline (so if we returned 9.864 seconds, the animation at 9.864 on the timeline will play). We want this animation to be calculated constantly, so we’ll do this in our _process() function.
To get the current time, we will use our Time object. We used this before in our Player scene to get the reload time for our bullets.
    ### Sky.gd

    #calculate the time
    func _process(delta):
        #gets the current time
        current_time = Time.get_time_dict_from_system()
Then we’ll call the current_time value’s hours, minutes, and seconds, and we’ll convert the total current_time value into seconds.
    ### Sky.gd

    #older code

    #calculate the time
    func _process(delta):
        #gets the current time
        current_time = Time.get_time_dict_from_system()
        #converts the current time into seconds
        time_to_seconds  =  current_time.hour * 3600 + current_time.minute * 60 + current_time.second
With our *time_to_seconds *value, we need to use our remap() method to calculate the linear interpolation within a range. In programming, lerp (linear interpolation) is a common function used in various fields, such as game development, graphics, and animation. It’s used to find a value that is a specific blend between two other values.
We will use our remap() method to convert our time_to_seconds into a value that can be used in our animation timeline. We’ll do this by scaling it from a range of [0, 86400] to [0, 24]. 86400 is the number of seconds in a day, and 24 could be representing the total frames or units of an animation timeline representing 24 hours (remember we set it to 24 seconds).
    ### Sky.gd

    #older code

    #calculate the time
    func _process(delta):
        #gets the current time
        current_time = Time.get_time_dict_from_system()

        #converts the current time into seconds
        time_to_seconds  =  current_time.hour * 3600 + current_time.minute * 60 + current_time.second

        #converts the seconds into a remap value for our animation timeline
        seconds_to_timeline = remap(time_to_seconds, 0, 86400, 0, 24)
Now we can use our seconds_to_timeline value to play the animation on our timeline.
### Sky.gd

extends Node2D
# Node refs
@onready var animation_player = $AnimationPlayer

#time variables
var current_time
var time_to_seconds
var seconds_to_timeline

#calculate the time
func _process(delta):
    #gets the current time
    current_time = Time.get_time_dict_from_system()
    #converts the current time into seconds
    time_to_seconds  =  current_time.hour * 3600 + current_time.minute * 60 + current_time.second
    #converts the seconds into a remap value for our animation timeline
    seconds_to_timeline = remap(time_to_seconds, 0, 86400, 0, 24)
    #plays the animation at that second value on the timeline
    animation_player.seek(seconds_to_timeline)
    animation_player.play("day_night_cycle")
And so, our day-night cycle is complete. All we need to do is go back to our Main scene and instance our Sky scene!

By the time I was writing this, it was the afternoon in my area — so my color should be in my “afternoon” range when I now run my scene:

You can always tweak your colors if you want. Let’s test the other times to see if it would work. Make sure your game scene is still running to test this.
In your computer settings, under “Date and Time”, disable the feature to “Set Time Automatically” and change the time to a different time, such as 11 PM.

If you go back to the running instance of your game, your scene should now be the color of your system’s new time!
11 PM:

6 PM:

2 AM:

These colors are a bit dark for my taste, so I recommend you tweak them. There you have it, two new ways to transition into new areas in your game plus a day-and-night cycle! We’re so close to the end of this tutorial series, with the only thing left to do is to add a pause and main menu, saving and loading, and music & sound effects to our game! Remember to save your project, and I’ll see you in the next part.
The final source code for this part should look like this.

FULL TUTORIAL

The tutorial series has 23 chapters. I’ll be releasing all of the chapters in sectional daily parts over the next couple of weeks.
If you like this series or want to skip the wait and access the offline, full version of the tutorial series, you can support me by buying the offline booklet for just $4 on Ko-fi!😊
You can find the updated list of the tutorial links for all 23 parts in this series here.

Top comments (6)
When I put the house near the water, then inside the house the water blocks the passage. How can I fix it or reset it?
You should place the house on the ground terrain. If you place the house over the water, then the water's collision will block it. Try moving the house onto the sand and see if it works?
Wahhh,Nice Tutorial and explaination.Now i realized that Godot is better than unity for 2D game Development.
Thanks! I think so too! 😊
Awesome tutorial! Going through the PDF (highly recommend to support such an effort) and loving it so far. Nice work, Christine!
Thank you so much! I really appreciate your support! 💛💎