
Welcome back to our Dusty Trails tutorial series! If you missed the previous part, you can find the links to it at the end of this tutorial.
We now have a functioning player, well, sort of, we still have a lot to add to our little person to make them a real game hero! But for now, our player has to wait, because in this part we are going to add our games TileMap with collisions, as well as add a Camera2D to our game so that we can follow our player around. We didn’t add the camera node during the player setup section of this tutorial because the camera node does not work without some sort of background, which is our tilemap.
WHAT YOU WILL LEARN IN THIS PART:
· How to work with sprite sheets for the TileMap node.
· How to work with the TileMap and TileSheet panels.
· How to use the TileMap tools to paint tiles onto the map.
· How to create tilemap layers, as well as physics and terrain layers.
· How to add a camera to your player.
First things first, what is a tilemap or tileset? Well, tilemaps are the base for building a game world or level map out of small, regular-shaped images called tiles. These tiles are stored in something we call an atlas, tileset, or spritesheet, which we’ve seen before when adding our animations. In other words, the tileset is the actual graphics of the tilemap.
What is the difference between a TileMap and a TileSet?
The TileMap is the grid where you place tiles from the Tileset to actually build your level. A Tileset is a collection of tiles that you can use to build your level.


Figure 1: TileSet (left) and a TileMap (right)
In our Main scene, we can add a new node of type TileMap. Click and drag this node so that it is behind our Player scene, otherwise, the player will be hidden by our map!


Let’s rename this node as Map, and in the Inspector panel, click on next to TileSet to create a new tileset.

You will see two new options pop up below: TileMap and TileSet.

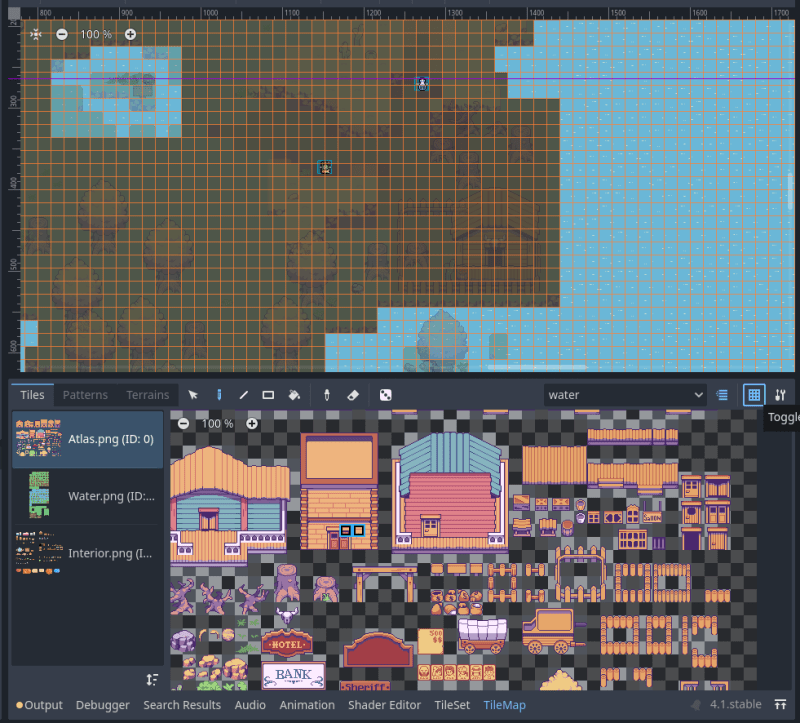
To create our TileMap (which is the map we will draw on our screen), we first need to assign it a TileSet (which is the image we will draw from). To do this, click on the TileSet option, and open your Assets folder in your FileSystem panel. You will see that I gave you three tilesets: Interior, Water, and Atlas. We will use these tilesets to create our world.
You can drag these tilesheet into the Tiles option in your TileSet panel.

A popup will arise asking you if you want the engine to create automatic tiles. Say yes to this prompt, because this will break our image into nice squares to form a grid.

You can now change the tilesheets name, ID, and grid separation values. Change your names and ID’s as follows:

Now if we go back to the TileMap panel, we can see that our tiles have been added. You can now click on the tilesheet and start painting the images onto the screen.

Here is a brief overview of the tools present in the TileMaps panel:
![]()

The next part will be a bit confusing, so I’m going to try and break it down into sections so that you can better understand the concepts. If things get a bit too complex for you, please download the Map scene that I created and drag in the Map node from the scene into your Main scene.
Map Creation
1. Terrain Layers Introduction (Auto-Tiling)
We can paint or create our map with just the paint tools provided, but our environment would look pretty bland, especially for our terrain. To make things easier for us, we can make use of something called autotiles.
Terrains — also referred to as autotiles, create organic terrain shapes that will autonomously draw corners and edges in the area that we tell them to. This removes the tediousness of manually placing down edges and sides of say grass patches or water bodies while trying to create interesting-looking terrains ourselves.

To create autotiles, simply go over to the Inspector panel, click on the TileSet resource (the one with the image), and underneath Terrain Sets add a terrain set element. Remember to add an element to the terrain set element as well.


You can create different terrain sets for different terrain elements. For example, you’ll put your grass autotile on one set, and your dirt autotile on another set, and so forth.
Let’s create terrain elements for grass, sand, and water. You will see from the image below, that I have a Sand_Dessert and a Sand_Forest. That is just to show you that you can have multiple sands in one terrain element set. Grass, sand, and water, in my case, are all in different sets, but the sand elements are in the same set.

2. TileMap Layers
While we’re at it, let’s also create layers so that we can paint these elements on separate layers so that they can overlap. If we paint on the same layer, the tiles will erase each other.

To add a new layer, simply go into the Inspector panel, and underneath the Layers property, add a new layer element. Let’s add one for each of our terrain sets: water, grass, and sand.


3. Terrain Layer Creation (Auto-Tiling)
We can now paint on our layers separately. But first, let’s create those autotiles. In your Tileset panel, on top, you’ll see three options: setup, select, and paint.

In setup, we’ve already seen that it is here where we can change the name and ID of our tileset. In our select panel, after we’ve added layers such as our terrain or physics layers from the TileMap properties, we can change the properties of tiles, i.e., add collisions or autotiling to groups of tiles via selecting them and then changing them. In the paint panel, we can do the same as in the select panel, but this time we can just paint these properties onto our tiles, i.e., painting collisions to multiple tiles at once.

Figure 8: TileSet Modes overview
a. Autotiling in the Select Panel
Remember, the select panel only allows us to select individual or multiple tiles and then change their properties via the properties panel.
You’ll see that our Terrains property has two numerical values: -1 for the Terrain set, and -1 for Terrain. This refers to the ID of our terrain sets and terrain elements. -1 means “no terrain set” or “no terrain” (it will erase the terrain), which means you must set Terrain Set to 0 or greater before you can set Terrain to 0 or greater.

For our terrains, we have three terrain sets, one for sand, water, and grass. In each of those terrain sets, we have terrain elements. For our sand terrain set, we have the Sand_Dessert terrain element and the Sand_Forest terrain element. For our water terrain set, we only have the water terrain element. And for our grass terrain set, we only have the grass terrain element. I hope this is making sense because it might be a bit confusing or overwhelming.
For our terrain layers, our elements will correlate as follows:

Let’s add autotiles to terrain set 0 (sand), terrain element 0 (Sand_Dessert). We’re going to use our Atlas.png tileset for this. Now we can go ahead and select our sand tiles. I’m going to select the top-left tile.

Now, we’ll have to assign the bit-peering values for these tiles. The peering bits determine which tile will be placed depending on neighboring tiles. -1 is a special value that refers to empty space.
For example, if a tile has all its bits set to 0 or greater, it will only appear if all its neighboring tiles are using a tile with the same terrain ID. If a tile has its bits set to 0 or greater, but the top-left, top, and top-right bits are set to -1, it will only appear if there is empty space on top of it (including diagonally).

When we assign this value, we want to avoid assigning values to obvious corners or sharp edges.
If we go back to our TileMaps panel, underneath our Sand_Dessert terrain element, we can now paint our newly created autotile onto the map. Now this won’t do anything because we need to add the other sand tiles. For this, we will speed it up via the paint panel, where we can paint the bit peerings directly onto the terrain.

b. Autotiling in the Paint Panel
In your TileSet panel, underneath paint, you can see that you can select your terrain sets and elements directly, without providing its ID.


Let's make sure that our terrain set element for Sand_Dessert is selected and, on your tiles, start drawing in the bit peerings directly. Remember to avoid corners, sharp edges, or lines. To add a bit value, left click on your mouse on the tile. If you need to erase a bit value, just right-click on your added bit value to remove it.

Now if you go back into your TileMap panel, you will see your other tiles added to your terrain set autotile. If you select your Sand_Dessert terrain and start drawing on your map, you'll see that it automatically draws nice, organic terrains.

We can now go ahead and create autotiles for the rest of our terrain set elements. If you cannot see your bit blocks, you can always change the terrain element color in the Inspector panel underneath Terrain Sets > Element > Color.

This is the terrain bits for our Sand_Forest autotille (using Water.png tileset):

This is the terrain bits for our Grass autotille (using Atlas.png tileset):

This is the terrain bits for our Water autotille (using Water.png tileset):

4. Painting Our Terrain
For our game, I will use my rectangle tool to draw a semi-large area of water using the water autotile. How large you draw this rectangle does not matter, what matters is how many objects you add to it. Too many items in a singular scene will take up a lot of memory. So just keep that in mind.

I don't want my player to run over this water, so this will be the bounds of my map, i.e., the player will stop when they run into water. We'll add the collisions for this water in a second.
Next, on our grass layer, I'm going to draw the land for my map. Go crazy with this design. Just keep in mind your navigation paths for your map. If you want a better idea of the workflow behind designing maps, go and look at this article. I'm just creating this map for tutorial's sake, so whatever I end up with does not matter since I will not be selling or releasing this game!

Figure 2: Example of a map layout

We also will draw the collisions in for the edges of the grass tiles later on. Let's finally add our sand to our sand layer. I'll only be adding a few pieces of the Sand_Forest tiles since the grass edges don't match our main grass. I just created it to show you how the sets work.

You can add the grass from the Water.png tilesheet if you want to create different environments/sections for your maps.
5. Adding World Items
Now that we have our terrain set down (remember, you can always make changes to it later on), we can go ahead and add things like flowers, trees, and even buildings. Before we do this though, let's add collisions to our tiles so that our player can run into items.
For this, we need to add physics layers to our TileMap. In your Inspector Panel, make sure your tileset resource is selected, and underneath Physics Layers add a new element.

After creating a physics layer, you will now have access to the Physics Layer option in the TileSet panel.

We can now add collisions by either adding them in the select panel or the paint panel. Let's do it again both ways.
a. Collisions in the Select Panel
In our select panel, let's add some collisions to our tree in our Atlas.png tilesheet. We don't want our player to be able to run through this tree at all, so select the bottom left root of the tree, and underneath Physics Layer > Polygons, we can start drawing in our collisions in that little box. Let's border the entire image outline. You can edit and delete the points with point tools above the box once you've completed your border.

Once you've finished drawing your collisions border or outline, and you've connected your last points, you will see that the shape drawn turns red. This means it now has a collision polygon added to it.

b. Collisions in the Paint Panel
You can also paint your collisions onto your shape via the paint panel. Select your Physics Layer in your paint panel and click on another tree tile. If you click on it, a box will appear. The blue means that a collision shape has been added to the entire tile, but you can drag in new points to outline the shape you want.


Now, click on the tile you want to assign the collision shape to - to assign it. You can also paint this collision shape onto multiple tiles if you'd like.

I'm not going to do that, so let's go ahead and draw in the collision shapes for the rest of our tree.

Let's create a new layer and call it foliage.

Now on this layer, select the tiles that make up the tree, and paint it onto your map (close to your player).

You can also go ahead and use your select tool to select the entire tree to create a pattern of the tree so that we don't have to keep on re-selecting all the tiles just to create new trees.
You can just copy and paste or drag this selected item into the Patterns panel in your TileMap option.

Now you can easily paint your tree as a singular object.

If you run your scene, you will now see that your player runs into the trees, and not through them. Let's add collisions to other objects, such as rocks, and our terrain edges.

You can go ahead and add collisions to your water and anything else you want to add to your world! Also, don't forget to create patterns for your tiles.


6. Create Your Map
You can also use the scattering tool (the dice icon) to place these tiles randomly on the map. The higher the scattering value, the fewer tiles will be placed in a close radius of each other.

I'm going to go ahead and create a basic map with placeholder buildings and such. Really let your creativity flow here.

**Note that if you notice that your player isn't moving, it's because of the water collisions. You can fix this problem by just removing the water tiles from underneath your land/ground.*

Player Camera
Okay, now that we have our map, we will notice that if we run our scene, our player will run off of the map and we can't follow them! To fix this issue, we need to add a camera to our player. If you want to capture your entire world, you will attach the camera to your main scene, but if you want to follow a specific character around, you will attach the camera to their scene.
Let's open up our Player scene, and in the Scene Dock, let's add a Camera2D node.

You will notice that it creates a purple border around your player. This is the camera frame, and we can add limits to these edges so that our player cannot see beyond a certain point in our map. Since we only have water around our map, we do not need to worry about this limit for now.


And that's it for this part. I know this was a very long section, and it might have even overwhelmed you a bit, but don't worry because in the next part of this tutorial series, we will be doing something new and simple when we start creating the game's GUI. Remember to save your game project, and I'll see you in the next part.
Your final code for this part should look like this.

FULL TUTORIAL

The tutorial series has 23 chapters. I’ll be releasing all of the chapters in sectional daily parts over the next couple of weeks.
If you like this series or want to skip the wait and access the offline, full version of the tutorial series, you can support me by buying the offline booklet for just $4 on Ko-fi!😊
You can find the updated list of the tutorial links for all 23 parts in this series here.

Top comments (18)
Great tutorial! :)
It seems really easy to do it
Thank you! I hope you found it helpful 😊
For sure!
Hey Christine While Drawing the map , I observed that only my water tilemap was showing in the main scene. I used z indexing to get around that?. Was that okay or will there be some issue with this?
Hey Nayan, can you attach an image of your scene tree in the comments so I can have a look? If you can run around then it should be fine.
Hey Christine I had a doubt. I would really like my godot to look as clean as yours when I am drying a map. How do i change it from it being always showing grid?
Hey Nayan! I'm sorry you're having issues. If you look next to your Layers property in your panel below, you will see the option to turn off your Grid (it's the icon that looks like a block with a bunch of squares).
You can press that to toggle your grid view on and off. This should fix your problem!

Furthermore, if you were referring to the way your nodes snap on the grid, then you can also toggle your Smart Snapping off. This is the magnet icon with small grids above. This allows you to move nodes around more freely.
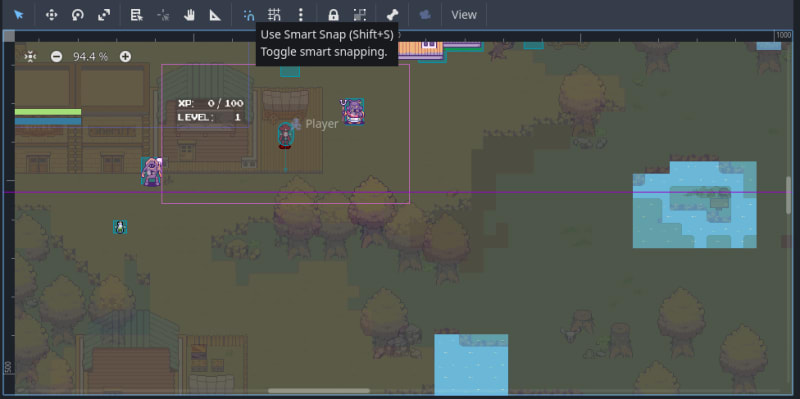
You can also toggle your entire scene's grid on and off via the Grid Snap menu. This is the magnet icon with large grids above. This is just used for guidelines when working with your scene.

Let me know if this helped, or if you need further assistance!😊
I know this tutorial uses 4.1.1, but not knowing how different they were, I started with my version of Godot 4.3, and I'm at the part where you create the TileMap Layers. It's different now, with Godot recommending using TileMapLayer instead; I attempted to look up the differences, but I'm not sure where I should be creating those layers, or if I should make a layer for each terrain set (but then, how would I link it all to the Main Map)? Do you have any advice for this? I was really looking forward to learning Godot with this project
EDIT: I wound up creating a 2D node, labeled "Map" and put in the TileMapLayers underneath it. the Interior has the "Exterior (ID: 0)" tileset and so on. The Exterior has 2 terrain sets, Sand and Grass; the Water has the water terrain.
I've no idea if this is the right way to do things for this project. But looking up tutorials seemed to have the different layers simply be different TileMapLayers?
I have the same problem. Have you solved it? Otherwise I have to abandon this tutorial...
this post might help you?
forum.godotengine.org/t/tileset-te...
the documentation for the new terrian stuff is pretty confusing but someone put together a pdf that kind of explains it
Regarding: "That is just to show you that you can have multiple sands in one terrain element set."
Is this just a logical grouping, so that you can keep all sands in the terrain set organized? Or is there some practical reason to group it that way that the engine recognizes?
Please disregard. I understand now.****
I should have said "functional" rather than "practical".
Hi Christine! This step "A popup will arise asking you if you want the engine to create automatic tiles." did not happen when I dragged the tilesets over.
After playing around with it a bit more, researching bugs, etc...I discovered that it was because I dragged all three PNGs at the same time. I did not realize that they had to be dragged over one at a time. Perhaps the instructions can be modified to highlight this?
looks like the tiling system has changed quite a bit since this was made, for understanding the new terrian stuff i found this post super helpful
forum.godotengine.org/t/tileset-te...
I also found after reading through the post and a bit of trial and error this pattern makes a (fairly?) workable autotiling
you might have to go back over drawn areas to update them when you add new tiles by them but it otherwise should work :3 I intend to keep trying to figure this stuff out, wish me luck lol
Help, I'm getting some kind of warning: The TileMap is deprecated as it is superseded by the use of multiple TileMapLayer nodes.
the newer version of godot has changed the autotiling to a new terrian thing, it's still not super great yet, and the documentation on godot's site is also not very good, this post was pretty helpful for understanding the way the terrian stuff works though so it might help you
forum.godotengine.org/t/tileset-te...