
Introduction
ASP.NET likewise gives the element of Databinding, utilizing Databinding you can append any server controls to different articulations, assortments, even techniques, or properties. There is likewise the effortlessness to choose an information source, which can be a static record, a data set, or some other source.
Hence ASP.NET Databinding gives a straightforward way of building a connection between server the executives and application information.
Prerequisites
To follow along, you need:
- To have visual studio introduced on your PC.
- An essential comprehension of C# language.
Table of content
Concepts of Databinding in ASP.NET
Databinding in ASP.NET makes it more straightforward to consolidate an ASP.NET code with the results of database queries, collection, technique calls, and properties. Through data binding with web control and ADO.NET, control content can be moved, from the Structured Query Language (SQL) select queries.
ASP.NET gives two kinds of restricting, which are:
- Declarative information binding.
- Simple information binding.
Very few controls support both of them, but the rest supports simple data binding
by default.
Below is a diagrammatic illustration of the Data binding concept in ASP.NET
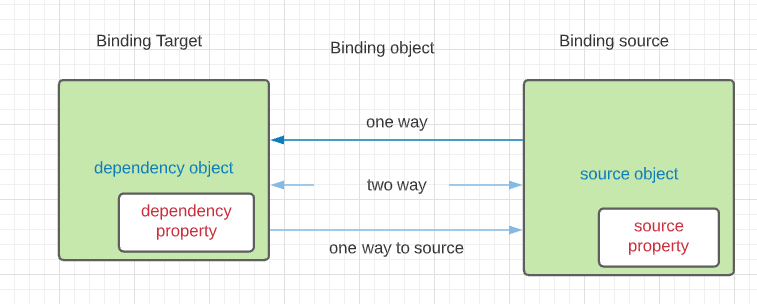
Wordings utilized in the chart above
- Source object - holds the organization data.
- Dependency object - object identified with the binding target.
- Source property - the value of this source object property, is the real data.
- Binding target - Data is tied to this user interface element.
- Dependency Property - data is tied to this attribute of the dependence object.
- Binding source - application data variable where organization data is held.
Let’s consider restricting text property with worker name, the relations are as per the following:
- Name- property.
- Text - Target property.
- Worker - association object.
- Textbox - target object.
Restricting decides the transmission of information back and forth between the source and the objective.
On account of single direction restricting, component information is quickly identified in the association object, whenever any kind of change is implemented in the UI.
When the UI is informative and the associated data is read-only then the one-way binding will be useful.
Two-way restricting is when there is synchronization in the information at the two finishes (target objects and source objects) consequently.
Moreover, intuitive UI structures are made in two-way binding, where back-end factors are refreshed instantly.
On account of one-way binding, any adjustment of the UI, component information is quickly recognized in the association object. Additionally, the opposite isn't permitted.
This sort of connecting is useful when information yield relies just upon the client inputs and constant re-assessment is required.
What is Databinding?
Before we move forward, let us have a look at Databinding in general.
The action of establishing a link between organization data and the User Interface is called data binding.
One may be curious to know if there is a difference between Databinding and displaying data on the user interface. There is an extremely large distinction. In the event that Databinding isn't done accurately, any change made isn't consequently recognized on the user interface. This is the fundamental contrast between the two.
User interface components are continually watching the information factors relegated to them. Any change on the upsides of the factors, the client components are told to refresh the change immediately.
The calculator in our smart gadgets is a certifiable situation of one-way binding.
How to create Databinding in ASP.NET
The following is a bit-by-bit manual for making Databinding in ASP.NET. In this aide, we will make a basic three control WPF application, that incorporates a text block, a slider, and a progress bar.
Step 1
Open visual studio and select, create new project

Step 2
In the new project wizard, select WPF APP (.NET FRAMEWORK) and select next.

Step 3
Configure the default details and select create.

Step 4
Then in the shell application created, drag and drop from the toolbox, progress bar, a slider, and a text block.
In this case, the progress-bar value and the textbox are what we will bind to control the value of the slider.

Step 5
To tie the text property of the text block add the accompanying code,
Text="{Binding Value, ElementName=slider}"
Furthermore, the Value property of the Progress Bar utilize the accompanying code,
Value="{Binding Value, Element Name=slider}"
By doing so, you bind the properties to the value of the slider.

Step 6
Run the application by selecting start, you would see the slider control changing the upsides of the text block and the progress bar. Move the slider to see the change.

Allow us to check out the phrasings found in the example.
- source property - value property of slider.
- Dependency Object - objects made are the text block and progress bar.
- Binding target - The progress bar and the text block.
- Binding source - slider control in the UI.
- Dependency property - the progress bar value and text block text property.
- Source object - slider object created with x: Name="slider"
The last code should resemble this one beneath,
 <Window x:Class="DataBinding.MainWindow"
        xmlns="http://schemas.microsoft.com/winfx/2006/xaml/presentation"
        xmlns:x="http://schemas.microsoft.com/winfx/2006/xaml"
        xmlns:d="http://schemas.microsoft.com/expression/blend/2008"
        xmlns:mc="http://schemas.openxmlformats.org/markup-compatibility/2006"
        xmlns:local="clr-namespace:DataBinding"
        mc:Ignorable="d"
        Title="MainWindow" Height="450" Width="800">
    <Grid Margin="-3,-28,-6,0">
   <TextBlock HorizontalAlignment="Left" Margin="184,58,0,0" TextWrapping="Wrap" VerticalAlignment="Top" Height="161" Width="282" FontSize="16"
      Text="{Binding Value, ElementName=slider}" />
        <Slider x:Name="slider" HorizontalAlignment="Left" Margin="201,231,0,0" VerticalAlignment="Top" Height="21" Width="210"/>
        <ProgressBar HorizontalAlignment="Left" Height="20" Margin="203,297,0,0" VerticalAlignment="Top" Width="237"
       Value="{Binding Value, ElementName=slider}"/>

    </Grid>
</Window>
Conclusion
In this article, we have taken in the essential ideas of Databinding in ASP.NET and its execution. The idea of Databinding in ASP.NET goes a long way past this. I energetically suggest investigating more, testing more, and composing more codes with different information sources.
Happy coding!

Top comments (0)