
Introduction
In this blog post, I'm going to be talking about all things Cloud Foundry, including some of its services, certified and other commercial providers. I'll also be demonstrating how to get started with Cloud Foundry quickly.
The main aim of this blog post is to serve as documentation for people that want to see what the Cloud Foundry community offers and how to locate or get started with their preferred method of deploying their applications to Cloud Foundry.
What is Cloud Foundry?
According to the official Cloud Foundry website, Cloud Foundry is an open-source platform that allows application development teams to build, test, deploy, and scale applications.
It also provides an underlying infrastructure including Kubernetes, developer frameworks, and application services.
Cloud Foundry is known for its awesome developer experience. The project is backed by Google, IBM, Microsoft, SAP, SUSE, VMware, and more.
Cloud Foundry takes the workload off developers and lets them focus on only the application code and business outcomes by making all those tasking deployment processes disappear.
In summary, Cloud Foundry takes away the burden of managing complexity and running containerized workloads of an application from developers and allows them to worry or stay focused on application code and the business outcomes. Aside from just taking away the burden, it also provides benefits. For example, packing and containerization come free.
Cloud Foundry Providers
The officially certified providers of the Cloud Foundry platform are:
Atos Cloud Foundry
IBM Cloud Foundry (formerly Bluemix)
SAP Cloud Platform
SUSE Cloud Application Platform
Swisscom Application Cloud
VMware Tanzu
Other distributions of Cloud Foundry include:
anynines Public PaaS
Pivotal Web Services
Cloud Foundry Command Line Interface
The Cloud Foundry CLI is a tool that allows developers, engineers e.t.c to interact with Cloud Foundry and any of its providers directly from their terminal. The Cloud Foundry CLI is the quickest way to interact or get started with Cloud Foundry. You can install the Cloud Foundry CLI by following the instructions here.
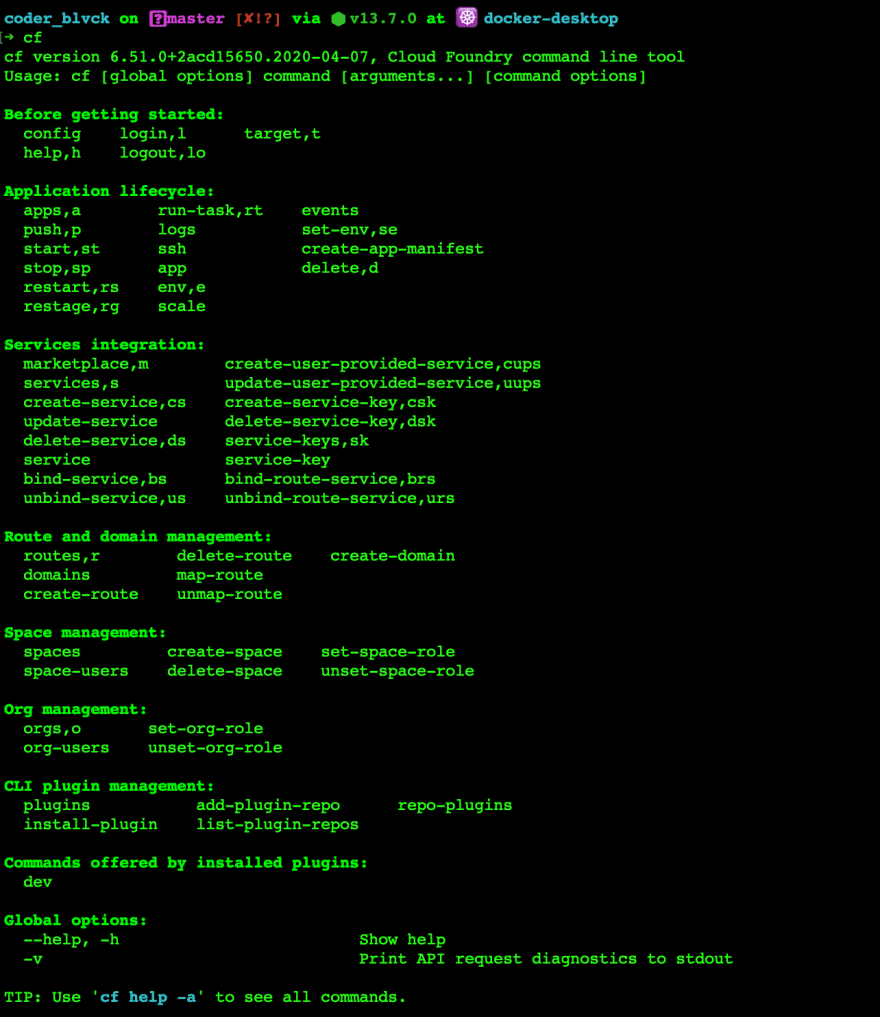
Once the CLI has been installed, you can confirm if it's available on your machine by going to your terminal and running the following command:
cf
After executing the above command, the following will be displayed in your terminal:
With the Cloud Foundry CLI, you can carry out the following actions:
Connect to the Cloud Foundry Marketplace for various services
Push your application live.
Connect with any of Cloud Foundry's official and other commercial providers.
See all your downloaded plugins.
The Cloud Foundry CLI is a very powerful tool that can do much more than the above listed and it is still being maintained by the Cloud Foundry Community with the latest major version being version seven(v7.0).
Organizations and Spaces in Cloud Foundry
Before we go further ahead, we would need to know what organizations and spaces in Cloud Foundry are so that we can better understand the Cloud Foundry deployment roles and permissions.
Organizations
An organization is like a group that consists of various users, resources, applications, and environments that belong to a particular organization. Each Organization can have a quota of resources allocated to them based on their subscription plan and organizations are billed separately based on the number of resources consumed by the organization.
Spaces
A Space in Cloud Foundry is an environment that consists of different phases on application development. An organization can have various spaces for its applications like a development space, a staging space, or a production space based on their preference.
For more information on organizations and space, you can check the Cloud Foundry official documentation or this article by Nikolay Grozev.
In the next and further sections, we'll be exploring the different ways we can connect to Cloud Foundry using a handful of its available commercial providers and distributions like:
Buildpacks
CF CLI
CF Dev
Pivotal Web Services
Stratos
IBM Cloud Foundry
SUSE CAP
Anynines public Paas
Buildpacks
Buildpacks are an important feature in Cloud Foundry, they provide a platform and runtime support for applications built with different languages to run efficiently on Cloud Foundry.
Cloud Foundry automatically detects the language used to build your application when you push it, this is achieved with the power of Buildpacks. You can push an application with one or multiple buildpacks depending on the type of application you are deploying.
You can configure your application's buildpack by putting the information for the buildpack inside a buildpack.yml file, Cloud Foundry will automatically detect this file and use the information in the file to deploy your application.
Cloud Foundry includes a set of system buildpacks for common languages and frameworks, this table lists all the available system buildpacks.
Apart from the available system buildpacks, you can create and customize a buildpack for your application, you can read more about this process here.
Certain Cloud Foundry Certified providers like IBM also provide their own custom buildpacks for your application to run smoothly on their cloud platform.
Cloud-Native Buildpacks
Cloud-Native Buildpacks transform your application source code into images that can run on any cloud.
Cloud-Native Buildpacks allow developers to ship applications that can run on any cloud platform including Cloud Foundry. Basically, they take an application source code and then convert it into images that allow them to run on the cloud.
For more information please visit here
Paketo Buildpacks
Paketo Buildpacks are Cloud Native Buildpacks and it is a project of the Cloud Foundry Foundation. They are written in Go, and they provide runtime support for applications. They are not exclusive to just the Cloud Foundry community but it can be used by any Cloud service provider.
Paketo Buildpacks currently has support for the following languages:
Go
Nodejs
.NET Core
Java
PHP
For more information about paketo buildpacks, visit its documentation here.
CF Dev
CF Dev is a distribution of Cloud Foundry that is meant to enable engineers or folks that want to try Cloud Foundry for the first time run Cloud Foundry directly on their machine without having to connect with an external service provider. It makes use- of native hypervisors and also comes packed with a fully functional BOSH Director and it gives developers the entire Cloud Foundry experience in a lightweight and very easy to install package. It is likely the best way to deploy Cloud Foundry on your local machine.
Note: The CF Dev Project is still being maintained but it is currently no longer receiving updates or being actively developed.
Installation Process
The following commands are to be executed in a terminal in order to install CF Dev in your machine.
CF Dev has a couple of system requirements that can be found in the README section of it's Github repository.
In order to install CF Dev you also need to have the CF CLI available on your machine, if you are yet to install it, please do.
After installing the CF CLI, run the following command in your terminal to install the CF Dev plugin:
cf install-plugin -r CF-Community cfdev
To start the CF Dev Server on your machine, run the following command in your terminal:
cf dev start
For first time users, it takes a while to start the CF Dev but if all goes well the following will be displayed on your terminal window:

Follow the instructions that are displayed on your terminal window to login and get started with CF Dev.
With CF Dev now installed and started on your machine, you can now enjoy the full Cloud Foundry experience directly from your terminal and your machine.
For more information on CF Dev Installation processes and configuration, you can check it's FAQ page, here
Stratos
Stratos is an official Cloud Foundry Project, it is an open-source user interface for Cloud Foundry and Kubernetes. Stratos supports multiple cluster monitoring and management from just a single User Interface.
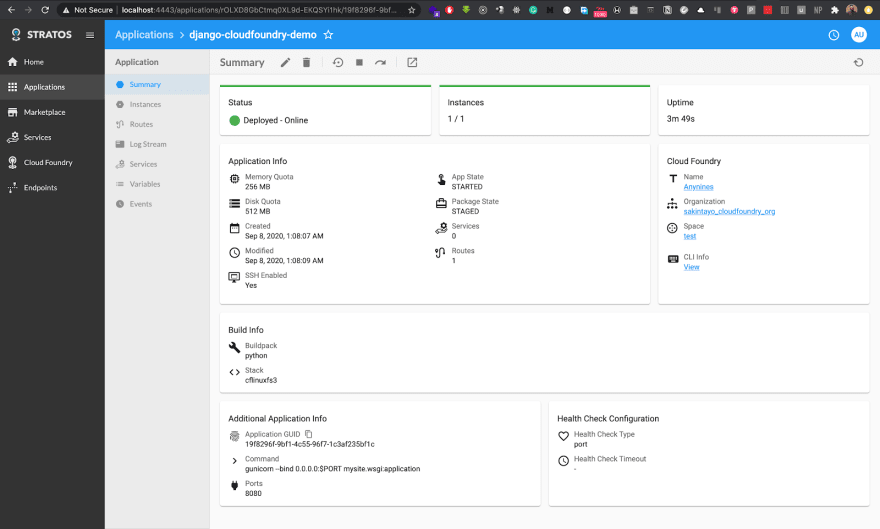
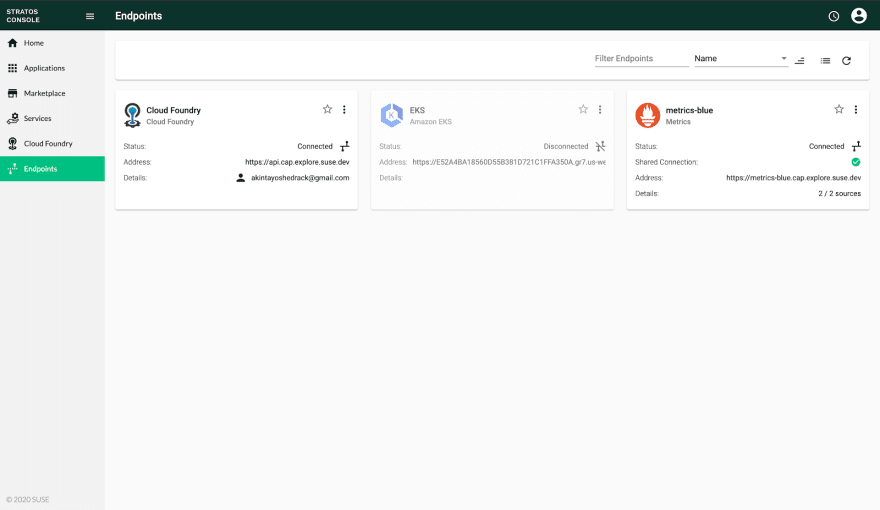
Below is an image of how the Stratos Dashboard looks like when an application is deployed on it:
Benefits of Stratos
Easily View Helm Charts and Workloads.
Easy Cloud Foundry Cluster Management including managing and deploying applications in the Cloud Foundry cluster.
Easy Customization to fit your team needs.
Connect to other Cloud Foundry Commercial providers via endpoints.
Easy Access to Cloud Foundry Marketplace.
View Application Logs.
Getting Started
The quickest way to get started with Stratos is to deploy it as a Cloud Foundry with docker by running the following command:
docker run -p 4443:443 splatform/stratos:latest
Note: Docker must be installed on your local machine.
After running the above command, you'll see the following in your terminal:

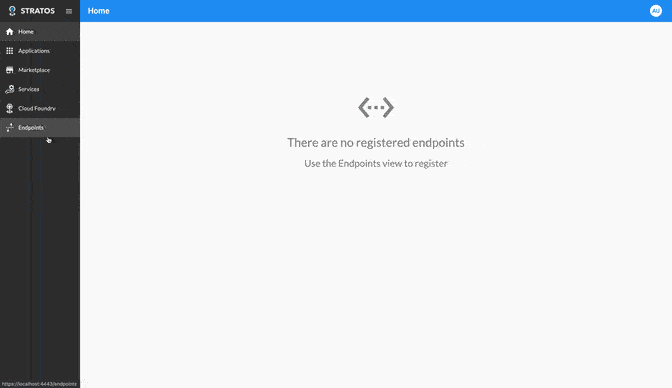
Next thing is to navigate to localhost:4443 to access the local Stratos app, the following screen will be displayed:

You'll be asked to log in either as a local admin or use a Cloud Foundry User Account and Authentication, read more on UAA here.
For the sake of this documentation, I'll log in as a local admin, and I'll be asked to create a password to login to my local admin account.

After creating the password, it'll take a few seconds to save the configuration, and automatically, you'll be logged in into the Stratos dashboard.
Note: Save the password you created because it'll be needed, if you need to log in again.
Connecting to Cloud Foundry via endpoints
Now that we are all set up and logged in, let's connect to an external Cloud Foundry service. In this case, we'll be making use of anynines Public Paas.
Firstly, we need to create an anynines account, you can do that here. After doing that, log in, and let's get started.
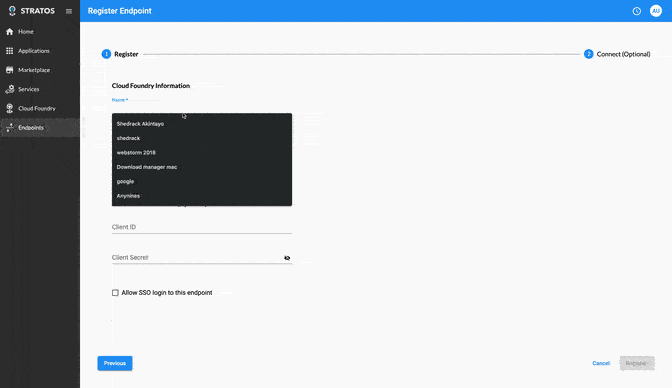
After registering and logging in into anynines and also Stratos, navigate to the endpoints tab on the sidebar of Stratos, click on it then click on the register endpoint + icon and then click on Cloud Foundry.
Here is a visual demonstration of the process:
Now, we need to fill in the form, you can name the endpoint whatever you like and the endpoint address should be the address shown to you on the anynines dashboard.

After inputting the endpoint address, you can click on the register button at the bottom left corner of the screen.
Here is a visual demonstration of the process:
After registering the endpoint, we can connect instantly by checking on the connect to the endpoint now checkbox and then fill in the username and password field with your anynines username and password and you'll be connected to anynines immediately.
Here is a visual demonstration of the process:

That's it! we have successfully connected to a Cloud Foundry endpoint. We can now view and manage all the applications that we deployed to Cloud Foundry with Stratos.
For more information about Stratos, you can check the official documentation.
SUSE Stratos Console
Optionally, you can use the hosted version of Stratos customized by SUSE called SUSE Stratos Console. All you need to do is set up a free SUSE account, log in and you're good to go. It works exactly like the open-source Stratos Cloud Foundry & Kubernetes console but it comes with a few customizations and improvements.
Here is an image of how the SUSE Stratos Console dashboard looks like when you are logged in:
Note: Your SUSE Stratos Console login details are the same with the free SUSE account you created.
IBM Cloud Foundry
IBM Cloud Foundry is a distribution of Cloud Foundry built on top of the IBM Cloud. It allows enterprise developers to deploy and develop Cloud Foundry applications on the IBM Cloud platform.
IBM Cloud Foundry gives developers access to enjoy the Cloud Foundry developer experience and the IBM Cloud experience at the same time.
Features of IBM Cloud Foundry
IBM Cloud Foundry has runtime support for various languages including Java, Nodejs, Ruby, Python etc.
Access to Cloud Foundry Community Buildpacks.
Deploy and develop your applications quickly and it facilitates developing applications as stateless processes.
Provides support for extending your application capabilities with external services.
Below is a gif of how the IBM Cloud Foundry Dashboard looks like when you are logged in on IBM Cloud.

Getting Started
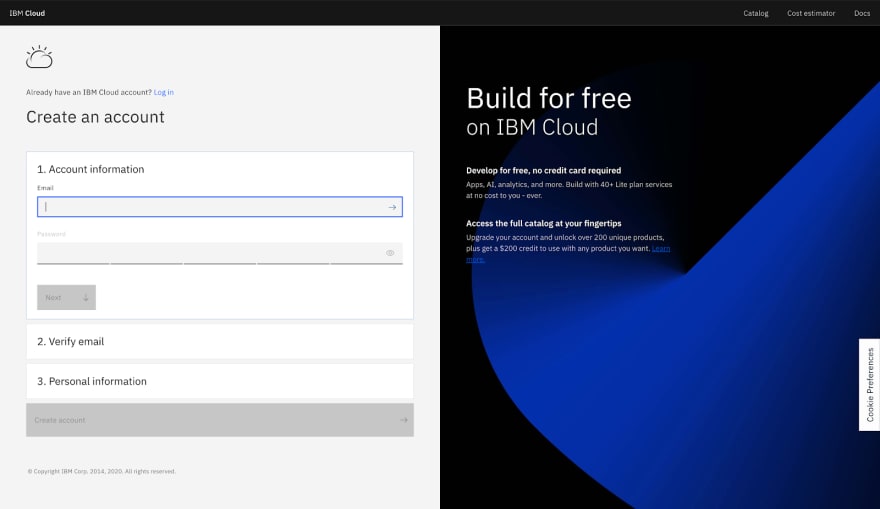
To get started with IBM Cloud Foundry, You can sign up for a free trial IBM Cloud account.
After registering and logging into your account you'll be redirected into the IBM Cloud dashboard.
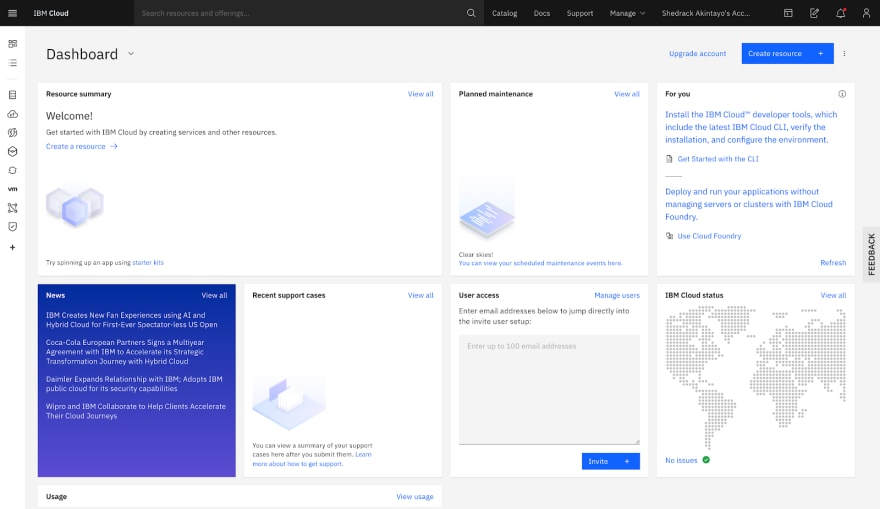
After logging into the dashboard, click on the fourth icon on the dashboard and you'll be navigated to the IBM Cloud Foundry Dashboard.
Here is a demonstration of the process:
Now that we've navigated to the dashboard, let's look at deploying applications on IBM Cloud Foundry.
Deploying an Application on IBM Cloud Foundry
There are two main ways of deploying an application on IBM Cloud Foundry namely:
- The command-line interface(IBM Cloud CLI)
- The integrated development environments (IDEs)
Additionally, you can use app manifests to deploy your application on IBM Cloud Foundry, when you use an app manifest to deploy your application, you reduce the number of deployment details you need to specify on your CLI when you are deploying your application.
All the CLI needs to do is read the content in your application manifest and use it to deploy your application immediately.
To learn more about deploying applications on IBM Cloud Foundry, please visit its official documentation.
Note: The fastest way to get started is to use the IBM Cloud CLI and install it on your machine by visiting here. Also, App Manifests are not just for IBM Cloud Foundry; all Cloud Foundry services and providers support the use of App Manifests to deploy your applications.
anynines Public Paas
Anynines Public PaaS (a9s) is a platform as a service that is built on top of Cloud Foundry. It is referred to as “The European Cloud Foundry Platform” because it uses a European datacenter.
Some of its features include:
- Fair pricing
- Easy and Quick deployments
Anynines Public PaaS provides a customer panel in addition to the Cloud Foundry command line tool for managing your organizations, applications spaces, billing information and also uploading SSL certificates to protect your custom domains.
Supported Technologies and Services on anynines Public Paas
The following are some of the supported technologies that can be deployed on the anynines PaaS:
- Ruby on Rails
- Tomcat
- Nodejs
- RACK
- Java
- Python
- Grails
- PHP
- Redis
- MySQL
- MongoDB
- PostgreSQL
Getting started with anynines Public PaaS
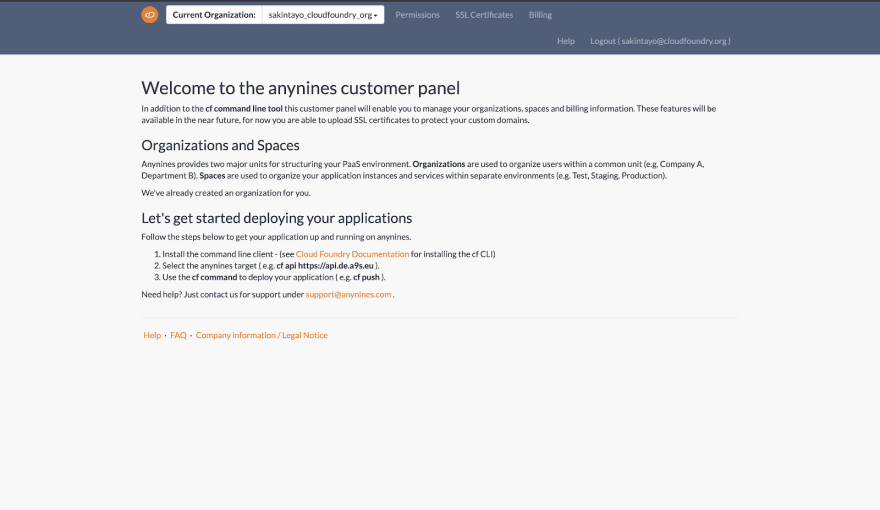
It is quite easy to get started with anynines Public PaaS, all you have to do is to create a free anynines account and login into your anynines customer panel.
Below is an image of how the a9s customer panel looks like:
Deploying Applications on Cloud Foundry with anynines
Deploying your application on anynines is very easy. All you need is the Cloud Foundry CLI and the anynines target endpoint which can be found on the anynines customer panel.

Next, navigate to your application folder in your terminal and connect the CF CLI with the anynines target and login with your anynines account login details by running the following command:
cf api https://api.de.a9s.eu
Here is a visual demonstration of the process:
After that you need to log into your anynines account in the Cloud Foundry CLI so that we can push our app. You can do that with the following command:
cf login
Here is a visual demonstration of the process:

Now that we are logged in, all we need to do is to run the cf push command and our application will be deployed.
After deploying our application, we can alternatively use any of the Cloud Foundry console user interfaces like Stratos or SUSE Stratos console to directly interact with applications deployed on the Cloud Foundry cluster via the anynines target endpoint.
For more information on the anynines Public PaaS, check out their official website.
Conclusion
Cloud Foundry has a wide range of services and providers that can be used by individual developers and large scale enterprises. Using Cloud Foundry eliminates the stress of ops, gives you flexibility and provides a proven developer experience for Kubernetes.
What features, concepts or providers of Cloud Foundry do you find interesting? Let us know in the comments section.
Cloud Foundry Summit Europe 2020 is built by and for the Cloud Foundry community. Whether you're new to Cloud Foundry, you're a long-time contributor building the platform, or you're using Cloud Foundry to attain your business goals, Cloud Foundry Summit is the place to collaborate with other developers, operators, CIOs and IT professionals to shape the future of the project, share best practices and innovate together.
Dates: Oct 21st & 22nd 2020
The best way to connect with the Cloud Foundry community is to join our Slack Workspace at (https://slack.cloudfoundry.org/). Those in the Slack community help you get quickly connected with other members or someone from the Cloud Foundry Foundation.

Top comments (0)