
If you're looking to master react-hook-form for beginners, you're in the right place. In this blog, we’ll walk through a hands-on react-hook-form tutorial, explore how to use it for seamless form handling and validation, and compare it briefly with Formik. You’ll also see real-world react-hook-form examples to get you started quickly.

🧩 What is React-Hook-Form?
If you're diving into react-hook-form for beginners, it's important to understand what makes this library so popular. React Hook Form is a lightweight, performance-focused library designed to make form validation and handling easy and intuitive in React applications.
Instead of relying on bulky form libraries that add extra complexity, react-hook-form leverages React hooks to manage form state, validation, and submission in a minimal and efficient way.
🤖 What Does React Hook Form Help With?
- ⚙️ Handling form inputs in React with less boilerplate code
- 🧠 Managing form state with ease using hooks
- ✅ Simplifying form validation with built-in and custom rules
- 🚀 Reducing re-renders for improved performance
- ♿ Enhancing accessibility out-of-the-box
✨ Key Features of React Hook Form
Here’s why developers—especially those exploring react-hook-form for beginners—choose this library:
- 💻 DX (Developer Experience): Intuitive, feature-complete API that provides a seamless form-building experience.
- 🌐 HTML Standard: Leverages existing HTML markup and allows validation using a constraint-based validation API.
- ⚖️ Super Light: React Hook Form is a tiny library with zero dependencies, keeping your bundle size small.
- ⚡ Performance: Minimizes re-renders, reduces validation computation, and speeds up form mounting for a snappier UI.
- 📦 Adoptable: Since form state is inherently local, it can be easily integrated without requiring extra dependencies.
- 🎯 Built-in Validation: Supports both custom and schema-based validation with Yup and Zod.
- 🛡️ TypeScript Support: Ensures type safety and a smoother development experience.
- 🎨 UX-Focused: Designed to provide a consistent validation strategy for a better user experience.
- 🧪 DevTools Support: Comes with React Hook Form DevTools for easy debugging and state visualization.
🚀 Getting Started with React Hook Form
In this section, we’ll walk through installing and using react-hook-form for beginners, covering everything from basic setup to validation and integrating with UI libraries.
🛠️ Installation
Installing React Hook Form is quick and simple. You only need one command:
npm install react-hook-form
Or, if you use Yarn:
yarn add react-hook-form
Once installed, you're ready to start building forms with minimal code.
📝 Creating Your First Form
To start using react-hook-form for beginners, let's set up a simple form with a text input and a submit button.
📌 Basic Form Example:
    import { useForm } from "react-hook-form";

    export default function App() {
      const { register, handleSubmit, watch, formState: { errors } } = useForm();
      const onSubmit = (data) => console.log(data);

      console.log(watch("username")); // Watch input value in real-time

      return (
        <form onSubmit={handleSubmit(onSubmit)}>
          <input {...register("username")} placeholder="Enter your name" />
          <button type="submit">Submit</button>
        </form>
      );
    }
🔥 What’s Happening Here?
-
useForm()initializes the form. -
register("username")links the input field to React Hook Form. -
handleSubmit(onSubmit)ensures form validation before submission. -
watch("username")lets us monitor input changes in real-time.
✅ Adding Validation
One of the biggest advantages of React Hook Form is its built-in validation support. You can easily enforce validation rules like required, minLength, pattern, and more.
📌 Adding Validation Rules:
    import { useForm } from "react-hook-form";


    export default function App() {
      const { register, handleSubmit, formState: { errors } } = useForm();
      const onSubmit = (data) => console.log(data);


      return (
        <form onSubmit={handleSubmit(onSubmit)}>
          <input {...register("email", { required: "Email is required" })} placeholder="Enter your email" />
          {errors.email && <p>{errors.email.message}</p>}


          <input {...register("password", { required: true, minLength: 6 })} placeholder="Enter password" />
          {errors.password && <p>Password must be at least 6 characters long</p>}


          <button type="submit">Submit</button>
        </form>
      );
    }
🔥 What’s Happening Here?
-
required: "Email is required"displays a custom error message. -
minLength: 6ensures the password has at least 6 characters. -
{errors.email.message}dynamically displays validation errors.
🎨 Integrating with UI Libraries
You can easily integrate React Hook Form with component libraries like Material UI, Ant Design, or Chakra UI. If the component doesn’t support ref, use the Controller component.
📌 Material UI Example:
    import { useForm, Controller } from "react-hook-form";
    import TextField from "@mui/material/TextField";


    export default function App() {
      const { control, handleSubmit } = useForm();
      const onSubmit = (data) => console.log(data);


      return (
        <form onSubmit={handleSubmit(onSubmit)}>
          <Controller
            name="fullName"
            control={control}
            defaultValue=""
            render={({ field }) => <TextField {...field} label="Full Name" />}
          />
          <button type="submit">Submit</button>
        </form>
      );
    }
🔥 What’s Happening Here?
-
Controllerwraps non-native inputs like Material UI’s TextField. -
controlis used to manage controlled inputs.
📌 Chakra UI Example:
    import { useForm, Controller } from "react-hook-form";
    import { Input, Button, FormControl, FormLabel, FormErrorMessage } from "@chakra-ui/react";


    export default function App() {
      const { control, handleSubmit, register, formState: { errors } } = useForm();
      const onSubmit = (data) => console.log(data);


      return (
        <form onSubmit={handleSubmit(onSubmit)}>
          <FormControl isInvalid={errors.username}>
            <FormLabel htmlFor="username">Username</FormLabel>
            <Input id="username" {...register("username", { required: "Username is required" })} />
            <FormErrorMessage>{errors.username && errors.username.message}</FormErrorMessage>
          </FormControl>


          <FormControl>
            <FormLabel htmlFor="email">Email</FormLabel>
            <Controller
              name="email"
              control={control}
              defaultValue=""
              render={({ field }) => <Input id="email" {...field} placeholder="Enter your email" />}
            />
          </FormControl>


          <Button mt={4} colorScheme="blue" type="submit">
            Submit
          </Button>
        </form>
      );
    }
🔥 What’s Happening Here?
-
FormControlandFormErrorMessagemanage validation messages. -
register("username", { required: "Username is required" })ensures validation. -
Controllerhandles non-native Chakra UI inputs likeInput.
🔄 Handling Errors Gracefully
React Hook Form provides an errors object to manage validation errors dynamically.
📌 Error Handling Example:
    import { useForm } from "react-hook-form";


    export default function App() {
      const { register, handleSubmit, formState: { errors } } = useForm();
      const onSubmit = (data) => console.log(data);


      return (
        <form onSubmit={handleSubmit(onSubmit)}>
          <input {...register("username", { required: "Username is required" })} />
          {errors.username && <p>{errors.username.message}</p>}


          <button type="submit">Submit</button>
        </form>
      );
    }
🔥 What’s Happening Here?
-
{errors.username.message}dynamically displays validation messages. - The form won’t submit until errors are resolved.
📜 Schema-Based Validation with Yup
For advanced validation, React Hook Form supports schema-based validation using Yup.
📌 Install Yup:
npm install @hookform/resolvers yup
📌 Using Yup for Validation:
   import { useForm } from "react-hook-form";
    import { yupResolver } from "@hookform/resolvers/yup";
    import * as yup from "yup";


    const schema = yup.object({
      name: yup.string().required(),
      age: yup.number().positive().integer().required(),
    }).required();


    export default function App() {
      const { register, handleSubmit, formState: { errors } } = useForm({
        resolver: yupResolver(schema)
      });
      const onSubmit = (data) => console.log(data);


      return (
        <form onSubmit={handleSubmit(onSubmit)}>
          <input {...register("name")} placeholder="Name" />
          <p>{errors.name?.message}</p>


          <input {...register("age")} type="number" placeholder="Age" />
          <p>{errors.age?.message}</p>


          <button type="submit">Submit</button>
        </form>
      );
    }
🔥 What’s Happening Here?
- Yup schema defines validation rules for
nameandage. - yupResolver(schema) integrates Yup with React Hook Form.
-
{errors.name?.message}dynamically displays validation errors.
🏗️ Integrating with Global State (Redux)
React Hook Form can easily integrate with global state management like Redux.
📌 Redux Integration Example:
    import { useForm } from "react-hook-form";
    import { connect } from "react-redux";
    import { updateUserData } from "./actions";


    function App({ updateUserData }) {
      const { register, handleSubmit } = useForm();
      const onSubmit = (data) => updateUserData(data);


      return (
        <form onSubmit={handleSubmit(onSubmit)}>
          <input {...register("name")} placeholder="Name" />
          <input type="submit" />
        </form>
      );
    }


    export default connect(null, { updateUserData })(App);
🔥 What’s Happening Here?
-
handleSubmit(onSubmit)dispatches form data to Redux. -
connect(null, { updateUserData })links the form to Redux actions.
By now, you've learned how to:
- ✅ Install and set up React Hook Form
- ✅ Create a basic form with validation
- ✅ Handle errors dynamically
- ✅ Use schema validation with Yup
- ✅ Integrate with UI libraries and global state
📌 React Hook Form API Overview
React Hook Form provides a set of powerful hooks to manage form state, validation, and performance. Below is a quick look at its core APIs that help streamline form handling in React applications.
⚡ Key API Hooks in React Hook Form
🔹 useForm()
The backbone of React Hook Form, this hook provides all the essential methods to manage form validation, submission, and state handling with minimal re-renders.
🔹 useController()
For controlled components, this hook helps interface with useForm methods while isolating re-renders, making it ideal for handling third-party UI libraries like Material UI and Chakra UI.
🔹 useFormContext()
This hook allows access to form methods from deeply nested components. It’s especially useful for larger forms that need shared form state across multiple components.
🔹 useWatch()
This hook enables real-time form input tracking without triggering a re-render for the entire form. It’s useful when you need to respond dynamically to input changes.
🔹 useFormState()
Use this hook to subscribe to form state changes at a granular level, helping optimize performance by reducing unnecessary re-renders.
🔹 useFieldArray()
Designed for dynamic form fields, this hook enables operations like adding, removing, and shuffling fields—perfect for handling complex data entry scenarios like CRUD operations.
❓ Frequently Asked Questions (FAQ)
Here are answers to some of the most common questions about using React Hook Form effectively.
🔹 How does React Hook Form improve performance?
React Hook Form is designed for minimal re-renders by relying on uncontrolled components. The register function attaches ref to inputs, which prevents unnecessary re-renders when typing. For controlled components, you can use Controller or useController to isolate re-rendering.
🔹 How do I create accessible input errors and messages?
Since React Hook Form is based on uncontrolled components, it allows easy integration with accessible form validation. You can use aria-invalid attributes and error messages to enhance accessibility.
🔹 Does React Hook Form work with class components?
No, React Hook Form does not work with class components out of the box because it relies on React Hooks. However, you can create a wrapper component and use it inside class-based components.
🔹 How do I reset a form in React Hook Form?
There are two ways to reset a form:
- HTML
reset()method – Clears form values but does not reset validation errors. - React Hook Form's
reset()method – Resets all field values and clears errors.
🔹 How do I set default values in a form?
You can set default values using:
-
defaultValuesinsideuseForm()for setting form-wide defaults. -
defaultValueordefaultCheckeddirectly on inputs for individual fields.
For async default values, use defaultValues as an async function to fetch data before setting defaults.
🔹 How can I use ref for both React Hook Form and other purposes (like scrolling)?
React Hook Form requires a ref to collect input values. If you need to use ref for other tasks (e.g., scrolling), you can split the ref and assign it to both.
🔹 What if I don’t have access to ref?
If a component doesn’t support ref, you can manually manage form values using setValue, setError, and trigger methods. However, you’ll need to manually update the field values and validation states.
🔹 Why doesn’t the first keystroke work in my form?
Make sure you're using defaultValue instead of value. React Hook Form focuses on uncontrolled inputs, so you don’t need to manage the value state manually.
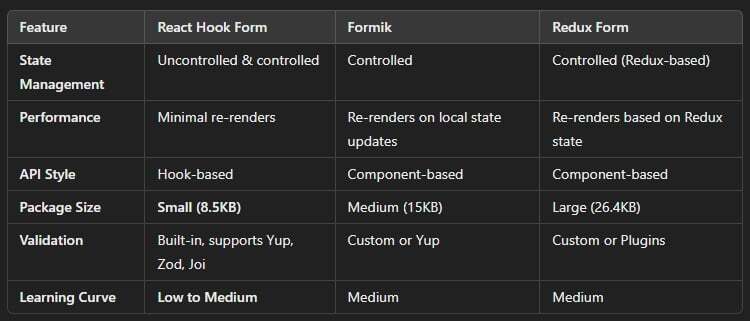
🔹 React Hook Form vs. Formik vs. Redux Form – Which one should I use?
All three libraries help with form handling, but they differ in performance and implementation:
🎯 Conclusion
In this guide, we explored react-hook-form for beginners, covering installation, form handling, validation, UI library integration, API overview, and common FAQs. You should now have a strong grasp of how to use React Hook Form effectively in your projects.
With its minimal re-renders, built-in validation, and seamless UI library integration, react-hook-form is a lightweight yet powerful tool for managing forms in React. Whether you're building simple forms or complex workflows, it provides a fast and efficient solution.
For more details, code examples, and advanced features, visit the React Hook Form Official Website.

Top comments (0)