
NestJS is a framework for building efficient, scalable Node.js server-side applications. It uses modern JavaScript and TypeScript and is built with a philosophy that embraces both object-oriented programming, functional programming, and functional reactive programming.
In this guide, we'll explore what makes NestJS special, why you might want to use it for your next project, and how to get started building applications with it.
What is NestJS?
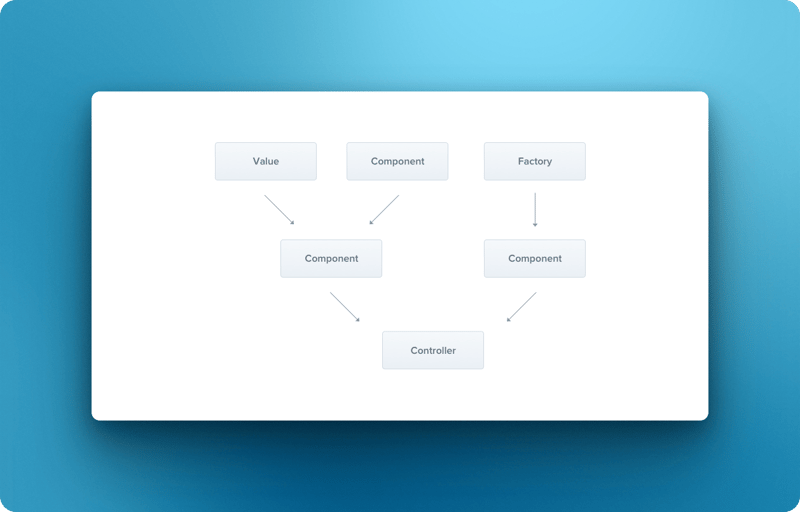
NestJS is a framework built on top of Express (though it can optionally use Fastify) that adds a layer of abstraction. It takes inspiration from Angular in its modular architecture and dependency injection system.
Why was NestJS created?
Well, while Node.js offers a lot of freedom, it lacks a consistent architecture for organizing medium to large applications. NestJS provides that architecture, making it easier to build maintainable, testable applications.
The Elegant Three-Tier Architecture of NestJS
One of the most powerful aspects of NestJS is its adherence to a clear three-tier architectural pattern that separates concerns and promotes clean code.
This architecture is specifically designed to solve the "spaghetti code" problem that plagues many Node.js applications as they grow in complexity.
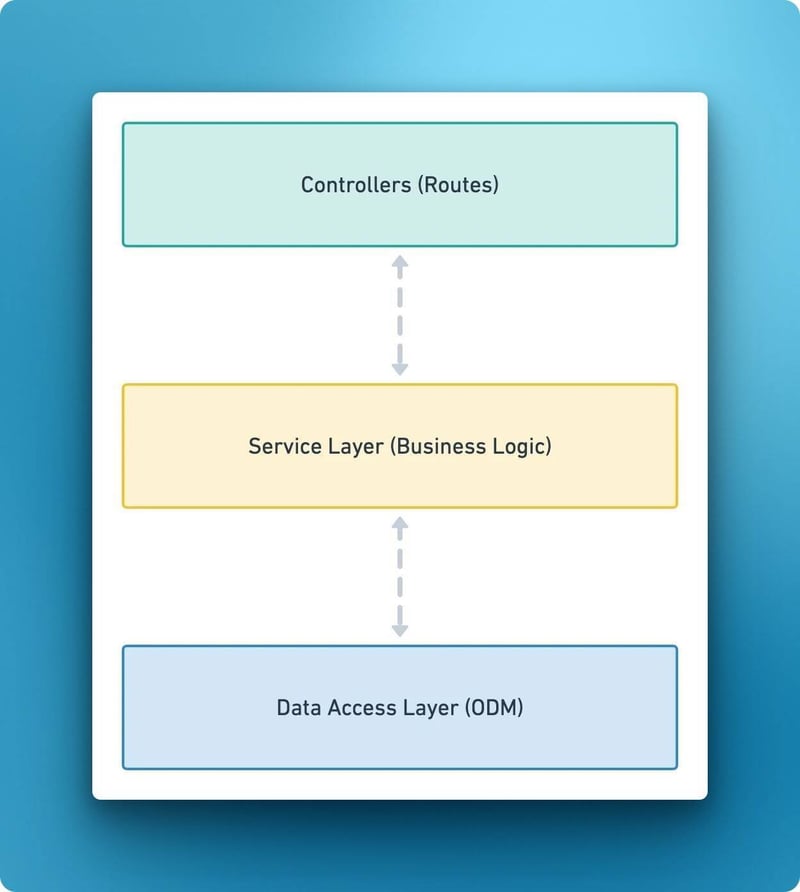
The three-tier architecture, as detailed in this excellent article, consists of:
Controllers Layer - Acts as the entry point for all requests, handling HTTP routes and request/response cycles. Controllers are responsible for receiving user input and delegating to the appropriate services, but should contain minimal logic themselves.
Service Layer - Contains all the business logic of your application. Services implement the core functionality, such as data transformations, calculations, and orchestrating the flow of data between controllers and repositories.
Data Access Layer - Manages data persistence through repositories or data access objects. This layer abstracts away database operations, making it possible to switch database technologies without affecting the rest of the application.
This separation of concerns offers several benefits:
- Maintainability: Each layer has a single responsibility, making the codebase easier to understand and modify
- Testability: Services can be tested in isolation without the complexity of HTTP or database operations
- Scalability: As the application grows, new components can be added within the appropriate layer without disrupting existing functionality
When requests flow through a NestJS application, they move from controllers to services and finally to the data access layer, with each layer focusing on its specific responsibility.
@Controller('users')
export class UsersController {
  constructor(private userService: UserService) {}

  @Get()
  findAll(): Promise<User[]> {
    return this.userService.findAll();
  }
}

@Injectable()
export class UserService {
  constructor(private userRepository: UserRepository) {}

  async findAll(): Promise<User[]> {
    // Business logic here
    return this.userRepository.findAll();
  }
}

@Injectable()
export class UserRepository {
  async findAll(): Promise<User[]> {
    // Database access logic here
  }
}
This architectural approach makes NestJS particularly well-suited for enterprise applications and teams working with complex domains.
Setting Up Your First NestJS Project
Getting started with NestJS is straightforward. First, you'll need to install the Nest CLI:
npm i -g @nestjs/cli
Then, create a new project:
nest new project-name
This sets up a new project with a basic structure. Let's take a look at what gets created. I created a project named nestjs-test and here's what I got when I opened it in my code editor:
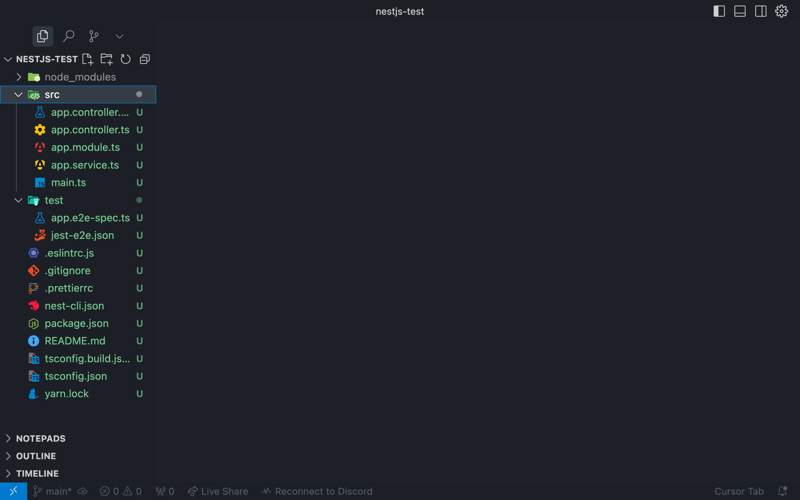
The CLI creates several files:
-
src/app.controller.ts: A basic controller with a single route -
src/app.service.ts: A basic service -
src/app.module.ts: The root module of the application -
src/main.ts: The entry file of the application -
test: A directory with testing utilities
Core Concepts in NestJS
Let's dive into some of the core concepts in NestJS:
Modules
Modules are a way to organize your application into cohesive blocks of functionality. Every NestJS application has at least one module, the root module. Here's an example of a simple module:
import { Module } from '@nestjs/common';
import { CatsController } from './cats.controller';
import { CatsService } from './cats.service';

@Module({
  controllers: [CatsController],
  providers: [CatsService],
})
export class CatsModule {}
Controllers
Controllers handle incoming requests and return responses to the client. Here's an expanded controller example:
import { Controller, Get, Post, Body } from '@nestjs/common';
import { CatsService } from './cats.service';
import { CreateCatDto } from './dto/create-cat.dto';
import { Cat } from './interfaces/cat.interface';

@Controller('cats')
export class CatsController {
  constructor(private catsService: CatsService) {}

  @Post()
  async create(@Body() createCatDto: CreateCatDto) {
    this.catsService.create(createCatDto);
  }

  @Get()
  async findAll(): Promise<Cat[]> {
    return this.catsService.findAll();
  }
}
Providers
Providers are classes annotated with @Injectable() that can be injected into constructors. Services, repositories, factories, and helpers can all be providers. Here's an example service:
import { Injectable } from '@nestjs/common';
import { Cat } from './interfaces/cat.interface';

@Injectable()
export class CatsService {
  private readonly cats: Cat[] = [];

  create(cat: Cat) {
    this.cats.push(cat);
  }

  findAll(): Cat[] {
    return this.cats;
  }
}
Middleware
Middleware functions can perform tasks before a request is processed by a route handler. They can:
- Execute code
- Make changes to the request and response objects
- End the request-response cycle
- Call the next middleware in the stack
Here's a simple middleware example:
import { Injectable, NestMiddleware } from '@nestjs/common';
import { Request, Response, NextFunction } from 'express';

@Injectable()
export class LoggerMiddleware implements NestMiddleware {
  use(req: Request, res: Response, next: NextFunction) {
    console.log('Request...');
    next();
  }
}
Advanced Features
NestJS offers many advanced features that make it powerful for larger applications:
Data Validation
You can use DTOs (Data Transfer Objects) and the built-in validation pipes:
import { IsString, IsNotEmpty } from 'class-validator';

export class CreatePostDto {
  @IsNotEmpty()
  @IsString()
  title: string;

  @IsNotEmpty()
  @IsString()
  content: string;
}
Then use it in your controller:
@Post()
@UsePipes(ValidationPipe)
create(@Body() createPostDto: CreatePostDto) {
  return this.blogService.create(createPostDto);
}
Read more about validation in Nest.js here.
Database Integration
NestJS works well with TypeORM, Mongoose, Prisma, and other database tools. Here's an example of integrating TypeORM:
// app.module.ts
import { Module } from '@nestjs/common';
import { TypeOrmModule } from '@nestjs/typeorm';
import { BlogModule } from './blog/blog.module';

@Module({
  imports: [
    TypeOrmModule.forRoot({
      type: 'postgres',
      host: 'localhost',
      port: 5432,
      username: 'postgres',
      password: 'postgres',
      database: 'blog',
      entities: [__dirname + '/**/*.entity{.ts,.js}'],
      synchronize: true,
    }),
    BlogModule,
  ],
})
export class AppModule {}
Authentication
NestJS provides robust authentication capabilities. Here's a simple example with Passport.js:
// auth.service.ts
import { Injectable } from '@nestjs/common';
import { JwtService } from '@nestjs/jwt';
import { UsersService } from '../users/users.service';

@Injectable()
export class AuthService {
  constructor(
    private usersService: UsersService,
    private jwtService: JwtService,
  ) {}

  async validateUser(username: string, password: string): Promise<any> {
    const user = await this.usersService.findOne(username);
    if (user && user.password === password) {
      const { password, ...result } = user;
      return result;
    }
    return null;
  }

  async login(user: any) {
    const payload = { username: user.username, sub: user.userId };
    return {
      access_token: this.jwtService.sign(payload),
    };
  }
}
Testing in NestJS
NestJS makes testing straightforward with built-in support for unit, integration, and end-to-end testing.
Unit Testing
Unit tests focus on testing individual components in isolation. NestJS provides tools that make it easy to mock dependencies and test service logic.
// blog.service.spec.ts
import { Test, TestingModule } from '@nestjs/testing';
import { BlogService } from './blog.service';

describe('BlogService', () => {
  let service: BlogService;

  beforeEach(async () => {
    const module: TestingModule = await Test.createTestingModule({
      providers: [BlogService],
    }).compile();

    service = module.get<BlogService>(BlogService);
  });

  it('should be defined', () => {
    expect(service).toBeDefined();
  });

  it('should create a blog post', () => {
    const post = { id: 1, title: 'Test Post', content: 'This is a test post' };
    expect(service.create(post)).toEqual(post);
    expect(service.findAll()).toContain(post);
  });
});
Testing Command-Line Applications
NestJS provides excellent support for building CLI applications with the nest-commander package. When building command-line tools, testing becomes even more important to ensure your commands work correctly.
Let's look at how to test a simple CLI command:
First, create a weather command that takes a city name and returns the weather:
// weather.command.ts
import { Command, CommandRunner, Option } from 'nest-commander';

@Command({ name: 'weather', description: 'Get weather for a city' })
export class WeatherCommand extends CommandRunner {
  constructor(private weatherService: WeatherService) {
    super();
  }

  async run(passedParams: string[], options?: Record<string, any>): Promise<void> {
    const city = passedParams[0] || options?.city || 'New York';
    const forecast = await this.weatherService.getWeather(city);

    console.log(`Weather for ${city}: ${forecast}`);
  }

  @Option({
    flags: '-c, --city [city]',
    description: 'City to check weather for',
  })
  parseCity(val: string): string {
    return val;
  }
}
To test this command, we use the CommandTestFactory from the nest-commander-testing package, which provides a way to execute commands in a test environment:
// weather.command.spec.ts
import { Test } from '@nestjs/testing';
import { CommandTestFactory } from 'nest-commander-testing';
import { WeatherCommand } from './weather.command';
import { WeatherService } from './weather.service';

describe('WeatherCommand', () => {
  it('should return weather for specified city', async () => {
    // Mock the console.log function
    const consoleLogSpy = jest.spyOn(console, 'log').mockImplementation();

    // Mock the weather service
    const mockWeatherService = {
      getWeather: jest.fn().mockResolvedValue('Sunny, 75°F'),
    };

    // Create a test command using CommandTestFactory
    const commandInstance = await CommandTestFactory.createTestingCommand({
      imports: [], // Any modules you need to import
      providers: [
        WeatherCommand,
        { provide: WeatherService, useValue: mockWeatherService },
      ],
    }).compile();

    // Run the command with arguments
    await CommandTestFactory.run(commandInstance, ['weather', 'Miami', '--verbose']);

    // Verify the weather service was called with the right city
    expect(mockWeatherService.getWeather).toHaveBeenCalledWith('Miami');

    // Verify the console output
    expect(consoleLogSpy).toHaveBeenCalledWith('Weather for Miami: Sunny, 75°F');

    // Clean up
    consoleLogSpy.mockRestore();
  });

  it('should use default city when none provided', async () => {
    const consoleLogSpy = jest.spyOn(console, 'log').mockImplementation();

    const mockWeatherService = {
      getWeather: jest.fn().mockResolvedValue('Partly cloudy, 65°F'),
    };

    const commandInstance = await CommandTestFactory.createTestingCommand({
      providers: [
        WeatherCommand,
        { provide: WeatherService, useValue: mockWeatherService },
      ],
    }).compile();

    await CommandTestFactory.run(commandInstance, ['weather']);

    expect(mockWeatherService.getWeather).toHaveBeenCalledWith('New York');
    expect(consoleLogSpy).toHaveBeenCalledWith('Weather for New York: Partly cloudy, 65°F');

    consoleLogSpy.mockRestore();
  });
});
Testing Interactive CLI Commands
For CLI applications that require user input through prompts, nest-commander-testing provides a way to mock user responses:
// pizza.command.ts
import { Command, CommandRunner } from 'nest-commander';
import { InquirerService } from 'nest-commander';

@Command({ name: 'pizza', description: 'Order a pizza' })
export class PizzaCommand extends CommandRunner {
  constructor(private readonly inquirerService: InquirerService) {
    super();
  }

  async run(): Promise<void> {
    const answers = await this.inquirerService.ask<{
      size: string;
      toppings: string[];
    }>('pizza-questions', undefined);

    console.log(`Ordering ${answers.size} pizza with ${answers.toppings.join(', ')}`);
    return Promise.resolve();
  }
}
Testing this interactive command:
// pizza.command.spec.ts
import { CommandTestFactory } from 'nest-commander-testing';
import { PizzaCommand } from './pizza.command';

describe('PizzaCommand', () => {
  it('should order pizza with selected options', async () => {
    const consoleLogSpy = jest.spyOn(console, 'log').mockImplementation();

    const commandInstance = await CommandTestFactory.createTestingCommand({
      providers: [PizzaCommand],
    }).compile();

    // Set mock answers for the inquirer prompts
    CommandTestFactory.setAnswers({
      size: 'large',
      toppings: ['pepperoni', 'mushrooms']
    });

    await CommandTestFactory.run(commandInstance, ['pizza']);

    expect(consoleLogSpy).toHaveBeenCalledWith(
      'Ordering large pizza with pepperoni, mushrooms'
    );

    consoleLogSpy.mockRestore();
  });
});
End-to-End Testing
// app.e2e-spec.ts
import { Test, TestingModule } from '@nestjs/testing';
import { INestApplication } from '@nestjs/common';
import * as request from 'supertest';
import { AppModule } from './../src/app.module';

describe('AppController (e2e)', () => {
  let app: INestApplication;

  beforeEach(async () => {
    const moduleFixture: TestingModule = await Test.createTestingModule({
      imports: [AppModule],
    }).compile();

    app = moduleFixture.createNestApplication();
    await app.init();
  });

  it('/blog (GET)', () => {
    return request(app.getHttpServer())
      .get('/blog')
      .expect(200)
      .expect([]);
  });
});
Conclusion
NestJS is a powerful framework that brings together the best of Node.js and TypeScript in an Angular-like structure. It provides a robust foundation for building server-side applications of all sizes, from small APIs to large-scale enterprise applications.
The learning curve might be a bit steeper than some other Node.js frameworks, but the benefits in terms of code organization, maintainability, and the ability to scale make it worth the investment.
Whether you're building a simple blog API or a complex microservices architecture, NestJS provides the tools and structure to make your development experience more productive and your applications more robust.
Resources for Further Learning
- Official NestJS Documentation
- NestJS GitHub Repository
- NestJS Community on X
- NestJS Community on Reddit
Happy coding with NestJS!

Top comments (1)
Very good article, covering all the most important topics about NestJS. I didn't know about the command feature, good to learn.