
Almost every web application needs the functionality to send transactional emails in response to various triggers. Events like account registration, password resets, purchase receipts, and user verification are among the many tasks today’s applications need to accomplish via email. These emails are crucial for notifying users of important updates and enabling key user workflows in your application.
This post explores three different options for sending email from within a Node.js app. I’ll share each method’s pros and cons, so you can select the best method for your needs.
3 options for sending email with Node.js
As a server-side tool, Node.js allows you to send emails using a few different options. I’ll provide an overview of the three main options — SMTP, email API, and multi-channel notification service — before diving into a technical tutorial for each of them.
1. Using SMTP
Simple Mail Transfer Protocol (SMTP) is a technology for sending outgoing emails across networks and is the most common transport method. It serves as a relay service to send email from one server to another.
When you send an email to a friend using an email client like Gmail, an outgoing (SMTP) server picks it up and connects with your friend’s receiving server. The two servers communicate using guidelines defined by the SMTP protocol, determining who the recipient is and how they can receive the incoming mail. Email clients usually have an SMTP server associated with them to aid in email delivery.
Advantages of using SMTP
The major advantage of SMTP is that it’s widely adopted and easy to set up and integrate in a web application. Email service providers, which I cover below, might have more features, but using them also means relying on a third-party intermediary to deliver your emails. With SMTP, you get fine-grained control over every aspect of your email sending.
Drawbacks of using SMTP
The major drawback of SMTP is it can be insecure and easily hacked. The standard SMTP protocol is susceptible to DDoS attacks, phishing, and data breaches. If you decide to use your own email SMTP server, you will be responsible for long-term server maintenance, which requires a lot of ongoing effort to maintain securely.
Sending emails with SMTP is also much slower than using an API service. SMTP requires extensive back-and-forth between mail SMTP servers to deliver a message. Even then the email may fail to deliver without feedback if the server’s IP address is blacklisted or a firewall has blocked a port. This back-and-forth also means multiple points of failure.
2. Using a transactional email API
Transactional email services allow you to send email from your app using a hosted API. Instead of managing email servers and their requirements yourself, you can use an email API to handle message assembly, sending, and deliverability. Transactional email APIs come in handy when you need a reliable service that can be integrated quickly, can support high-volume sending, and offers rich functionality.
There are many transactional email services on the market. The most popular ones include Amazon SES, Postmark, SparkPost, SendGrid, Mailgun, and Mailchimp Transactional (formerly Mandrill). All of them are paid services, though most offer free or low-cost introductory plans.
Advantages of using a transactional email API
The main advantage of using a transactional email service is they’re very easy to set up and easy to use, especially since most services come with comprehensive documentation. They provide monitoring, such as whether emails are delivering, as well as web analytics and reporting, including bounce rate, open, click, and unsubscribe tracking.
Other key advantages of using an email API are that they’re highly scalable, they add an extra layer of security by utilizing API keys as opposed to the SMTP method, and they can save you significant engineering time and costs when it comes to ongoing maintenance.
Drawbacks of using a transactional email API
The major drawback of using a hosted email service, instead of SMTP, is you’re relying on a third-party to handle your emails. Before picking a provider, spend some time researching their features, guaranteed uptime, email deliverability rates, and API documentation.
The other drawback of using a hosted email service, instead of a multi-channel notifications service (which I cover below), is if your application needed to notify users on other channels, you’d have to integrate each new channel separately. For example, you’d have to separately integrate mobile and web push, SMS, and chat apps like Slack and WhatsApp. Whether all the extra code and effort is worth it is up to you.
3. Using a multi-channel notification service
Multichannel notification services, such as Courier, allow you to reach users across a number of different channels using one uniform API. They usually allow you to bring your own provider for each channel; in the case of email, that could be your own SMTP server or a hosted transactional email API.
With a multichannel notification service, you can easily add more channels or even switch your email service provider without having to touch your code. If you wanted to notify users across email, SMS, push, or chat apps like Slack and WhatsApp, you could do that in one fell swoop.
Courier, in particular, gives you additional functionality — on top of what you’d get with a transactional email service. You can design your emails in a flexible visual and code editor, set delivery rules and create simple workflows, and monitor delivery status in real-time.
Advantages of using a multichannel notification service
The major advantage of using a multichannel notification service is you can easily start sending notifications from other channels, such as SMS, push, and chat apps, using the same API. This means there’s less code to maintain when integrating multiple services and no additional work required to add a new channel or switch providers.
Another advantage of using a service like Courier is it allows non-technical users to edit the content, styling, and even branding of outgoing emails without involving developers or deploying code. You can easily preview your emails in Courier using dummy data and safely troubleshoot notifications in a separate test environment before pushing to production.
Drawbacks of using a multichannel notification service
The drawbacks of using a multichannel notification service are similar to directly integrating with a transactional email API. You are relying on a third party to manage your message assembly, sending, and delivery. Plan to spend time researching your options and exploring the product before making a decision. Courier has a generous free plan, which includes 10,000 notifications per month.
Tutorial: How to send emails with Nodemailer and SMTP
Nodemailer is a Node.js module used for sending emails and is the most popular Node.js email package. You can use Nodemailer to create HTML or plain-text emails, add attachments, and send your emails through different transport methods, including built-in SMTP support. It requires Node.js 6.0 or newer.
Let’s walk through how to send email using Nodemailer. The first step is to create a Node.js application:
    mkdir email-nodeapp && cd email-nodeapp
    npm init -y
Here you’ve created a folder and initialized a package.json file using the npm init command. The -y flag is there to skip the interactive back-and-forth questions by npm.
Next, install the Nodemailer module:
npm install nodemailer
Nodemailer’s createTransport function specifies which method you want to use for sending email. It takes the connection data and credentials as an argument. In this case, since SMTP is the preferred transport, you will need to define an SMTP host, port, and credential password for accessing a host SMTP server.
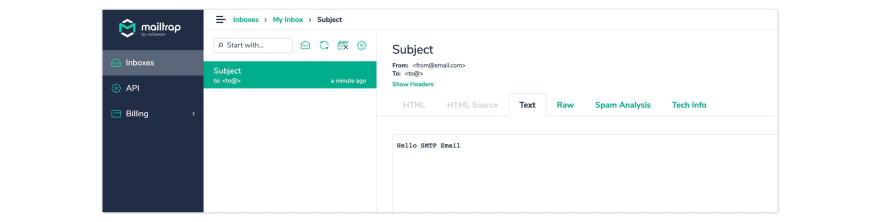
To get a host URL, you need an SMTP server. For development purposes, you can use Mailtrap, or a similar service, to serve as a fake SMTP server. A fake SMTP server lets you avoid cluttering your real account with multiple tests while still seeing how your test emails behave — do all the buttons work the way they’re supposed to, is the formatting still correct after sending, and so on.
Create a Mailtrap account if you don’t already have one. In the Integrations dropdown on the dashboard, select Nodemailer and copy the credentials displayed.

Create an email.js file and add the following:
    const nodemailer = require('nodemailer');
      let transporter = nodemailer.createTransport({
             host: 'smtp.mailtrap.io',
             port: 2525,
             auth: {
                 user: "<user>",
                 pass: "<pass>"
             }
     })
Substitute the host, user, and password with the Mailtrap credentials you copied from the dashboard above. Now you can send an email using the sendMail method of Nodemailer’s createTransport function.
Append the following to the email.js:
    message = {
         from: "from-example@email.com",
         to: "to-example@email.com",
         subject: "Subject",
         text: "Hello SMTP Email"
    }
    transporter.sendMail(message, **function**(err, info) {
         if (err) {
           console.log(err)
         } else {
           console.log(info);
         }
Nodemailer also supports sending emails using HTML. All you need to do is add the html attribute to your message object like so:
    message = {
         from: "from@email.com",
         to: "to@email.com",
         subject: "Subject",
         html: "<h1>Hello SMTP Email</h1>"
     }
To test that it works, go to your terminal and run:
node email.js
Go to your Mailtrap dashboard to see your email was received.
Tutorial: How to send emails using a transactional email API
There are a variety of email-as-a-service platforms and APIs, such as SendGrid and Mailgun, among others. For this article, I’ll demonstrate sending emails from within a Node application using SendGrid, which allows you to send up to 100 emails per month for free.
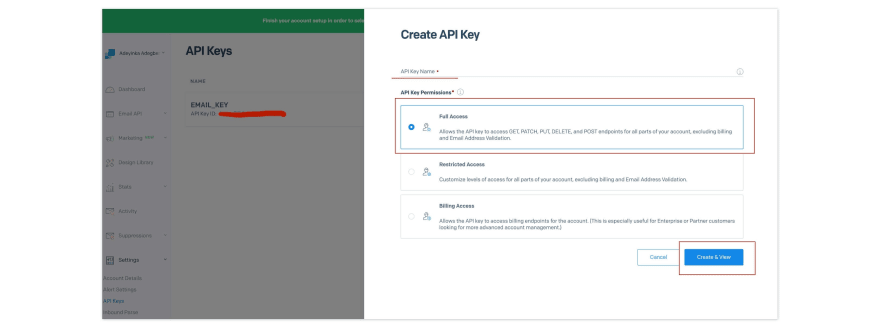
To start sending emails with SendGrid, the first step is to sign up for the service. Then you’ll need to create a SendGrid API key for sending email.
To create an API key, go to Settings > API Keys on SendGrid’s dashboard, then click “Create API Key.” Give the key a name, select “Full Access,” then click “Create & View.” Copy your API key and keep it safe for later use.
Next, install the SendGrid JavaScript client with npm:
npm install --save @sendgrid/mail
Create a file in your project directory named sendgrid.js:
touch sendgrid.js
In the sendgrid.js file, add the following lines of code:
    const sendgrid = require('@sendgrid/mail');

    const SENDGRID_API_KEY = "<SENDGRID_API_KEY>"

    sendgrid.setApiKey(SENDGRID_API_KEY)

    const msg = {
       to: 'test@example.com',
     // Change to your recipient
       from: 'test@example.com',
     // Change to your verified sender
       subject: 'Sending with SendGrid Is Fun',
       text: 'and easy to do anywhere, even with Node.js',
       html: '<strong>and easy to do anywhere, even with Node.js</strong>',
    }
    sendgrid
       .send(msg)
       .then((resp) => {
         console.log('Email sent\n', resp)
       })
       .catch((error) => {
         console.error(error)
     })
Replace the variable SENDGRID_API_KEY with the SendGrid API key you created previously and make sure the email address in the From field has been verified by SendGrid. You can do this by creating a sender identity. This verifies that the email address actually belongs to you. Also, replace the email address in the To field from test@example.com to your test recipient.
To test that it works, run:
node sendgrid.js
To see if your email was delivered, check the SendGrid dashboard, and on the sidebar, select “Activity.” There, you should see the email you just sent. SendGrid will show you whether it was delivered or not and whether it has been opened.
Tutorial: How to send emails using a multichannel notification service
Courier is a multichannel notifications platform that enables you to reach your users on any channel using one uniform API. With Courier, you can bring your own email service provider, including SMTP or Gmail, or any of the popular email APIs like SendGrid, Amazon SES, and Postmark.
To start using Courier, create an account. You can send up to 10,000 notifications per month for free. During the onboarding flow, you’ll be asked to give Courier permission to send email on your behalf from your Gmail account. You can skip this step if you’re planning on using a different ESP, but we recommend setting it up as the fastest way to test out sending from Courier.
To use Courier to send transactional emails, head to the Courier dashboard and select Designer on the lefthand menu. Then, click the “Create Notification” button.
Select Gmail in the provider selection modal and hit “Continue”.

From there, you’ll want to add the content for your email notification. You can use the toolbar to drag and drop blocks for text, images, buttons, and more. You can even add Markdown or add code blocks to further customize your email.

Next, send the email notification from within Node.js using the Courier npm package@trycourier/courier. To install it, run:
npm install @trycourier/courier
Create a file in your app directory named courier.js:
touch courier.js
Courier will automatically generate a code snippet for your notification, which you can copy-paste from the Send tab. Add the following lines of code to the file:
    const { CourierClient } = require("@trycourier/courier");

    const courier = CourierClient({ authorizationToken: "<AUTH_TOKEN>" });
      courier.send({
       eventId: "<EVENT ID>", *// your Notification ID
       recipientId: "<RECIPIENT_ID", *// usually your system's User ID
       profile: {
         email: "<EMAIL_ADDRESS>"
       },
       data: {} *// optional variables for merging into templates }).then((resp) => {
         console.log('Email sent', resp)
       })
       .catch((error) => {
         console.error(error)
       });
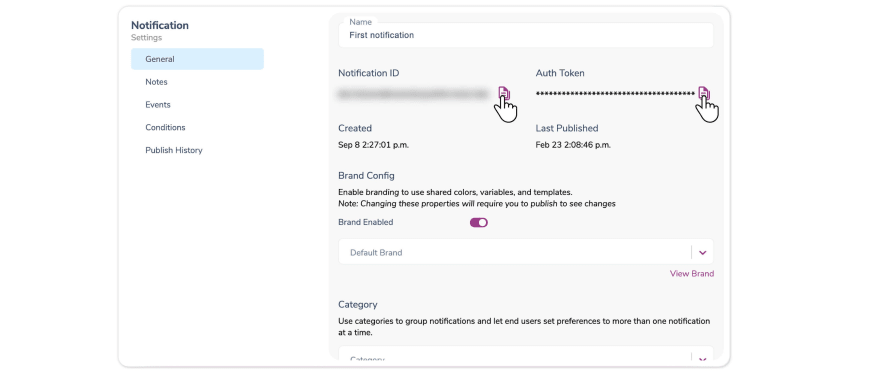
The Courier package is imported into the file, and the Courier client is instantiated. The client takes an authentication token, which you can get from the Courier notification settings created earlier. Click the gear icon from within your notification and copy the masked auth token.
The Courier client has a send method which takes an event ID, which is either the notification ID or custom event that you’ve mapped to your notification. The recipient Id should be a unique string you can use to identify the recipient and look them up in data logs. Note that email refers to the email address of the recipient.
To check the status of your email, head to the Data tab in your Courier dashboard. Courier will tell you if your email has been delivered, opened, and/or clicked. Courier will also tell you if there are any errors and when in the delivery pipeline they occurred.
Conclusion
In this guide, we’ve explored methods for sending email in a Node.js web application. You’ve learned how to use SMTP and Nodemailer, a transactional email service (in this case, SendGrid), and a multichannel notifications service (in this case, Courier). Hopefully, reviewing these pros and cons will help you pick the best option for efficiently and securely sending emails in your web application.

Top comments (0)