
In the last article of this series, I am going to show you how to create the same exact pricing component in VueJS.
That's going to be a piece of cake since it's just a matter of following the same approach I used for React.
Let's create a Pricing.vue template file, and add the HTML 👇
<template>
  <div class="pricing">
    <div class="pricing-slider center-content">
      <label class="form-slider">
        <span>How many users do you have?</span>
        <input type="range">
      </label>
      <div class="pricing-slider-value">
        <!-- {{ Current slider value }} -->
      </div>
    </div>

    <div class="pricing-items">
      <div class="pricing-item">
        <div class="pricing-item-inner">
          <div class="pricing-item-content">
            <div class="pricing-item-header center-content">
              <div class="pricing-item-title">Basic</div>
              <div class="pricing-item-price">
                <span class="pricing-item-price-currency"></span>
                <span class="pricing-item-price-amount">Free</span>
              </div>
            </div>
            <div class="pricing-item-features">
              <ul class="pricing-item-features-list">
                <li class="is-checked">Excepteur sint occaecat</li>
                <li class="is-checked">Excepteur sint occaecat</li>
                <li class="is-checked">Excepteur sint occaecat</li>
                <li>Excepteur sint occaecat</li>
                <li>Excepteur sint occaecat</li>
              </ul>
            </div>
          </div>
          <div class="pricing-item-cta">
            <a class="button" href="http://cruip.com/">Buy Now</a>
          </div>
        </div>
      </div>
    </div>
  </div>
</template>

<script>
export default {
  name: "Pricing"
};
</script>
Shaping input and output data
We already have a data scheme with input and output values (check out the first article of this series to know more).
| Key | Slider value | Price, currency | Price, amount | Price, after |
|---|---|---|---|---|
| 0 | 1,000 | Free | ||
| 1 | 1,250 | $ | 13 | /m |
| 2 | 1,500 | $ | 17 | /m |
| 3 | 2,000 | $ | 21 | /m |
| 4 | 2,500 | $ | 25 | /m |
| 5 | 3,500 | $ | 42 | /m |
| 6 | 6,000 | $ | 58 | /m |
| 7 | 15,000 | $ | 117 | /m |
| 8 | 50,000 | $ | 208 | /m |
| 9 | 50,000+ | Contact us |
We will use the data object to contain those values.
Defining the component data
React has a built-in data function that returns an object. Here is where we will store input range and data scheme values.
data() {
  return {
    priceInputValue: "0",   // initial input value
    priceInput: {           // slider values
      0: "1,000",
      1: "1,250",
      2: "1,500",
      3: "2,000",
      4: "2,500",
      5: "3,500",
      6: "6,000",
      7: "15,000",
      8: "50,000",
      9: "50,000+"
    },
    priceOutput: {          // output values
      plan1: {
        0: ["", "Free", ""],
        1: ["$", "13", "/m"],
        2: ["$", "17", "/m"],
        3: ["$", "21", "/m"],
        4: ["$", "25", "/m"],
        5: ["$", "42", "/m"],
        6: ["$", "58", "/m"],
        7: ["$", "117", "/m"],
        8: ["$", "208", "/m"],
        9: ["", "Contact Us", ""]
      }
    }
  };
}
Now bind the priceInputValue to the input range with the v-model directive
<input type="range" v-model="priceInputValue" />
Setting range slider attributes
Create a ref on the input range element
<input type="range" ref="slider" v-model="priceInputValue">
Let's set the range slider min, max attributes, right after the component output has been rendered to the DOM 👇
mounted() {
  this.$refs.slider.setAttribute("min", 0);
  this.$refs.slider.setAttribute(
    "max",
    Object.keys(this.priceInput).length - 1
  );
}
We have now a range slider whose values go from 0 to 9! 🙌
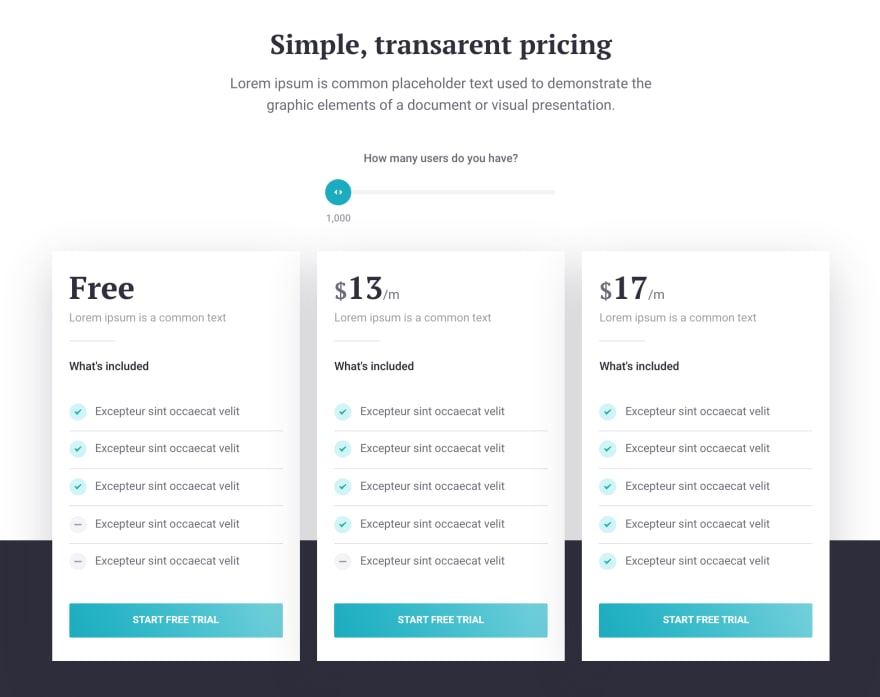
Here is a recap of what we have built so far:
Binding input and output data
We have a working range slider, but it is still disconnected from the visualized price.
We need another method that retrieves the data to be outputted, accordingly with the current input value
getPricingData(obj, pos) {
  return pos !== undefined
    ? obj[this.priceInputValue][pos]
    : obj[this.priceInputValue];
}
This method has two parameters:
-
obj- The input or output object we want to retrieve data from -
pos(optional) - The position of a required element in the array, if there is any. It is required for the plan objects, since to each key corresponds an array of values (e.g.0: ["", "Free", ""], ...).
So, to output the current slider value, we will call the method like this 👇
<div class="pricing-slider-value">{{ getPricingData(priceInput) }}</div>
And here is how to output the price data instead 👇
<div class="pricing-item-price">
  <span class="pricing-item-price-currency">
    {{ getPricingData(this.priceOutput.plan1, 0) }}
  </span>
  <span class="pricing-item-price-amount">
    {{ getPricingData(this.priceOutput.plan1, 1) }}
  </span>
  {{ getPricingData(this.priceOutput.plan1, 2) }}
</div>
Adjusting the slider value element position
Almost there. 🏁 We want the slider value to be following the slider thumb.
We need a new method for that but, before proceeding, there is another DOM element that needs to be referenced.
Create a ref for the current slider value
<div ref="sliderValue" class="pricing-slider-value">{{ getPricingData(priceInput) }}</div>
Get the slider thumb size from a CSS property 👍
this.thumbSize = parseInt(
  window
    .getComputedStyle(this.$refs.sliderValue)
    .getPropertyValue("--thumb-size"),
  10
);
Now that we have referenced the .pricing-slider-value element, let's create the method we need.
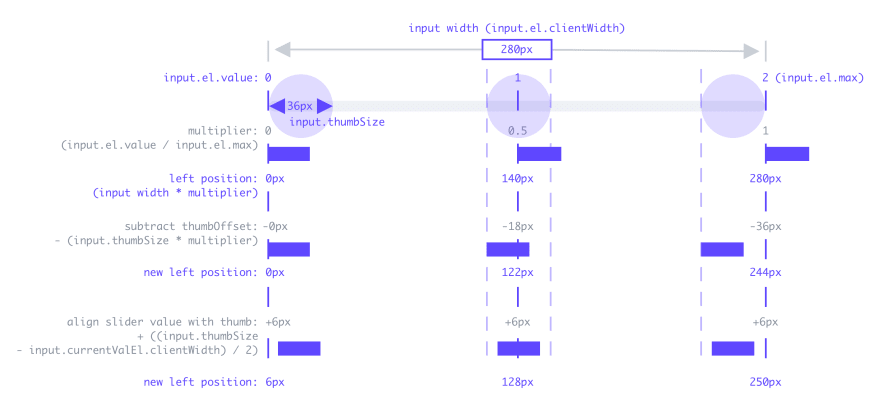
handleSliderValuePosition(input) {
  const multiplier = input.value / input.max;
  const thumbOffset = this.thumbSize * multiplier;
  const priceInputOffset =
    (this.thumbSize - this.$refs.sliderValue.clientWidth) / 2;
  this.$refs.sliderValue.style.left =
    input.clientWidth * multiplier - thumbOffset + priceInputOffset + "px";
},
Here is a visual representation of what the method does 👇
Call the method as soon as the component has rendered.
mounted() {
  this.handleSliderValuePosition(this.$refs.slider);
}
We also need to call that method every time the input range value changes, so let's use the v-on directive to listen to element input event:
<input
  type="range"
  ref="slider"
  v-model="priceInputValue"
  @input="handleSliderValuePosition($event.target)"
>
Conclusion
Here is the final result. Click on Open Sandbox to see the full code.
I hope you enjoyed this tutorial. If you want to see this in action, here is a landing page template where it’s implemented 👉 Evelyn

Top comments (0)