
If you have a bit of Unity experience, then you know that game projects are complex beasts that contain a wide variety of files - from source code to graphical assets, a Unity folder hierarchy is divided in quite a lot of subfolders with a plethora of file types.
Yet those files need to remain structured and organised, otherwise it’s a recipe for disaster!
That’s why, in video game development as in other domains, we have to follow good practices and version our code thanks to Source Code Management (SCM) solutions - also known as Version Control. And one of the best-known tools for this is Git which is still, to this day, a favourite among developers (as shown in a previous survey we conducted)... although as we’ll see in this article, it’s not always suited for versioning game projects, and it requires some adjustments in your Unity settings.
Tuning your project’s settings for Git versioning
Versioning a Unity project with Git is not exactly plug-and-play; indeed, it’s essential to understand how to properly specify the SCM which files are relevant and which should be ignored - and to ensure you really commit all your project’s data, in particular the relationships between your assets.
Using the right .gitignore model
Now, if you’re ever faced with versioning your first Unity project, you might be a bit frightened by all the files you’ll need to commit and update... but fear not, there are actually some good practices to keep in mind when versioning a Unity project hierarchy with Git to reduce the amount of versioned files!
As is the case for most Git repositories, it’s crucial to properly tell the tool which files or folders it can safely ignore without losing any data in the process, thanks to a .gitignore file. For Unity, this .gitignore typically includes at least the following:
-
/[Ll]ibrary/: Luckily, Unity projects don’t need to be shipped with all of their dependencies directly! For versioning, you can just share thePackages/folder that contains themanifest.jsonandpackages-lock.jsonfiles: those files are simple metadata lists that detail all the required lib dependencies and will allow another Unity instance to retrieve all the needed packages in the right version. -
/[Oo]bj/,/[Bb]uild/,/[Bb]uilds/...: All the files that are auto-generated by Unity during compilation, or at runtime, can of course be ignored since another Unity instance will re-generate them when the time comes. -
*.tmp, /[Tt]emp/and/[Ll]ogs/: The temporary files can obviously be ignored since they’re worksession-related (they’re created dynamically when you start up Unity and destroyed when you close it, and they depend on the machine you open the project on). -
/[Rr]ecordings/and/[Mm]emoryCaptures/: Those files can quickly grow in size and hurt your storage usage - plus, they can contain sensitive data.
This list is far from comprehensive - to get a full example .gitignore file, you can either:
- check out this official sample, and copy it in your own Git repo
- or, if you’re just creating your project and you’re using Github or Gitlab for example, reference this template in the UI to add directly to your project:
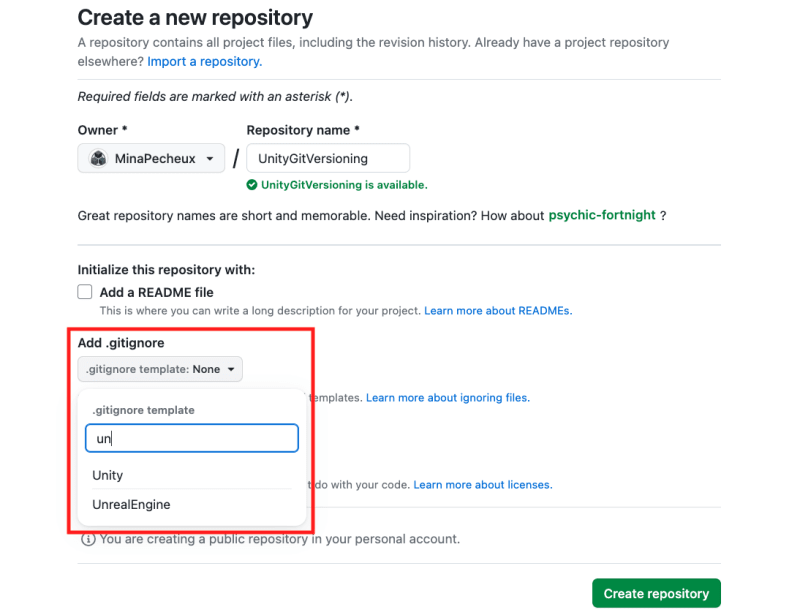
Of course, if you have any types of credentials in your Unity folder (such as keys for publishing to the Apple Store or Google Play, or a unique Unity Pro id), you should definitely add these to your .gitignore too. Because don’t forget that even removing these files with a new commit won’t erase them from the repo’s history :)
Checking a few editor settings for even cleaner repositories
In addition to excluding the unnecessary files and folders with your .gitignore, it’s also important to tell Unity how to properly store and reference the files that you do wish to commit and version.
Keeping the references
First of all, you have to remember that a game project is not just a bunch of code snippets and assets tossed together in a big pile; all of these pieces of data have to be linked and referenced the right way so that you eventually get the expected interactions and an actual playable thing!
In a Unity project, these connections and references are handled by the famous .meta files - the Editor automatically creates one for every folder and file in your project. And yet, if you explore the hierarchy of one of your game projects outside of the Editor, by default, you won’t see any of these .meta files.
Similarly, by default, Git versioning won’t be able to see these .meta files and it will thus lose all these references in commits.
To avoid this and actually keep the connections, you need to go to the Project Settings panel and, in the Version Control section, set the Mode option to Visible Meta Files:

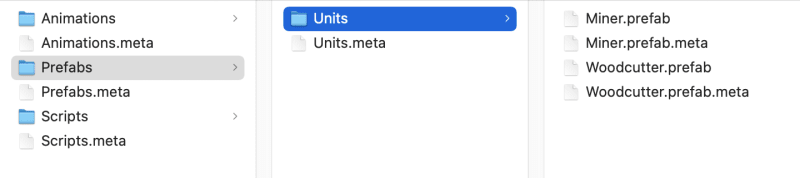
If you take another look at your project in your OS file explorer, you should now see .meta files next to each folder and asset:
Versioning the assets more easily
Another interesting setting is the asset serialisation mode. If you want your project to be more adapted to Git versioning (which is a text-based SCM tool), then you can force Unity to serialise the assets as text.
Once again, go to your Project Settings and, in the Editor section, make sure that, in the Asset Serialization block, the Mode is set to Force Text:

This will make your Unity assets easier to version for Git... but, sadly, it doesn’t solve everything!
Important note: After any of these changes, don’t forget to save them explicitly by going to the File | Save Project menu ;)
Handling large assets
Asset management is a big topic (as we’ve already discussed in this other article), and anyone who’s tried to use version control on multimedia projects like video games or animation movies knows that the common SCM tools can’t always cut it. Especially when it comes to versioning large and complex files such as images, movies, 3D models or audio clips.
The problems with multimedia files
Large binary assets are always the pain point when using Git - and for several reasons:
- First and foremost, Git was not designed to deal with these types of files. Its text-based philosophy is excellent for versioning code or, to a certain extent, project configuration files, but it really lacks some features for multimedia assets.
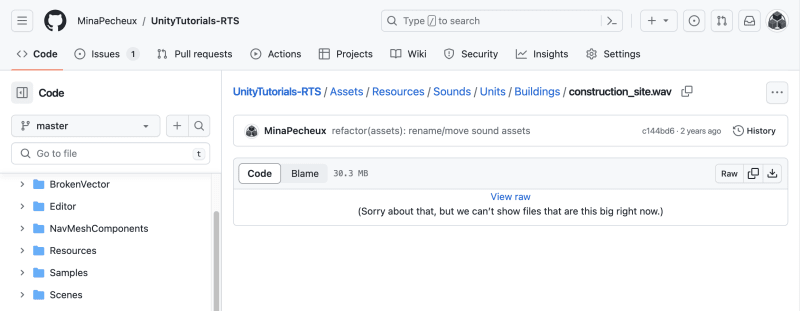
- Even if you manage to commit and store your files, don’t hope to get easy-to-read version comparisons for your images or your videos: while Git providers like Github or Gitlab offer pretty impressive tooling for browsing your code history and studying the changes made by your peers in the codebase, they don’t have anything remotely as efficient for binary assets. \ And if your file is too large, you won’t even get a preview - that’s typically the case for audio files:
- Moreover, those large assets are often resources created by artists - and Git is by no means easy-to-apprehend for non-coders. Versioning these assets therefore either implies that the artists take time to learn how to use Git (or at least a UI Git client), or that you devote a team member to integration.
These issues shouldn’t be ignored because Git is still the go-to versioning tool for a lot of developers, so many will just use it as a reflex when they set up the project. But if you’ve not properly assessed whether it’s fit for your team, you might run into quite a number of difficulties later on, when you bring in your actual assets.
Of course, the Unity team and community are well aware of these problems, and there are a few tricks you can learn to mitigate them...
Improving the management of your large files
Now that we know large files are the most common issue for Unity Git versioning, let’s discuss some interesting techniques for better configuring and storing them.
Testing and limiting the size of your images
An obvious but important thing to keep in mind is that your files shouldn’t be larger than needed. This is particularly valuable for images since, by picking the right format and the right resolution, you can greatly reduce the file’s size and thus improve your storage consumption.
When you’re working with bitmap images, there’s always this concern that the asset might be scaled up somewhere, and that it will end up blurry if you, as an artist, haven’t prepared a file with a high enough resolution.
However, all in all, games aren’t that responsive - sure, you’ll want to accommodate for various platforms and screen sizes, but you don’t necessarily have to prepare each and every image in your project for a 4k display. So a good process is to keep a high-resolution source file archived somewhere out of version control, and only include the final exported assets in the versioning, while making sure those exports suit the project’s needs - no less, and no more.
In order to check if a given image size works for your game, it’s possible to actually test it out inside Unity by defining a maximum resolution for the image asset in the Editor at import time, and then verifying it’s okay in-game:
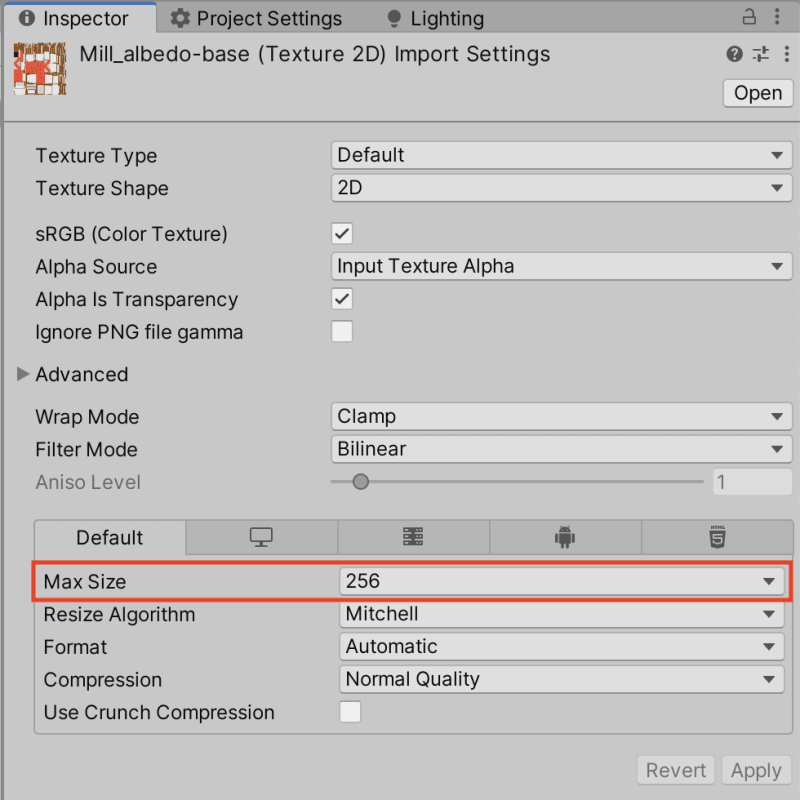
This import setting doesn’t modify the image file itself, it simply limits the max resolution inside Unity - so you can use this setting to check down to which resolution the image is still legible in your game, and then re-apply those settings to your export to actually reduce the file size.
Re-using instead of duplicating
Another nice trick is to try and anticipate your asset variations, and produce some base that can then be transformed automatically into the other alternatives, without duplicating this file over and over again.
For example, consider a 2D platformer game with some little characters jumping around, each for one player. Each avatar has the exact same shape, but the colours have to be different to distinguish between each player:
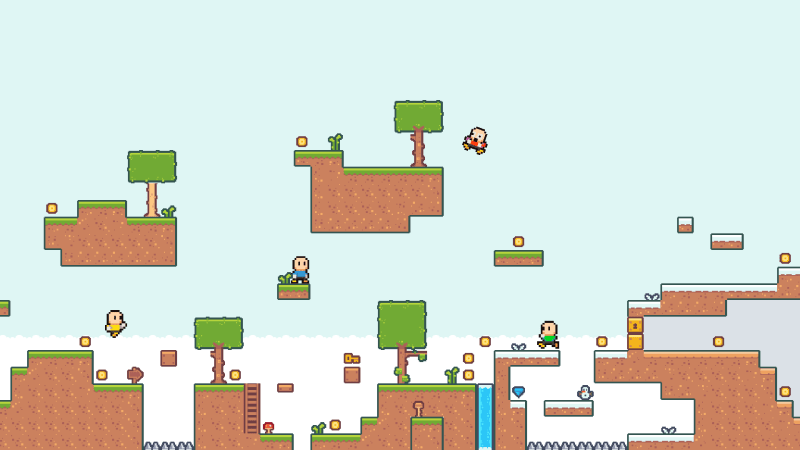
Now, suppose that these sprites are defined in a spritesheet, so as to have all the animations and poses. Then, a naive solution could be to prepare one spritesheet per player, and vary the colours on each, right?
The problem is that this is very risky in terms of maintainability (since changing a chunk of one spritesheet requires the artist to update all the others the same way, and this is very error prone), and it is absolutely not efficient in terms of storage. A better solution is thus to use some colour-swap shader to create per-player colour variations, and switch the colour palette of the spritesheet accordingly.
And it’s the same for materials, which can be customised at runtime using a MaterialPropertyBlock instance; or sounds which can be re-pitched and even chopped down to create other audio clips; or 3D models that can be combined to form unique sets.
Using Git LFS... or not?
Finally, it’s worth talking a bit about the Git Large File Storage system, also known as Git LFS.
In short, Git LFS is a Git command-line extension that is meant to simplify the versioning of large files. As explained on the tool’s main page, the goal is to better deal with heavy resources (up to several GB), keep your main Git repo manageable by externalising these large assets and benefit from faster push and pulls on these big objects, all the while working with a Git-like solution.
That’s very nice and this page also shows you how quick it is to start using Git LFS... unfortunately, from my own experience and the experience of many users, Git LFS becomes a real thorn in your side the minute you install it in your pipeline.
From my own experience, it’s true that Git LFS does make the push and pulls faster. However, it also requires you to list all your “asset types” (meaning the file extensions you consider like large files, and want to include in this alternate system). And that you maintain this list. And that you migrate your previous assets that fall under this list, if any, to the Git LFS system. And you can’t really use SSH easily, so you’re bound to fall back to HTTPS transfers, whereas your main Git repo may be using SSH.
Oh and, yes - if you’re mixing Git LFS with Github or Gitlab, the moment you begin to really store some fair amount of assets, you’ll need to buy additional LFS data storage, and this can quickly grow to a significant amount of money.
That’s an awful lot of trouble - even though, to date, Git LFS is about the only Git-solution for managing your large files. So, does that mean despite its wide usage among developers, Git is not suited for versioning video games? Should we try and find another SCM tool that’s better at handling our heavy assets?
Switching to a SCM with native large file management?
At this point, it’s clear that although Git is the de facto SCM tool in many domains, it’s not the perfect fit for game projects versioning. In particular, its lack of support for large files severely complicates the management of a Unity project for example. So: wouldn’t it be cool to find an alternative that both coders and artists can use, and that handles large binary files better?
Well, actually - there is one worth taking a look at: a cloud-native SCM tool, currently in beta, called Diversion.
Diversion is working hard on integrating large assets management in the normal versioning pipeline, no addons required, and with an easy-to-use interface for devs and artists alike. So it lets you version your source code and your big assets next to each other in one unified way, no matter their size:

This way, your team can keep together all the project files and rely on just a single tool, rather than extending the SCM solution with command-line plugins specifically for one kind of asset!
Conclusion
Git is still one of the most used versioning tools nowadays, and in lots of domains, it’s great for the job. However, with video games, there are some challenges that Git just wasn’t designed to solve - most notably, the management of large multimedia assets like images, movies or audio clips. So if you use Git for versioning a Unity project, there are a few guidelines to follow to make your workflow more manageable and streamlined.
When you want to store and version your heavy assets, you can rely on a command-line extension called Git LFS. It makes your push and pulls way faster, and it provides better examination tools for those big binary files. And yet, this tool is far from perfect, in particular because it’s not that easy-to-use, and you have to keep track of which file types should be handled by this alternate system.
On the other hand, other SCM solutions such as Diversion take this fact into account and aim at providing creators (both artists and developers) with a user-friendly scalable tool, capable of handling small code snippets and large asset files. So if you’re not satisfied with your Unity Git versioning, or if you’re curious about this alternative solution and you want to learn more, check out Diversion here!

Top comments (0)