Heyyo devs, welcome to part 4 of the React series. In this section, we will take look at some of the higher order functions of JavaScript which we will use often in React.If you haven't checked out part 3, click here.
What are higher order functions in JavaScript?
Higher order functions are those functions which can take a function as a parameter to perform a functionality or return a function.

Lets see in detail what it really is. A function can accept parameters, which can be any kind of data an integer, string, array etc. These parameters can be used anywhere inside the function. In case of higher order functions, these parameters can be a function itself. There are some built-in higher order function:
- map
- filter
- forEach
- reduce
We will be using map and filter function most of the time.
Now lets start with our webapp!
In our app we need to show all the items in the cart. In order to achieve this, we have to store this data as a state of the cart component. There will be multiple products in the cart, so the best practice to store these products are in an array. Each product will be an object with its details such as the product name, quantity and price.
product = {
    id: 1,
    product_name: "Product 1",
    price: 25.0,
    quantity: 1
}
The above snippet is a prototype of how each product's data will be stored. All of the products as objects will be kept inside an array which will be stored as the state of the component. Let us look at the below snippet.
src/components/Cart.jsx
import React from 'react';

export default class Cart extends React.Component {
    constructor (props) {
        super(props);
        this.state = {
            products: [
                {id: 1, product_name: "Product 1", price: 25.0, quantity: 1},
                {id: 2, product_name: "Product 2", price: 10.50, quantity: 3},
                {id: 3, product_name: "Product 3", price: 8.25, quantity: 1},
            ]
        }
    }

    render () {
        return (
            <h1>Hello, world</h1>
        )
    }
}
We can display this array as HTML template. Yes!! isn't that amazing.

If you are good with HTML then do your magic 😉. You can follow along if you are new to this.
import React from 'react';

export default class Cart extends React.Component {
    constructor (props) {
        super(props);
        this.state = {
            products: [
                {id: 1, product_name: "Product 1", price: 25.0, quantity: 1},
                {id: 2, product_name: "Product 2", price: 10.50, quantity: 3},
                {id: 3, product_name: "Product 3", price: 8.25, quantity: 1},
            ]
        }
    }

    render () {
        return (
            <div className="products">
              <div className="product">
                <div className="product__details">
                  <h3>Product 1</h3>
                  <p>Lorem ipsum dolor sit amet consectetur adipisicing elit. Veniam dolorum ipsum ex?</p>
                  <h3>$25</h3>
                </div>
                <div className="product__quantity-container">
                  <button>+</button>
                  <p>2</p>
                  <button>-</button>
                </div>
              </div>
            </div>
        )
    }
}
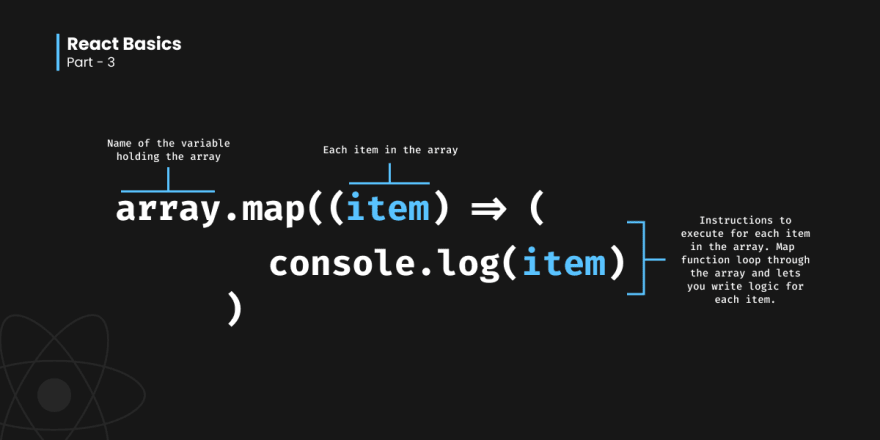
You can write the above HTML in your render function. In the above snippet we can see a <div> with className product, we will use the map function to repeat this <div> for the length of the products array. Let us analyze how a map function works.
NOTE - Normal class attribute does not work in jsx. It is written as className in React.

In our case, the instructions to execute for each item will be a small HTML template. We can change the Cart component as below.
import React from "react";

export default class Cart extends React.Component {
  constructor(props) {
    super(props);
    this.state = {
      products: [
        { id: 1, product_name: "Product 1", price: 25.0, quantity: 1 },
        { id: 2, product_name: "Product 2", price: 10.5, quantity: 3 },
        { id: 3, product_name: "Product 3", price: 8.25, quantity: 1 },
      ],
    };
  }

  render() {
    return (
      <div className="products">
        {this.state.products.map((product) => (
          <div className="product">
            <div className="product__details">
              <h3>Product 1</h3>
              <p>Lorem ipsum dolor sit amet consectetur adipisicing elit. Veniam dolorum ipsum ex?</p>
              <h3>$25</h3>
            </div>
            <div className="product__quantity-container">
              <button>+</button>
              <p>1</p>
              <button>-</button>
            </div>
          </div>
        ))}
      </div>
    );
  }
}
Whenever you want to write some JavaScript code inside an HTML template, you need to write it inside a curly braces. And yes, you can write more HTML inside those curly braces too.
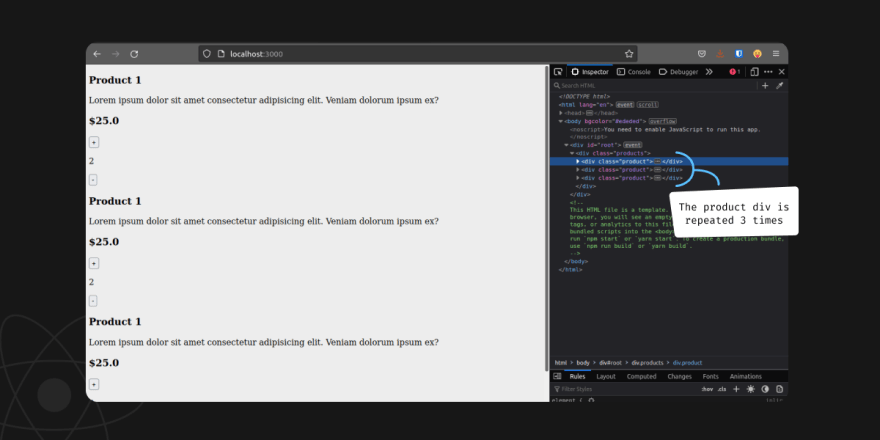
In the above snippet, we can see the map function called inside the curly braces. The array for the map function is the products array inside the state. So as discussed in the last blog, products array will be called like this.state.products along with that you can use any of the higher order function as you wish. Now if you check your browser, the <div> with className product will be repeated thrice because there are 3 items in the this.state.product array.

In each iteration of the map function, the item element will be an object containing all the data of the product. As discussed in the last blog, we can call the keys in the item object. Lets see how it is done.
import React from "react";

export default class Cart extends React.Component {
  constructor(props) {
    super(props);
    this.state = {
      products: [
        { id: 1, product_name: "Product 1", price: 25.0, quantity: 1 },
        { id: 2, product_name: "Product 2", price: 10.5, quantity: 3 },
        { id: 3, product_name: "Product 3", price: 8.25, quantity: 1 },
      ],
    };
  }

  render() {
    return (
      <div className="products">
        {this.state.products.map((product) => (
          <div className="product">
            <div className="product__details">
              <h3>{product.product_name}</h3>
              <p>Lorem ipsum dolor sit amet consectetur adipisicing elit. Veniam dolorum ipsum ex?</p>
              <h3>${product.price}</h3>
            </div>
            <div className="product__quantity-container">
              <button>+</button>
              <p>{product.quantity}</p>
              <button>-</button>
            </div>
          </div>
        ))}
      </div>
    );
  }
}
Change your template like the above snippet and check your browser.


TADA!!
It looks awful ofcourse. Lets add some stylesheets.
Organizing your resources is important. So create a folder in src named assets. Inside assets create a stylesheet named main.css.
The stylesheet is pretty huge so you can download mine here. This downloaded file can be replaced with the one we just created
Linking stylesheet
In React you cannot directly link a stylesheet to the index.html file. We will have to add it as an import statement in the Component jsx file. You can create different stylesheets for each component in your app but for the purpose of the tutorial I will be using one single global stylesheet for the whole app. In this case, I will add the stylesheet to the App.jsx file.
src/App.jsx
import Cart from "./components/Cart";
import "./assets/main.css";

function App() {
  return <Cart />;
}

export default App;
You can change the App.jsx file like the above snippet. The import statement in line 2 will include the css file and apply the styling. If you are creating different css file for each component then you should import the correct css file in their respective component.
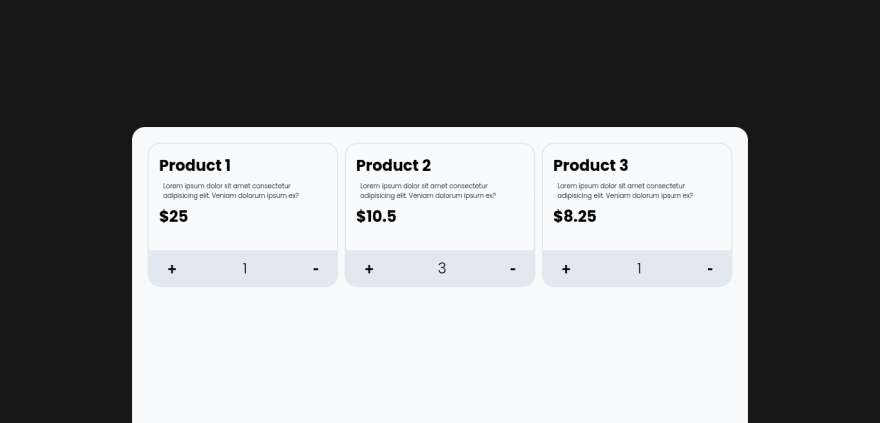
After the stylings it will look like this.

That's it for today!!
Thanks for reading 😊


Top comments (0)