
I recently wanted to figure out a way to place an entire development environment on a flash drive or portable SSD that I could take with me anywhere, plug into a PC, and to development work straight from there.
This proved significantly harder to do than I had first expected, with very little documentation online about how to achieve this. After spending quite a few hours trying different methods and techniques, I think I've found the best solution.
We are going to be placing a portable version of VS Code, Nodejs (with npm) and git on a single flash drive that can be used in any windows computer. We're also going to be using a portable terminal program (Cmder). Let's get started.
Step 1. Downloads
- VS Code
- Go to the VS Code download page
- Download the .zip x64 for windows.
- Nodejs
- Go to the Nodejs download page
- Download the Standalone Binary (.zip)
- Git
- Go to the Git download page
- Download the 64-bit "Portable Thumbdrive Edition"
- Cmder
- Go to the Cmder download page
- Download the Mini version (the full version already includes Git, but we're installing it separately).
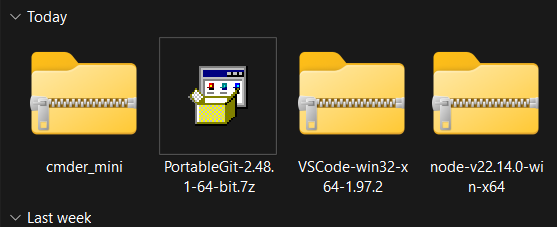
Extract each of these downloads here to the downloads page (but not the Git download yet).
Step 2. Folder Structure
- Mount your flashdrive or SSD in your PC, and open it. Mine opens as drive D, yours may be different. Adjust paths below accordingly.
Create the following structure:
D:
|-cmder
|-git
|-nodejs
|-vscode
|-ProjectsCopy the files from the extracted cmder-mini folder into your D:/cmder folder.
Copy the files from the extracted node folder into your D:/nodejs folder
Copy the files from the extracted VSCode into your D:/vscode folder
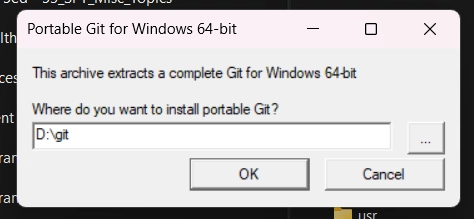
Run the PortableGit "installer". Place D:\git in the extraction field. This will basically just extract the git files there.
Step 3. Make VS Code Portable
- To set the vscode mode to portable, go to D:/vscode.
- Create an empty folder and call it "data". Now, open the Code.exe application that is also in the /vscode folder. This will create some required files automatically. You can close it after it has opened.
Step 4. Set up Cmder
At this point everything is basically set up! The only issue is that if we try to use node or git in a terminal, we're likely going to get an error that these commands are not recognized. That is why I've chosen to also download Cmder because it makes it easy to set up node and git, and it's so much nicer than the default windows command prompt.
- Navigate to D:/cmder and run Cmder.exe for the first time to create some necessary files. Close after opening.
- Navigate to D:/cmder/config and right click -> edit the user_profile.cmd file.
- Here, we need to tell Cmder to set the proper paths to node and git when it opens so that we can use them. It already has some boilerplate code here. At the end of the file, before
@echo offAdd the following:
- Here, we need to tell Cmder to set the proper paths to node and git when it opens so that we can use them. It already has some boilerplate code here. At the end of the file, before
set PATH=D:\nodejs;D:\git\cmd;%PATH%
This sets the two paths, one to our nodejs folder, and the other to our git/cmd folder where are git executable it located.
Note that you may need to edit these paths if you've set up your structure differently / use a different drive letter.
- Save and close the .cmd file.
- Now, re-open Cmder (D:/cmder/Cmder.exe). It should automatically set the path upon opening. To test it, run:
node -v
npm -v
git --version
This should return something like 11.1.0 under each command. If it does, congrats! You've successfully gotten node, npm, and git working on a portable drive.
Step 5. Usage
To use this setup:
- Navigate to your D:/vscode folder and open the vscode.exe executable.
- Open your cmder terminal either through the cmder.exe, or through the vscode terminal command shown in the optional step below.
- In the terminal, navigate to D:/Projects.
- Use your normal git clone commands to bring in a repository, use npm install your dependencies, etc. You should have access to all your normal git and node commands. NOTE: If using a flash drive, not that it might take a long while to install dependencies and large files.
OPTIONAL step 5. Make Cmder the default vscode terminal
- in vscode, use ctrl+shift+p and type: "open user settings". Select the "Open User Settings (JSON)" option.
Here, inside the object syntax, paste:
//This first section sets the default terminal to Cmder
"terminal.integrated.defaultProfile.windows": "Cmder",
"terminal.integrated.profiles.windows": {
    "Cmder": {
        "path": "D:\\cmder\\Cmder.exe" //...or whichever path you use
    }
},
//This second section sets where the terminal's root will be. We want it to be in the root of the drive.
"terminal.integrated.cwd": "D:\\",
"git.path": "D:\\git\\bin\\git.exe"
NOTE: The file paths above must use the double slash syntax.
Conclusion
Hopefully this was helpful to you and will save you some of the pain I had trying to figure out a workable solution. Cheers!

Top comments (1)
I would like to do the same thing but with macOS instead. Anyone know something comparable to cmder for macOS?