
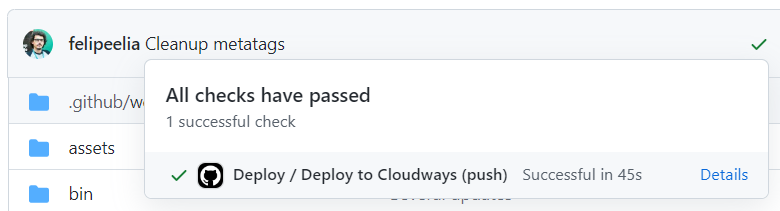
Do you still use FileZilla to send files one by one to the server? It is time to change! After reading this post all you will need is to push a file to a GitHub repository and it will be automatically sent to your server.
If you are in a hurry... that is fine!
There is no problem if you are in a hurry. In summary, this is what we are going to do:
- Create an SSH Keys pair to connect to your server;
-
Create the
DEPLOY_SSH_HOST,DEPLOY_SSH_USER, andDEPLOY_SSH_KEYsecrets in GitHub; -
Create the
bin/rsync-excludes.txtfile in your repository; -
Create the
.github/workflows/deploy.ymlfile in your repository; - Make any changes in the
trunkbranch.
If this post helps you, don't forget to share it!
What you need
The list of things you need for this post is quite simple:
- SSH Acess to your server: Available in almost all host providers nowadays;
- A GitHub repository: Free and unlimited, including private ones.
Don't forget to back up your files before you continue. If something goes wrong you will have a way to revert it.
What the GitHub Action will do
Basically, when a file in a certain branch is updated, a GitHub Action will connect to your server via SSH and send the files using the rsync command.
SSH Access
Your GitHub Action will need to connect to your server via SSH (Secure SHell) to send the files. To make that possible, we will create a new pair of SSH keys and configure the server to accept it.
1. Create a pair of SSH keys
The cryptography used by the SSH protocol uses two keys: a public and a private. So your GitHub Action can send the files to your server, you will need a new pair of keys. Although possible, I do not recommend using the same key you use on your computer.
The command to create a new key is the following:
ssh-keygen -t ed25519 -C "user@domain"-
ssh-keygen: The command itself; -
-t ed25519: The algorithm used in the file creation; -
-C "user@domain": It does not need to be a real email. It is only used to differentiate keys, as a comment. Something likedeploy@mysite.comis enough.
The command will ask:
- A password: leave it empty to make the process easier;
-
A filename: do not use the default, put something like
deployor the project name. Do not add any extensions.
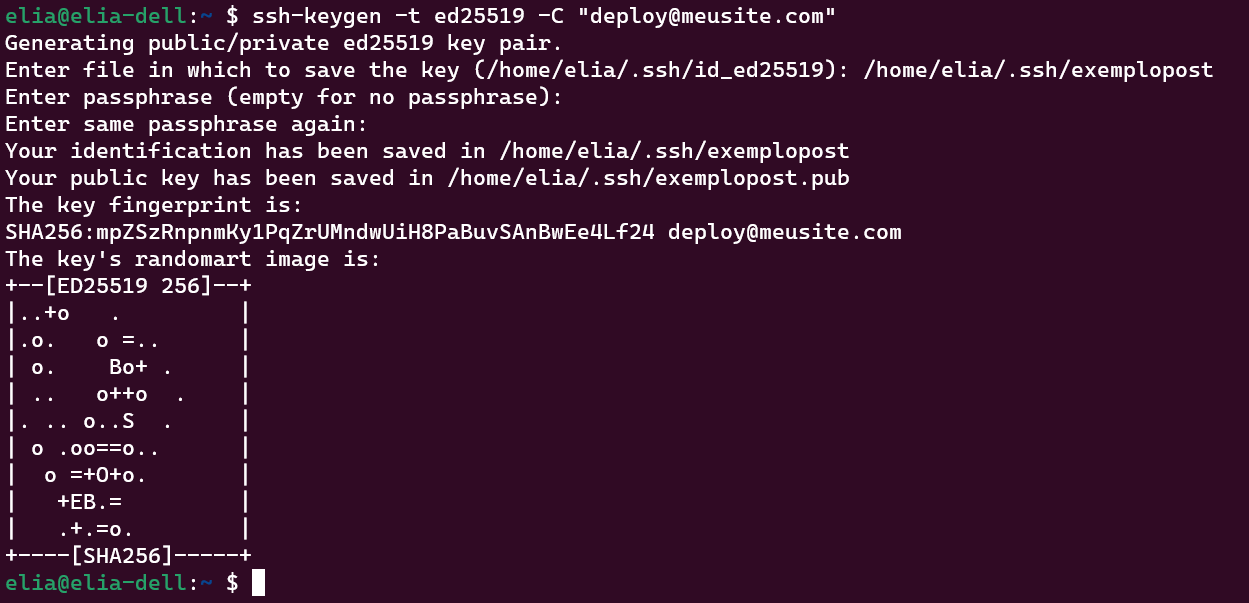
ssh-keygen command and its return
2. Authorize the key to connect to your server
Each hosting provider handles this in a different way. In services that provide some sort of dashboard, it can be in My Account > SSH or similar.
On Cloudways, for example, the SSH keys are handled per application. In the Access Details section, it is possible to manage the keys under Application Credentials. (Cloudways also offers a Deployment Via Git option that we are not covering here.)
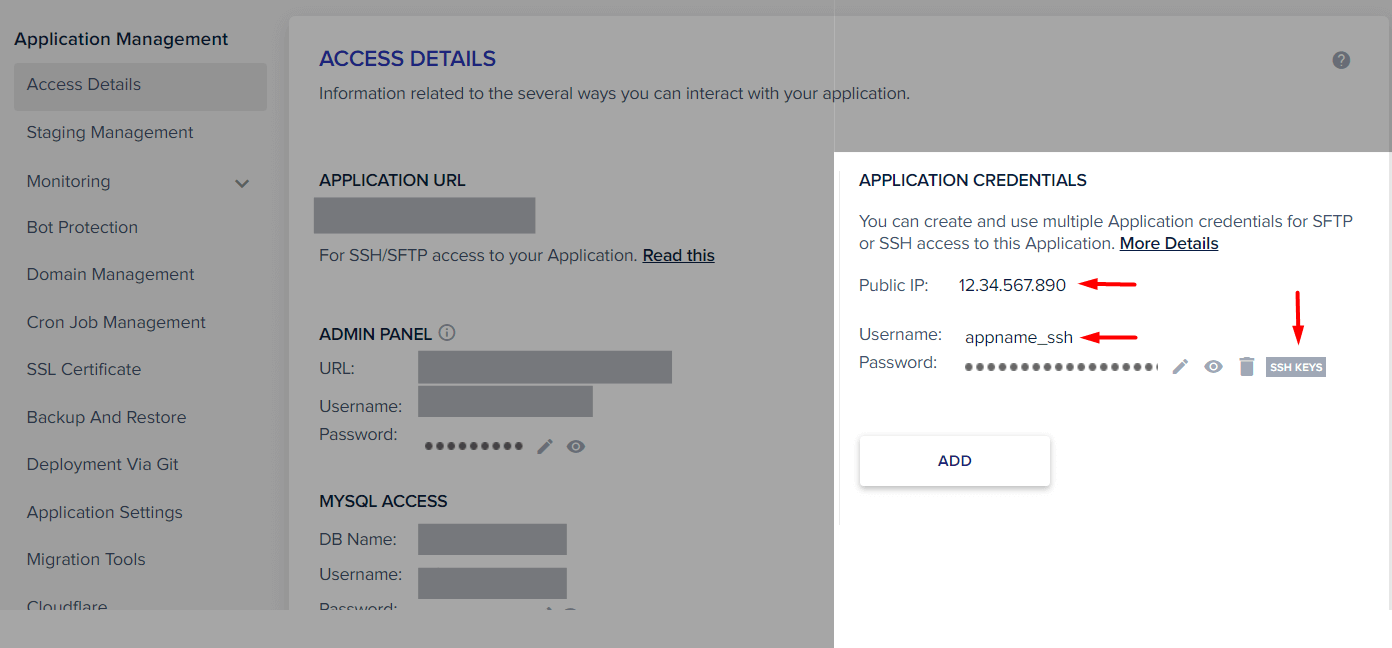
In the image we have arrows pointing to three elements:
- Public IP: This will be used as the host in our setting. In many cases, it is the website domain.
- Username: Cloudways has a different username per application. Some hosts use the same username for dashboard and SSH accesses.
-
SSH Keys: This is the place where it is possible to set new keys for this application. There, you can provide the public key (
file.pub) of the pair we've generated.
3. Test the SSH key (Optional)
You can use your computer to test the access using the new key. For that, all you have to do is call:
ssh -i <private-key-filepath> <user>@<server>-
<private-key-filepath>: The path to the private key file (without.pub) in your computer; -
<user>@<server>: It can change depending on the provider. For that screenshot from Cloudways, it would beappname_ssh@12.34.567.890.
If we would use the key generated in our example, the call would look like this:
ssh -i /home/elia/.ssh/exemplopost appname_ssh@12.34.567.890If you had everything right, you will see the server terminal on your computer.
GitHub Actions
GitHub Actions is GitHub's automation tool. In summary, GitHub will analyze any .yml file in the .github/workflows folder of your repository and try to execute it every time something happens in your repo.
In our case, we will create a file named .github/workflows/deploy.yml. You can name it as you want but you need to keep the .yml extension and the file location.
ATTENTION: .yml files do not allow tabs, only spaces (2 or 4).
Our .github/workflows/deploy.yml file contents will be as follows:
name: Deploy

env:
  SSH_USER: $`{{ secrets.DEPLOY_SSH_USER }}`
  SSH_HOST: $`{{ secrets.DEPLOY_SSH_HOST }}`

on:
  push:
    branches:
      - trunk

jobs:
  deploy_cloudways:
    name: Deploy to Cloudways
    runs-on: ubuntu-latest

    steps:
    - name: Checkout
      uses: actions/checkout@v2

    - name: Configure SSH
      run: |
        mkdir -p ~/.ssh/
        echo "$SSH_KEY" > ~/.ssh/deploy.key
        chmod 600 ~/.ssh/deploy.key
        cat >>~/.ssh/config <<END
        Host cloudways
          HostName $SSH_HOST
          User $SSH_USER
          IdentityFile ~/.ssh/deploy.key
          StrictHostKeyChecking no
        END
      env:
        SSH_KEY: $`{{ secrets.DEPLOY_SSH_KEY }}`

    - name: Send files
      run: "rsync --delete -avO $`{{ env.RSYNC_FLAGS }}` --exclude-from=$`{{ env.EXCLUDES }}` ./ $`{{ env.SSH_USER }}`@$`{{ env.SSH_HOST }}`:$`{{ env.DESTINATION }}`"
      env:
        RSYNC_FLAGS: '' #--dry-run
        EXCLUDES: bin/rsync-excludes.txt
        SSH_HOST: cloudways
        DESTINATION: "~/public_html/wp-content/"
Workflow name
The first line of our file simply gives a name to our workflow. The name is used just for display purposes and does not interfere with the automation functionality.
name: Deploy
Secrets for GitHub Action
The second section of our file configures environment variables to be shared across some steps further up.
env:
  SSH_USER: $`{{ secrets.DEPLOY_SSH_USER }}`
  SSH_HOST: $`{{ secrets.DEPLOY_SSH_HOST }}`
As the description of our workflow is made in a file visible to anyone with read access in the repository, GitHub provides a way to create secrets, editable only by administrators of the repo or organization.
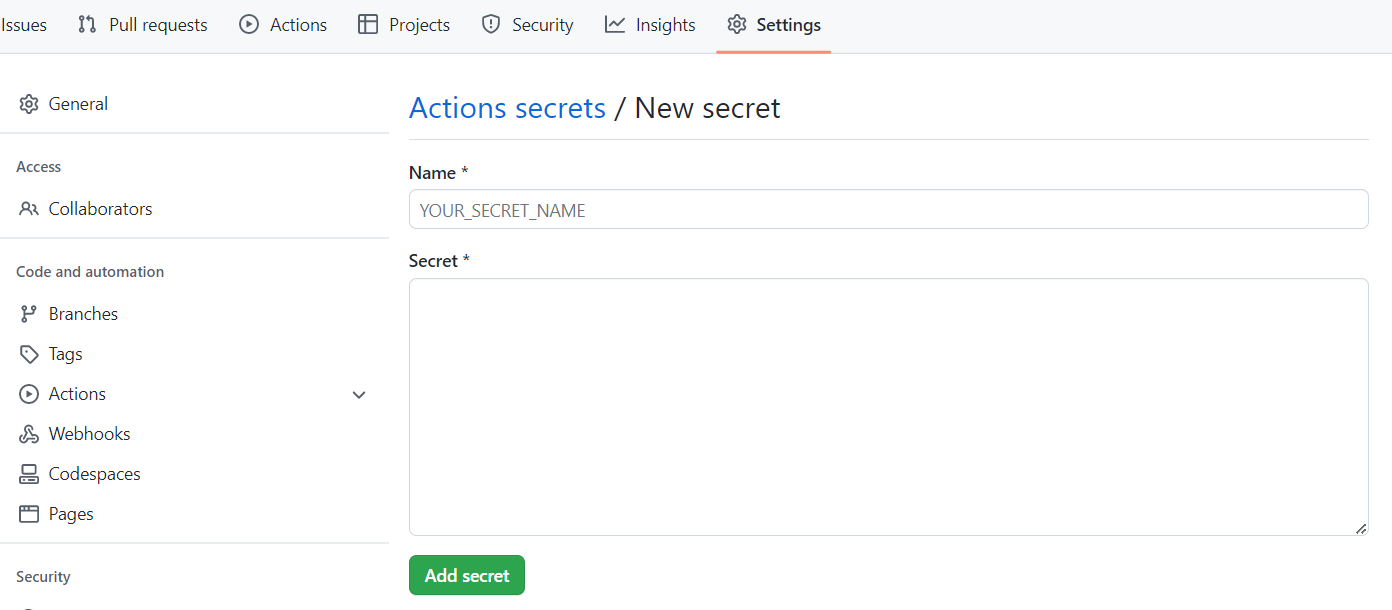
How to create a secret in GitHub Actions
Let's remember the SSH access command we previously used to test:
ssh -i <private-key-filepath> <user>@<server>With that command in mind, access your repository, and go to Settings > Secrets and Variables > Actions. We will create three secrets:
-
DEPLOY_SSH_KEY: The content of the private key you created. -
DEPLOY_SSH_USER: What you used as<user>; -
DEPLOY_SSH_HOST: What you used as<server>;
Note that DEPLOY_SSH_KEY is different from the others: we are using the file path in the command but the secret has the content of the file. This happens because we will create the file during the action execution.
The DEPLOY_SSH_KEY secret is not in this env section on purpose. It will be used later.
Triggers and Events
on:
  push:
    branches:
      - trunk
The content of this section is quite self-explanatory: the steps in this file will only be executed if the trunk branch changes.
Instead of push, it could be pull_request or schedule, for example.
Jobs
The jobs section is a set of steps to be executed. Our workflow file has only one job but it is possible to have more than one. Different jobs run in parallel.
jobs:
  deploy_cloudways:
    name: Deploy to Cloudways
    runs-on: ubuntu-latest
The deploy_cloudways string could be any slug, the same is valid for Deploy to Cloudways. These are just names.
The ubuntu-latest string specifies under which OS the job will run. It is possible to use different Linux, Windows, and macOS versions. See the full list.
Steps
Steps are the parts that make a job and they are executed in order.
    steps:
    - name: Checkout
      uses: actions/checkout@v2
Our first step is the repository checkout. Usually, this will be the very first step of all the workflows you will see out there. It simply brings the repository content to the action's environment.
SSH Configuration
This section configures SSH of the machine running our action in GitHub.
    - name: Configure SSH
      run: |
        mkdir -p ~/.ssh/
        echo "$SSH_KEY" > ~/.ssh/deploy.key
        chmod 600 ~/.ssh/deploy.key
        cat >>~/.ssh/config <<END
        Host cloudways
          HostName $SSH_HOST
          User $SSH_USER
          IdentityFile ~/.ssh/deploy.key
          StrictHostKeyChecking no
        END
      env:
SSH_KEY: $`{{ secrets.DEPLOY_SSH_KEY }}`-
mkdir -p ~/.ssh/: Creates the.sshdirectory inside the$HOMEfolder of GH's machine. -
echo "$SSH_KEY" > ~/.ssh/deploy.key: Puts the content of theSSH_KEYvariable inside thedeploy.keyfile. -
chmod 600 ~/.ssh/deploy.key: Configures the permissions of thedeploy.keyfile. In this case,600means the owner can read and write on it but no one else is able to access it. -
cat >>~/.ssh/config <<END: What you see between<<ENDandENDwill be inserted in theconfigfile of the.sshdirectory.-
Host cloudways: Creates a name for the following configuration. When calling SSH passingcloudways, the data below will be used; -
HostName $SSH_HOST: The server address. If you remember what we talked about theenvsection, this variable will receive the value of theDEPLOY_SSH_HOSTsecret; -
User $SSH_USER: Similar toHostNamebut applied to the user; -
IdentityFile ~/.ssh/deploy.key: Specifies the path of the key to be used when connecting toHost; -
StrictHostKeyChecking no: Skips the server's identity verification with theknown_hostsfile.
<!-- /wp:list -->
<!-- /wp:list-item --> -
Down below, we can see an env section, similar to that global one (declared at the beginning of our file.) Note that in this case the variable is created only for this step. Here we are passing the content of the DEPLOY_SSH_KEY secret to an environment variable called SSH_KEY. The content of this variable will be added to the deploy.key file, as we saw.
Send files with rsync
In the last step, we will finally change the content of the target server. For this, we will use the rsync command, which synchronizes the files from one place to another. Here, the files in GitHub's machine (origin) with the files in your server (target.)
    - name: Send files
      run: "rsync --delete -avO $`{{ env.RSYNC_FLAGS }}` --exclude-from=$`{{ env.EXCLUDES }}` ./ $`{{ env.SSH_USER }}`@$`{{ env.SSH_HOST }}`:$`{{ env.DESTINATION }}`"
      env:
        RSYNC_FLAGS: '' #--dry-run
        EXCLUDES: bin/rsync-excludes.txt
        SSH_HOST: cloudways
        DESTINATION: "~/public_html/wp-content/"
If the rsync command is something new to you, let's give a deeper look into each one of the parameters we are calling:
-
--delete: If a file does not exist in the origin, also delete it in the target. -
-avO:-ais to sync all files, folders, and symbolic links preserving their permissions. Thatvis forverbose, i.e., outputs to the terminal the list of changes being made. ThatO(an uppercase "o") tellsrsyncto not worry about folders' modification dates. -
$`{{ env.RSYNC_FLAGS }}`: As you can imagine, this will be replaced with the content ofRSYNC_FLAGS, configured a couple of lines below. Usually, it doesn't receive anything but you can pass--dry-run, for example, to simulate what the command would do without changing anything in the real world. -
--exclude-from=$`{{ env.EXCLUDES }}`: You can pass the path of a file containing the list of everything that should be ignored byrsync. Check the next section to know more about it. -
./: The path (in the origin) that needs to be synced. -
$`{{ env.SSH_USER }}`@$`{{ env.SSH_HOST }}`:$`{{ env.DESTINATION }}`: The target path. The last part will be replaced by the folder in the target server. In our case, the repository only contains thewp-contentfiles and the website is located in the$HOME/public_htmlfolder on the server. In your case, the folder can be elsewhere, like/var/www/html. Access your server or search in your host configurations to get where in the server your website files are located.
About exclusions and rsync
In the previous example, we are using a file called rsync-excludes.txt located in the bin folder of the repository. This file has a list of files and folders that should be ignored by the rsync command. For example:
*.gitignore
*.gitmodules
*.git
*.gitkeep
*.github

/bin
*rsync-excludes.txt

/uploads
/upgrade
/themes/index.php
/plugins/index.php
Instead of using --exclude-from=<file> you can change the rsync call and use --exclude .git --exclude README.md, for example.
Doing more with GitHub Actions
If you want, it is also possible to call commands like composer install or npm install during the process, so you don't have to version 3rd party files in your repo. In addition to that, the process can also be triggered by a Pull Request creation or time periods (hourly, daily, etc.)
For real examples, give a look at the ElasticPress repository. There you will see actions executed daily, automated tests, deployments to WordPress.org, and more.
Why you should not use SFTP anymore
Firstly, you should be using a version control system like git, even if you work alone. Versioning your projects in a git repo will give you control of your changes and a backup. It is also a requirement in most jobs nowadays.
The process described here has several advantages over the old method of sending file by file using a program like FileZilla, for example. My favorite is that you'll be sending only the files that were changed, making it all easier and faster. We also avoid having different people updating the same file and overwriting changes one from the other.
I used GitHub and GitHub Actions in this post but there are several alternatives available if you want. The process of sending files to a server through a repository is called Continuous Delivery and is part of the Continuous Integration, Delivery, and Deployment topic, also known as CI/CD.
Conclusion
In this post, we saw a method to send files to a server from a git repository.
To access the server, an SSH key pair is needed. The public key is stored in the server, the private key is stored as a secret in GitHub.
We also saw how easy it is to create a workflow in GitHub: we just need to create a .yml file in the .github/workflows folder. To restrict access to sensitive information we can use GitHub secrets.
The sync between files is made through the rsync command, which accepts several parameters. It is also possible to exclude files from the sync through different ways: a list in a file with the --exclude-from parameter or several --exclude.
This post is just a glimpse of what is possible with GitHub Actions. It is also possible to use Composer and NPM during the process and much more.
Lastly, we saw why this deployment method is much better than sending individual files via SFTP.
Don't forget to share the post and leave a comment!

Top comments (1)
Thank you for this article.
I would like to know how to use git when with my wordress application.