
Introduction
This is one of those projects which you start after a burst of excitement but end up leaving unfinished to the uncomfortable point where it isn’t good enough to publish but it is good enough to talk about it.
So, in this series, I will share with you how I retake this project and convert it into an MVP!
You can find the code at my Github repo and play the game at fernando.works/amateur-archaeology.
About this project
I bought a banana phone after watching this video. The fact that I could create apps for a feature phone using web technologies blew my mind — I remember being a kid and creating toy feature phones using small and thin wood rectangles that (for some strange reason) were laying around in my house. I would make different designs using tape, rubber bands, nails, and color markers.
Anyways, I bought the thing and went on to enable development mode and got a Hello World app running.
A few months past by and suddenly decided I wanted to do something with it. I thought of remaking a game I made for a game jam some years ago using Game Maker. This was a perfect idea, the game was simple enough so I started on working on it.
Defining the MVP
As a starting point, the game should have the same functionalities as the original game with some variations and additions:
- Infinite digging (done before this devlog started)
- Intro screen
- Dialogs (UI)
- Treasures - with different rewards
- Time, score, and game states (intro, level start, game over)
- Level Transition Effect (new)
- Foes - Fire and Scorpions
- Randomized hue (didn't implement)
Game Rules
- The objective is to reach the score goal before time runs out.
- If you pass the score goal you get extra time for the next level.
Day 1
I’ll start by taking the intro image from the original game and adapting it to the resolution of the Banana Phone (240 x 320px). I use Aseprite for manipulating pixels and Sketch for… level design? I like to use Sketch for moving the assets around and prototyping ideas.

After, cleaning some pixels with Aseprite I copied the assets to Sketch and placed them where I wanted them:

I exported the assets for the game, put them in place, added some logic and animation for the instructions and title and this is how it turned out:

After testing it on the real phone, I went on to design the score and time UI. This led me to realize that using 1x pixels and 2x pixels at the same time sucks, so I spent some more time playing with the title image and re-drew it:

Now we are talking! And this is the mockup that I came with for the game’s user interface:

Since Aseprite has some algorithm that neatly scales the font in a pixel-art way, I need to export the number renders to make a number font. I decided to skip letters since there is not going to be dynamic text content.
But, before I continue with that, I need to eat! BRB
[ About 5 hours later ]
Coming back, I thought of what was the most practical and performant way of displaying this custom font. After testing different ideas, the best solution turned out to be to create a font (tff file) using IcoMoon and manually tracing the pixels in sketch:

After some hours of testing, manually tracing pixels to SVGs, tweaking CSS and what not. I concluded that the best way of implementing the user interface for the game (in terms of pixel sharpness and performance) was using HTML and CSS.
This was the end result:

It looks sharp, it is more performant since I didn’t put more logic into the animation frame event.
Day 2
I separated the UI code to a separate module and started implemented the dialog box. I also created two states for the game: before the game starts, and when the game has started.
This is it for this two days! Here is the end result:

Day 3
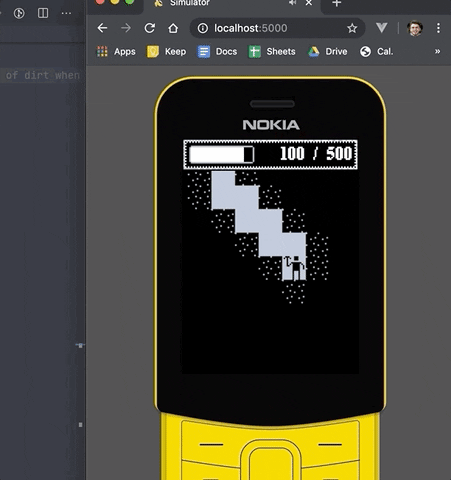
I started by working on the treasure generation. I decided to code the distribution logic based on the Pareto Principle. There are 5 possible treasures and one heart which gives you time. I decided to ignore the heart for now.
I wrote a function that randomizes a horizontal lane of dirt which gets called every time the player moves one grid block down. There is a 5% chance for a dirt block to be a treasure and then we roll the dice again and get a treasure based on the distribution I talked about.
I have decided that I will not publish code in this devlog to keep it slim, but you can take a look at it in the repo.
After playing some minutes with the probabilities, the game looks like this:

I also added some logic that puts “diggable” dirt around a treasure when “air” flows in. (You can see what I mean in the gif below)
After testing this on the simulator, I went on to test this on the device to see if there were any performance issues. I didn’t find any so I moved on to work on treasure gravity.
This was a little harder to grasp but after about 2 hours I came up with a solution that didn’t cause any performance issues.
Fun fact: Today I went to a conference and was coding this during the break and, yes, during a conference too (sorry).
Here is how the “physics“ look!

Now, I need to work on the “collisions” with the player.
Another speaker went up and that meant another commit was getting ready. I implemented the “collision” detection (just matching the grid positions with the player). I tested it for a while, found some issues, and headed home after the conference was over.
I arrived home, fixed those issues, and added the sound for when the player takes treasure.
I had dinner, took a break, and continued after some time. I implemented the score and time system and made the user interface reactive to it.
This is how it looks now!
The next thing to work on is the next level transition and the game over screen.
Day 4
Ok, so I need to start with the level transition before I jump into the enemies. Here is the to-do list:
- Game state logic — restart the camera, player, score, time, ui, and grid.
- Transition
- Add a sound for when a transition enters.
- Calculate new goals and time.
While developing this game state reset, I realized that if this was a bigger game I would be in deep trouble if I continued doing this the way I am currently doing. It would quickly become spaghetti code.
I implemented the game state reset and a Super Mario World style transition. This is how it looks.

As you can see I also updated the image of the controls and the dialog border.
I also worked on the new goal and new time calculations. These are going to be placeholders since the final value will be decided after I add enemies.
I jumped on Aseprite again and improved the dialog background. I also added a level title to let the player know what level he is currently at.

Day 5 - Short
I started off by implementing the new mocks. I also made it possible to quit the game showing a question dialog.
I want to make it more performant since I am seeing a lot of lag, so I decided that I’m going to port this to WebGL.
I spent the rest of the day trying to use a WebGL light library but I ended up wasting my time trying to fix code that wasn’t mine. So, after a few hours and without any results I decided I was going to use WebGL myself without any libraries and called it a day.
Day 6
Since today is a holiday in Mexico I don’t have to work today. I’ll be dedicating some more love to this project.
So, after carefully following a tutorial about how to implement DrawImage, I managed to port most of it! I made some adjustments. I added support for the opacity/alpha channel and also created a drawRect method, and also refactored the transition code.
After a whole day of work, I managed to port everything that I needed. And now I can use the shader to change the hue as in the original game! (Although I won't)
I made heavy use of WebGL Fundamentals, so if your trying to learn WebGL, I would definitively suggest you start there.
So, it feels slightly smoother now. But, I noticed something else, playing sounds slows down the game. So, I’ll figure out how to improve that on another day. I’ll try to use Howler.js since it has a sprite functionality which may be good here.
Day 7 (noon)
I spent my evening using the howler.js library and it solved my problem, now I can play sounds and have no lag!
Day 8 (noon)
I tried to use the sprite functionality but it turned out to worsen performance. My guess is that batching requires more processing power vs just storing and accessing a bunch of KBs into the memory.
I also tried using the OGG format for sounds but it wasn’t being reproduced correctly, it was as if it was breaking at times.
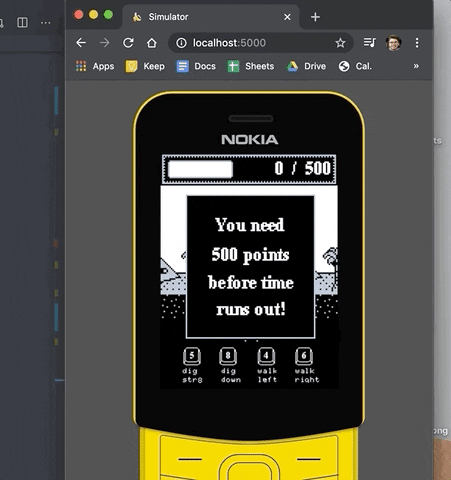
Day 9 (morning)
After doing my daily exercise routine (I don’t commute anymore due to COVID-9), I decided to use my spare time to work on implementing the game over screen. Here is how it looks:
Day 10
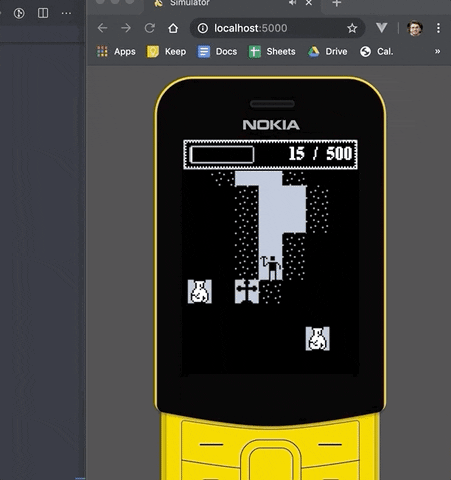
The first thing I did today was adding foes to the grid generation algorithm. I added some debug overlays to know which blocks would contain a foe by drawing a red dot on the “bad dirt” block.
Next, I refactored the treasure instance manager to be a general instance manager. I added the scorpion as if it was another treasure, except, of course, it doesn’t do anything when it touches the player.
I fixed some bugs and went on to refactor the drawImage method from my canvas helper class so that I could flip an image vertically or horizontally. This, by the way, wasn’t previously possible without the WebGL context. So now that I have this code I’m thinking if I should remove the other flipped sprites for the player or if I should keep them. In any case, I’d like to make it consistent across the code.
Day 11 (noon)
I updated the code to make the scorpions actually freeze the player for 1 second:
Day 12
I started working on the fire code to make it move horizontally and bounce off of walls. My first approach was doing something like a “raycast” where I would know what position would the fire be able to move to. But I struggled with that approach. I did a rubber ducky session with a friend and decided to do a similar approach as what I did with gravity — I made the fire move block-by-block and it worked! Way simpler to read too. Here is how it currently looks like:

I alose made the fire be able to burn treasures and scorpions.
This is it! I’m basically finished with the MVP! I’m thinking about adding something like hue change per 5 levels and making it progressively harder as levels go up. But, to be honest, I just wanted to finish the MVP. I'm not too invested in this project.
Remaining Bugs
I showed this game to a friend of mine who’s a QA engineer. He found about 5 bugs that I need to fix. Since this game is not such an exciting project to me, I am deciding to leave a small backlog so that /someday, someone/ comes and fixes these. I did fix the critical ones though.
Github
Now that the MVP is finished, I need to update the README and polish a few things. One of those things is making it a single NPM package. Currently, I have two: one for the simulator and another one for the runner. So I’ll make it just one thing.
What I want to do is watch the app-core source so that when there is a change I can re-bundle and thus refresh the browser.
app-core > bundle > simulator includes bundle
                  > runner includes bundle
Something like that. So, what I am thinking is of an approach where you don’t need to have access to the svelte app from the simulator, but rather just to the compiled simulator which you can inject the script into.
[Few hours later]
I used webpack to bundle everything together.
This approach worked pretty well, now the folder structure is way more readable and easier to use.
Publishing on Marketplace
So, the process to publish an app to the KaiStore is quite easy, all you have to do is register on the publisher and developer portals on kaiostech.com.
For now, it seems like using ads is obligatory, so I had to download a JavaScript file that I included on my index.html file so that I could call a function that is added to the window.
I decided to show ads after the game over screen, right after the user decides to try again or close the game. He always gets the ad, though.
[a few recent updates]
I had a small email conversation with the engineers from the KaiStore and after a few days of their testing, my app is now published in the KaiStore!

I had to rename the game to "Treasure Hunter" since "Amateur Archaeology" is too big!
Hey! Thanks for taking the time to read this devlog. If you'd like to see more of my work or projects be sure to follow me on the following social media or check my website at fernando.works:
Youtube: Fernando Garcia
Twitter: @_fergarram_
LinkedIn: @fergarram
Facebook: @fergarram
Instagram: @fergarram
Reddit: @fergarram
Twitch: @fergarram

Top comments (12)
Thanks for sharing so much about the dev process! It was interesting to see how you approached the game development and solved issues. Do you think working through the KaiOS process and talking to the KaiOS development team helped you improve as a developer overall? I'd definitely be interested to know if you were able to apply anything you learned through KaiOS to other projects.
Thank you for reading!
In general, I felt more like I was using my frontend skills to leverage my game development skills. About the KaiOS dev team, they didn't provide any technical feedback so I can't say that interaction improved something.
Working on this project did actually helped me improve as a developer overall, especially on the game dev part. I have a way better understanding of WebGL and GLSL than I used to thanks to this project!
I think that working on any type of side project will always help you improve as a developer, especially if you set challenging but attainable goals for your MVP.
Awesome 👍
Awesome work!!
Nicee
This is so neat! Very cool!
Thanks!
This was very interesting to read, thanks.
Thanks for taking the time to read!
Good work !!
Thanks!