Summary: jyserver allows access to Javascript and the DOM directly from Python and allows Javascript to call and access Python. It works seamlessly with Flask and other frameworks.
For example, using jyserver, a server running Python can do this:
self.js.document.getElementById("act").innerHTML = "Jump"
And it will automatically convert the expression to Javascript, send it to the browser and execute it causing the page to update. It can also work in reverse as in this HML snip:
<button id="b1" onclick="server.increment()">Increase</button>
When the button is clicked, increment() is executed on the server. No additional code is needed. The framework provides the library that makes this possible.

Keep it simple
Traditionally, Python web frameworks like Flask or Django are a complicated interplay of HTML, CCS, Javascript and Python. Each page update involves some HTML, some Javascript, marshaling parameters, async communication to the server, some crunching in Python and a trip back to Javascript. Or some variation on that.
Seems like a lot of work if you just want to create a simple a front end for an application.
But what if all of that complexity was hidden and the language syntax dynamically provided the plumbing?

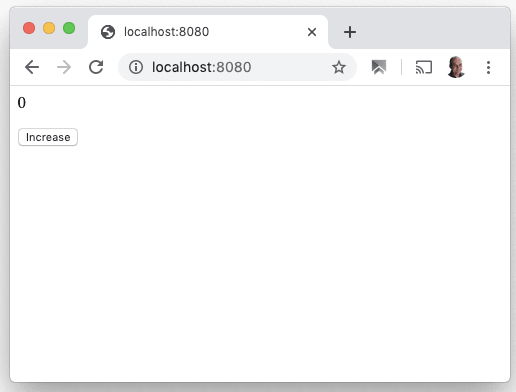
An example will illuminate. Let's say your page is very simple. You want to create a counter and a button to increase the count. You want everything to be controlled by the server. Your index.html file would look like this:
<html><body>
<p id="count">0</p>
<button id="b1" onclick="server.increment()">Increase</button>
</body><html>
Your server needs to change the text for count and respond to increment(). Using jyserver, your server code would look like this for Flask:
from flask import Flask, render_template, request
app = Flask(__name__)

import jyserver.Flask as jsf
@jsf.use(app)
class App:
    def __init__(self):
        self.count = 0
    def increment(self):
        self.count += 1
        self.js.document.getElementById("count").innerHTML = self.count

@app.route('/')
def index_page():
    return App.render(render_template('flask-simple.html'))
In Bottle, this would be the code:
from bottle import route, run

import jyserver.Bottle as jsb
import time

@jsb.use
class App:
    def __init__(self):
        self.count = 0
    def increment(self):
        self.count += 1
        self.js.document.getElementById("count").innerHTML = self.count

@route('/')
def index():
    return App.render(file='flask-simple.html')

run(host='localhost', port=8080)
That's all the code you need. @jsf.use(app) connects the App class with your Flask application object app. @jsb.use does the same for Bottle. When the browser opens "/", the page will get rendered by index_page(). App.render() will add the appropriate Javascript. When the button is clicked on the browser, it calls server.increment(), which causes App.increment() to execute on the server, which then changes the DOM in real-time by updating innerHTML for count.
One of the principal benefits of this approach is that it makes it easy to put program logic in a single place. If you want the server to control things, you use the self.js object to change the DOM and execute statements on the browser. On the other hand, if you want to control everything from the client, you can write the logic in Javascript and use the server object to execute specific commands or query variables on the server.
How is this accomplished? The secret sauce is in the server object in the browser and the self.js object in Python.
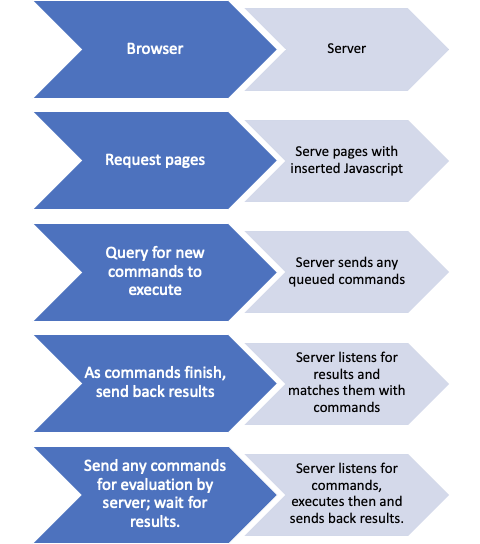
This is what happens behind the scenes.
After starting, the server will listen for new http requests and forward special POST requests to
jyserver.Flaskmodule. This is accomplished by the line@jsf.use(app).When "/" is requested, jyserver will read
flask-simple.htmland insert special Javascript code into the HTML that enables communication before sending it to the browser. This code creates theserverProxy object.This injected code will cause the browser to send an asynchronous http request to the server asking for new commands for the browser to execute. Then it waits for a response in the background. This is used to transmit commands from the server to the browser.
When the user clicks on the button
b1, theserverProxy object is called. It will extract the method name--in this caseincrement--and then make an http request to the server to execute that statement.The server will receive this http request, look at the App class, find a method with that name and execute it.
The executed method
increment()first increases the variablecount. Then it begins building a Javascript command by using the specialself.jscommand.self.jsuses Python's dynamic language features__getattr__,__setattr__, etc. to build Javascript syntax on the fly.When this "dynamic" statement get assigned a value (in our case
self.count), it will get converted to Javascript and sent to the browser, which has been waiting for new commands in step 3. The statement will look like:document.getElementById("count").innerHTML = 1The browser will get the statement, evaluate it and return the results to the server. Then the browser will query for new commands in the background.
It seems complicated but this process usually takes less than a 0.01 seconds. If there are multiple statements to execute, they get queued and processed together, which cuts back on the back-and-forth chatter.
As is typical in web applications, all communication is initiated by the browser, usually asynchronously. The server keeps a queue of pending commands and matches results as they are returned.
The exception to asynchronous requests is when the browser initiates a server call. In that case, if there are no blocks, the browser waits for the server to respond when execution is complete. Often, this wait is not necessary, but it is used to make flow more predictable and avoid out-of-order execution.
The components
There are three main parts to the system.
HTTP server; in this case Flask
Javascript "plumbing" and server object
Python "plumbing" and self.js object
The HTTP server
The jyserver module must be configured to respond to POST requests to the page "/_process_srv0". All communication occurs through this URL.
The server object
The server object lives in the browser and is used by Javascript to execute commands on the server. Basically, the server object is a proxy for the Client app. It can call methods, query values and set values. For example, the following code will call reset() on the server for every click.
<button id="b1" onclick="server.reset(0)">Zero</button>
In addition, setting a value on the server's Client object is possible:
<button id="b1" onclick="server.count=0">Zero</button>
You also can run methods and get return values.
alert(server.getresult(125, 99))
The self.js object
Python code uses the self.js object to communicate with the browser. Let's say you have a function in Javascript on the browser.
var factor = 1.3
function adjust(value) { return value * factor; }
This can be run from the Python server side using:
result = self.js.adjust(i)
print("Factor is", self.js.factor, "2 x result is", 2 * result)
To change values, just set them in code.
self.js.factor = 2.3
self.js.data = {"a":15.4, "b":12.7, "c":[5,4,6]}
The last statement will convert the structure to a Javascript dictionary. This data conversion is accomplished via the json module in Python and the JSON module in Javascript.
Just to make life even easier, the self.js object has a special shorthand for querying elements by id using the keyword dom. These two statements are the same:
self.js.document.getElementById("count").innerHTML = 10
self.js.dom.count.innerHTML = 10
A more complex example
To illustrate a few more features, we'll create a stopwatch app. The design is to run a function on the server that updates the time on the HTML page every so often. We also provide two buttons: one to reset to zero and other to pause the updates.
<p id="time">WHEN</p>
<button id="b1" onclick="server.reset()">Reset</button>
<button id="b2" onclick="server.stop()">Pause</button>
The class will need to define the reset() and the stop() methods. Just for kicks, we'll be dynamically changing the Pause callback.
from flask import Flask, render_template, request
app = Flask(__name__)

import jyserver.Flask as jsf
import time
@jsf.use(app)
    def reset(self):
        self.start0 = time.time()
        self.js.dom.time.innerHTML = "{:.1f}".format(0)
    def stop(self):
        self.running = False
        self.js.dom.b2.innerHTML = "Restart"
        self.js.dom.b2.onclick = self.restart
    def restart(self):
        self.running = True
        self.js.dom.b2.innerHTML = "Pause"
        self.js.dom.b2.onclick = self.stop
Notice that when you click Stop, the stop() method gets called, which changes the text and then modifies the onclick callback of the button. The next click will then run restart(), which will then change the text and callback.
Next, we need a main function that gets executed for every new session. In our case, the program runs for 1000 iterations and then terminates. When it ends, the server will also shut down. Naturally, you can convert this to an infinite loop and the program will never terminate. Or, if the function is omitted, then the server just listens for connections indefinitely.
    @jsf.task
    def main(self):
        self.running = True
        self.start0 = time.time()
        for i in range(1000):
            if self.running:
                t = "{:.1f}".format(time.time() - self.start0)
                self.js.dom.time.innerHTML = t
            time.sleep(.1)
Lastly, we start the server to handle page requests.
@app.route('/')
def index_page(name=None):
    App.main()
    return App.render(render_template('clock.html'))

Installation and source code
jyserver is available in pip or conda.
pip install jyserver
The source code is found in the Github repository jyserver
Future directions
Since jyserver's aim is to simplify the creation of web-based front ends for apps and kiosks. The plumbing to connect it to a framework is simple.
Although jyserver itself is comples, the "glue" required to connect it to framework such as Flask or Django is not. Basically, you only need to reroute the "/_process_srv0" request. This is the entirety of the "glue" code that joins jyserver to Flask:
from flask import Flask, request
import json
import jyserver
import threading

def task(func):
    def wrapper(*args):
        server_thread = threading.Thread(target=func, args=args, daemon=True)
        server_thread.start()
    return wrapper

def use(flaskapp):
    def decorator(appClass):
        global context
        context = jyserver.ClientContext(appClass)

        @flaskapp.route('/_process_srv0', methods=['GET', 'POST'])
        def process():
            if request.method == 'POST':
                req = json.loads(request.data)
                result = context.processCommand(req)
                if result is None:
                    return ''
                return result
            else:
                return "GET reqeust not allowed"
        return context

    return decorator
As you can see, it's pretty simple to connect it to any other framework.
About the author
Fernando "Fen" Trias is a serial entrepreneur, CEO of Vindor Music and an avid Python and C++ coder specializing in data science, embedded development and cybersecurity in the Boston areas. He is the author is jyserver, PyEmbedC, TeensyThreads and other open source projects.

Top comments (0)