Python offers various packages and frameworks for building interactive, production-ready AI app interfaces, including chat UIs. This article details the top platforms.
AI Chat UIs: Overview
Chat UIs for AI applications provide the front-end interface to interact with AI assistants, local, and cloud-based large language models (LLMs), and agentic workflows. Like popular AI apps Grok for iOS, Le Chat, and ChatGPT for the Web and mobile, UIs are available for sending and generating text, images, audio, or video (multimodal input and output).
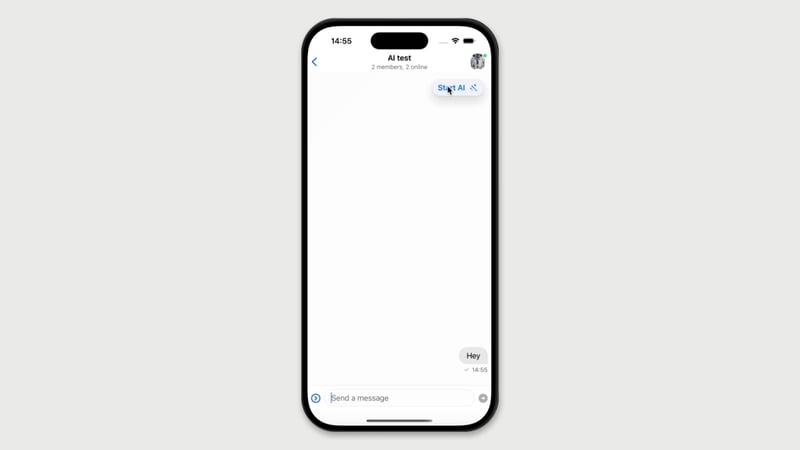
Generally, developers can utilize chat SDKs and ready-made AI UI components from Stream to assemble interactive chatbots and assistants. One advantage of this approach is that developers can implement these AI components for popular platforms such as iOS, Android, Flutter, React, React Native, and NodeJS with minimal effort using available code samples and taking inspiration from demo apps.
How To Build AI Apps in Python
Developers can use several model provider APIs when building AI apps. Popular AI model solutions include OpenAI, Anthropic, Mistral, Grok, and DeepSeek. Typically, developers build these AI solutions and agents using platforms like LlamaIndex, LangChain, PydanticAI, Embedchain, LangGraph, CrewAI, and more. Using the command line to test and debug these applications is excellent.
However, an intuitive interface is needed to interact with the underlying AI functionalities to perform specific tasks, test them with real users, or share them through the world for feedback. Additionally, an AI app you build in Python may need to connect to other external services to access knowledge bases, tools to execute tasks, monitor performance, etc.
Why Use Python Libraries For AI Chat UIs?
Creating UIs for an AI app involves many considerations, such as text generation style, response streaming, output structuring, and how all the user-AI interactions create a coherent experience. Depending on the platform you choose to build the front end of your AI app, there are numerous built-in functionalities and AI chat components you get out of the box.
- Output streaming: An LLM's response streaming is complex if you need to implement it from scratch for your AI project. Although many AI models implement the feature by default, most UI-building platforms provide easy ways to enable output streaming unless custom streaming is preferred.
- Chatbot animations: You can get free chatbot response animations, such as typing indication and thinking, by using some libraries to build UIs for your AI projects.
- Feedback: They help to get feedback quickly for a project's improvement.
- Monitor and visualize performance: Chainlit, for example, uses Literal AI (AI observability service) playground to observe the performance of underlying LLMs, manage prompts, and see analytics.
- Easy to test: These libraries provide easy ways to test and demo AI apps to people.
AI Chat UI Builders and Use Cases
You can build the front end of AI apps for many use cases, depending on the app's target. Generally, the AI chat UI you may want to make will fall into some of the following categories.
- Multimodal AI: AI apps in this category involve Audio-text-to-text, Image-text-to-text, Visual question answering, Document question answering, Video-text-to-text, Visual document retrieval, etc.
- Computer vision: In this category, you can build AI apps for text and image classification in a chat messaging app, video classification in a conferencing app like Zoom, and Text-to-video generation.
- Natural Language Processing: In the natural language processing category, developers can build AI app UIs for summarization in a video calling app, translation in a chat app, and an AI chatbot for question answering and text generation.
- Audio: In this category, you can easily create front-end UIs for Text-to-speech, Text-to-audio, Automatic speech recognition for video conferencing, Audio classification for voice messaging, and Voice activity detection AI apps.
Tools For Building AI Chat UIs in Python
Depending on a project's objectives, several ways and UI styles exist to build AI apps. For example, a multi-modal AI app that allows users to send text, voice, and image inputs may differ from the one supporting only voice cloning. For Python-based AI projects, you can build the front ends using frameworks like Gradio, Streamlit, and Chainlit. There are other Python-based frameworks for building web and data apps. However, those are beyond the scope of this article.
Our primary focus is on creating front-end interfaces for AI apps. The tools mentioned here have their strength and limitations, so we discuss them in the following sections, demonstrating sample code and implementation examples to help you pick the suitable framework for your next AI app.
1. Gradio: Build UIs for Testing and Deploying AI Apps
Gradio is an open-source Python library from Hugging Face that allows developers to create UIs for LLMs, agents, and real-time AI voice and video applications. It provides a fast and easy way to test and share AI applications through a web interface. Gradio offers an easy-to-use and low-code platform for building UIs for unlimited AI use cases.
- Easy to start: You can quickly begin with Gradio and set up a fully functioning interface for an AI app shortly with a few lines of Python code.
- Showcase and share: Easily embed UIs in Jupyter Notebook, Google Colab or share them on Hugging Face using a public link.
- Deploy to production: You can permanently host the UI of a Gradio-powered AI project on Hugging Face Spaces.
Key Features and Benefits of Gradio
Gradio is one of the most famously used Python libraries for building the front end for machine learning (ML) applications. Its popularity and widespread use result from feature-rich components and building blocks for constructing AI chat interfaces with minimal effort. The following are the key features of Gradio.
- Custom components: Create custom-made components as UI libraries and integrate them into your AI apps powered by Gradio's UI. Custom components can be published as Python packages and distributed to the developer community.
- Agent UI: Easily create a Gradio interface for text-to-image generation, etc., using Hugging Face's transformers.agents.
- Support for leading AI building platforms: Gradio integrates well into leading Python frameworks for creating AI and agent applications such as LangChain, LlamaIndex, Embedchain, and more.
- Native intermediate thoughts: Leverage the built-in support for chain of thought (CoT) to build interfaces and demos for projects implementing reasoning LLMs.
- Support for handling different AI app use cases: One essential characteristic when looking for a UI-building framework for an AI app is the platform's ability to handle different app use cases. Luckily, Gradio's gradio.Interface class allows developers to create interfaces around four distinct use cases. The standard use case allows you to build UIs with input and output. This interface type is excellent for creating image classifiers or speech-to-text AI apps. You can create an interface that supports only an output use case, like image generation. It also supports an input-only interface, which can be used to build an LLM app that stores uploaded images in external databases. With the unified interface option, you can make UIs whereby input and output do not differ. In this option, the output overrides the input. An excellent example in this category is an AI UI that autocompletes text or code.
- Custom interfaces: Blocks in Gradio allow you to implement bespoke UIs quickly for AI projects.
-
Chatbot UI: Use Gradio's high-level abstraction
gr.ChatInterfaceto quickly build chatbot and assistant interfaces.
Gradio Installation and Quickstart
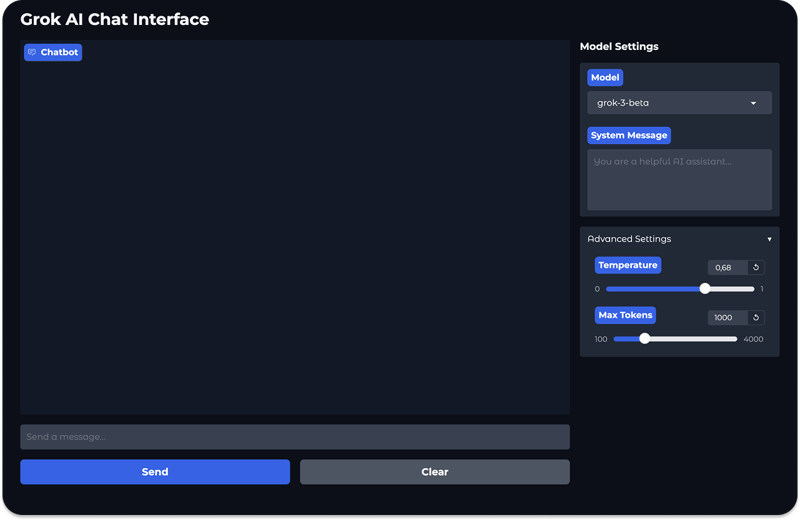
This section uses Gradio's building blocks to create the chatbot UI in the image above. First, in your favorite IDE, you should set up a Python virtual environment and install Gradio's Python package using the following commands.
python -m venv venv
source venv/bin/activate
pip install gradio
Next, create a Python file grok_ui.py and replace its content with this sample code.
import gradio as gr
import os
from dotenv import load_dotenv

# Load environment variables from .env file
load_dotenv()

# Function to handle chat interactions
def chat_with_grok(message, history, system_message, model_name, temperature, max_tokens):
    # In a real implementation, this would call the Grok API
    # For now, we'll just echo the inputs to demonstrate the UI is working
    bot_message = f"You selected model: {model_name}\nSystem message: {system_message}\nTemperature: {temperature}\nMax tokens: {max_tokens}\n\nYour message: {message}"
    return bot_message

# Create the Gradio interface
with gr.Blocks(theme=gr.themes.Soft(primary_hue="blue")) as demo:
    gr.Markdown("# Grok AI Chat Interface")

    with gr.Row():
        with gr.Column(scale=3):
            # Main chat interface
            chatbot = gr.Chatbot(
                height=600,
                show_copy_button=True,
                avatar_images=("👤", "🤖"),
                bubble_full_width=False,
            )

            # Message input
            msg = gr.Textbox(
                placeholder="Send a message...",
                container=False,
                scale=7,
                show_label=False,
            )

            with gr.Row():
                submit_btn = gr.Button("Send", variant="primary", scale=1)
                clear_btn = gr.Button("Clear", variant="secondary", scale=1)

        with gr.Column(scale=1):
            # Model settings sidebar
            gr.Markdown("### Model Settings")

            model_dropdown = gr.Dropdown(
                choices=["grok-1", "grok-2", "grok-3-beta"],
                value="grok-3-beta",
                label="Model"
            )

            system_message = gr.Textbox(
                placeholder="You are a helpful AI assistant...",
                label="System Message",
                lines=4
            )

            with gr.Accordion("Advanced Settings", open=False):
                temperature = gr.Slider(
                    minimum=0.0,
                    maximum=1.0,
                    value=0.7,
                    step=0.01,
                    label="Temperature"
                )

                max_tokens = gr.Slider(
                    minimum=100,
                    maximum=4000,
                    value=1000,
                    step=100,
                    label="Max Tokens"
                )

    # Set up event handlers
    submit_btn.click(
        chat_with_grok,
        inputs=[msg, chatbot, system_message, model_dropdown, temperature, max_tokens],
        outputs=[chatbot],
    ).then(
        lambda: "",
        None,
        msg,
        queue=False
    )

    msg.submit(
        chat_with_grok,
        inputs=[msg, chatbot, system_message, model_dropdown, temperature, max_tokens],
        outputs=[chatbot],
    ).then(
        lambda: "",
        None,
        msg,
        queue=False
    )

    clear_btn.click(lambda: None, None, chatbot, queue=False)

# Launch the app
if __name__ == "__main__":
    demo.launch()
In this example, we use Gradio's gr.Blocks() component to create a chatbot UI for sending and generating text output from an AI. Using the built-in blocks, we can partition the UI into message input and output, model settings, and advanced settings sections.
Running the Python file grok_ui.py will display the above chatbot interface via your local URL: http://127.0.0.1:7860.
Bravo! 👏 You have created your first AI chat UI using Gradio. As discussed earlier, Gradio is not limited to only building text and image generation interfaces. You can easily integrate it with other AI app development platforms to create UIs for any use case. Let's make a real-time voice interface with Gradio, allowing you to have a live audio conversation with an AI in the next section.
Gradio: Build a Real-Time Voice UI
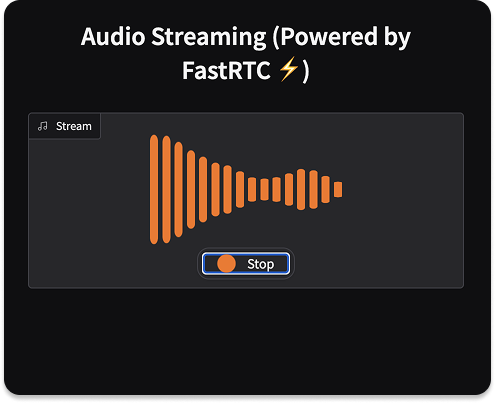
Gradio is an excellent choice for building conversational AI UIs. Let's use its built-in components to create a real-time voice app using Hugging Face's FastRTC. Think of FastRTC as a direct competitor and alternative to OpenAI's real-time API. It is a Python library that allows developers to build real-time communication apps for AI. The interface in this section is simple. We create a voice UI with Gradio, allowing you to input a speech and get the output back as an echo using FastRTC.
Like the previous example, we create a virtual environment and install Gradio, the FastRTC Python library, and optional dependencies using the following Terminal commands.
python -m venv venv
source venv/bin/activate
pip install gradio
pip install fastrtc

# Install the vad, stt, and tts extras
pip install "fastrtc[vad, stt, tts]"
Next, create a new Python file gradio_fastrtc_voice_ui.py and fill its content with the following.
from fastrtc import Stream, ReplyOnPause
import numpy as np

def echo(audio: tuple[int, np.ndarray]):
    # The function will be passed the audio until the user pauses
    # Implement any iterator that yields audio
    # See "LLM Voice Chat" for a more complete example
    yield audio

stream = Stream(
    handler=ReplyOnPause(echo),
    modality="audio",
    mode="send-receive",
)
stream.ui.launch()
In the above sample code, the stream.ui.launch() method launches a built-in Gradio UI for quickly testing and sharing your real-time stream. After running the Python file, you should see this information in the Terminal Running on local URL: http://127.0.0.1:7860. Launch http://127.0.0.1:7860 in your browser to see a Gradio voice interface similar to the image above. To initiate real-time communication, you should grant access to your webcam. Enjoy 😊 your first real-time voice UI with Gradio.
Gradio: Integration With Popular APIs and LLM Libraries
When working with popular LLM APIs like OpenAI, Anthropic, xAI, and libraries such as Embedchain and LlamaIndex, you can easily use Gradio to construct the front end of your projects. Refer to the following guides and examples to get started.
- Gradio with Llama Index
- Gradio with Enbedchain
- Gradio with LangChain
- Gradio with OpenAI
- Gradio with SambaNova
- Gradio with Hyperbolic
- Gradio with Anthropic's Claude
2. Streamlit: Build AI Apps and Share in the Cloud
Aside from Gradio, another excellent open-source app framework for constructing UIs for AI projects is Streamlit. It is well known for being magically easy to use. Want to create UIs to run LLMs locally? Connect Streamlit with Ollama to access open-source reasoning models like QwQ-32.
Key Features and Benefits of Streamlit
Using Streamlit, you can begin with a fully working app with just five lines of Python code. It allows developers to extend their apps with pre-built widgets and supports instant deployment to the web. The following highlights the essential functionalities of Streamlit.
- Local LLMs support: Streamlit integrates seamlessly with local and open-source models. That means you can quickly run any GGUF model from Hugging Face or run models using Llama.cpp, Llamafile, and more.
- Streaming and model progress animations: Get a beautiful text streaming animation for output generation for free and loading/status animations while a model generates responses.
- Components: Go beyond what is possible with Streamlit by extending and integrating your AI apps and LLMs with third-party tools.
- Deployment: Quickly build shareable web apps that require no front-end experience and let users test with any browser. Streamlit provides a beautiful web UI for your AI apps.
- Build Streamlit UIs with LLMs: Due to Streamlit's popularity and large community-shared code samples on GitHub the Web, you can use State-of-the-Art (SOTA) LLMs to generate Streamlit code to create multi-modal AI app UIs.
- Chat interface: Build UIs for generative AI apps with interactive real-time visualizations.
- LLM building tools agnostic: Streamlit is supported by all popular AI app-building applications, such as LangChain, Embedchain, LlamaIndex, and agentic frameworks.
Build a Streamlit UI To Run Models Locally
Local LLM tools like LMStudio or Ollama are excellent for offline running a model like DeepSeek R1 through an app interface and the command line. However, in most cases, you may prefer having a UI you built to interact with LLMs locally. In this circumstance, you can create a Streamlit UI and connect it with a GGUF or any Ollama-supported model.
This section adopts a privacy-focused, local-first approach to cloning the DeepSeek Chat UI and running the DeepSeek R1 model via a custom-made Streamlit offline interface powered by Ollama. Feel free to download and run other Ollama-supported models with the code sample in this section. In summary, we want to:
Build a local Streamlit interface to run and test open-source models, avoiding the fear of data sharing.
Benefit from Streamlit's streaming (typewriting animation) feature for answer generation.
Get an animated spinner for free while the chatbot is generating responses.
Enhance the user experience of waiting for answer generation with an animated count-up duration timer.
To begin, you should install the following required and optional dependencies.
# Set up a Python virtual environment you prefer
python -m venv venv
source venv/bin/activate

# Install dependencies
pip install streamlit
pip install ollama

# Download your open-source model with Ollama
ollama run deepseek-r1:8b
Here, we set up a Python virtual environment, installed Streamlit and Ollama, and pulled one of the distilled versions of DeepSeek R1.
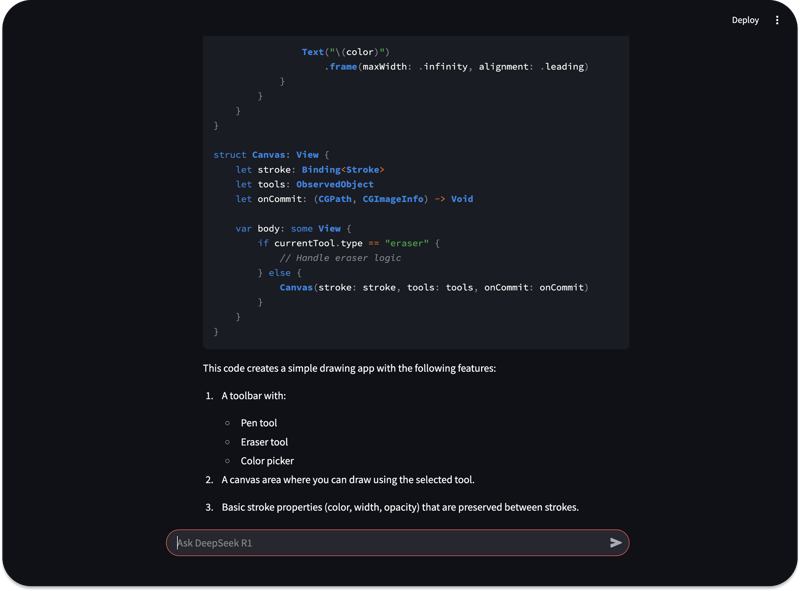
Next, create a Python file and name it whatever you want, local_deepseek_r1_streamlit.py. Add the following code to the file you just created.
import streamlit as st
import ollama
import time

def stream_data(text, delay: float=0.02):
    for word in text.split():
        yield word + " "
        time.sleep(delay)

# Input for the prompt
prompt = st.chat_input("Ask DeepSeek R1")

# Initialize chat history in session state if it doesn't exist
if "messages" not in st.session_state:
    st.session_state.messages = []

# Display chat history
for message in st.session_state.messages:
    with st.chat_message(message["role"]):
        st.markdown(message["content"])

if prompt:
    # Add user message to chat history
    st.session_state.messages.append({"role": "user", "content": prompt})

    # Display input prompt from user
    with st.chat_message("user"):
        st.markdown(prompt)

    # Processing
    with st.chat_message("assistant"):
        message_placeholder = st.empty()
        full_response = ""

        # Stream the response with a spinner while waiting for the initial response
        with st.spinner("Thinking...", show_time=True):
            response = ollama.chat(
                model="deepseek-r1:8b",
                messages=[{"role": m["role"], "content": m["content"]} for m in st.session_state.messages],
                stream=True  # Enable streaming if supported by your ollama version
            )

            # If streaming is supported
            if hasattr(response, '__iter__'):
                for chunk in response:
                    if chunk and "message" in chunk and "content" in chunk["message"]:
                        content = chunk["message"]["content"]
                        full_response += content
                        message_placeholder.markdown(full_response + "▌")
                message_placeholder.markdown(full_response)
            else:
                # Fallback for non-streaming response
                full_response = response["message"]["content"]
                # Simulate streaming for better UX
                for word in stream_data(full_response):
                    message_placeholder.markdown(full_response[:len(word)] + "▌")
                message_placeholder.markdown(full_response)

        # Add assistant response to chat history
        st.session_state.messages.append({"role": "assistant", "content": full_response})
The above sample code creates a simple input field for capturing user prompts. Once a user sends a prompt, we stream the response generation, making a typewriting effect. The chatbot displays a spinner while generating a response. The Streamlit spinner also shows an animated count-up timer to simulate the duration of output generation.
Use the streamlit run command and specify the name of your Python file streamlit run local_deepseek_r1_streamlit.py to view your local AI chat app on http://localhost:8501/. You can now use any prompt to generate a response similar to the preview below.

Thanks to Streamlit 🙏, we have a beautiful streaming, spinning, and animated count-up duration timer for free. Check out Streamlit's website for more integration examples for building AI chat and LLM apps with other frameworks.
3. Chainlit: Build UIs for Conversational AI
Like Streamlit, you can use Chainlit to create aesthetically pleasing and pragmatic UIs to interact with AI systems and LLMs. Streamlit can be used to build general-purpose web applications for data manipulation and AI in pure Python. However, Chainlit has one primary focus, which is creating AI and LLM apps. If you want to make a universal web app in Python rather than AI-focused, Chainlit may not suit you.
Key Features and Benefits of Using Chainlit
Chainlit's broad integration with external third-party applications and deployment options make it an excellent choice for creating AI chat UIs. Work faster with your team by utilizing Chainlit's monitoring, observability, and authentication mechanism for building secure and extensible AI apps.
- Built-in monitoring and analytics: Monitor your API calls to model providers like Anthropic and OpenAI on a beautiful dashboard and prompt playground using Literal AI.
- Customization: Chainlit provides different customization options to help you customize the look and feel of the UIs you create. Perform basic modifications like swapping a logo and favicon. You can do advanced theming of Chainlit’s UI or use custom CSS to theme interface components.
- Authentication: Authenticate users with industry-standard protocols like OAuth. The above means you can authenticate users with third-party authorization services like Google or GitHub. Another great feature of Chainlit is its ability to authenticate people with password/login.
- Supported functionalities: Interact with your AI applications with messages, streaming, audio, chat history, chat profiles, feedback (upvote or downvote an LLM's responses, like in ChatGPT and Grok), and more.
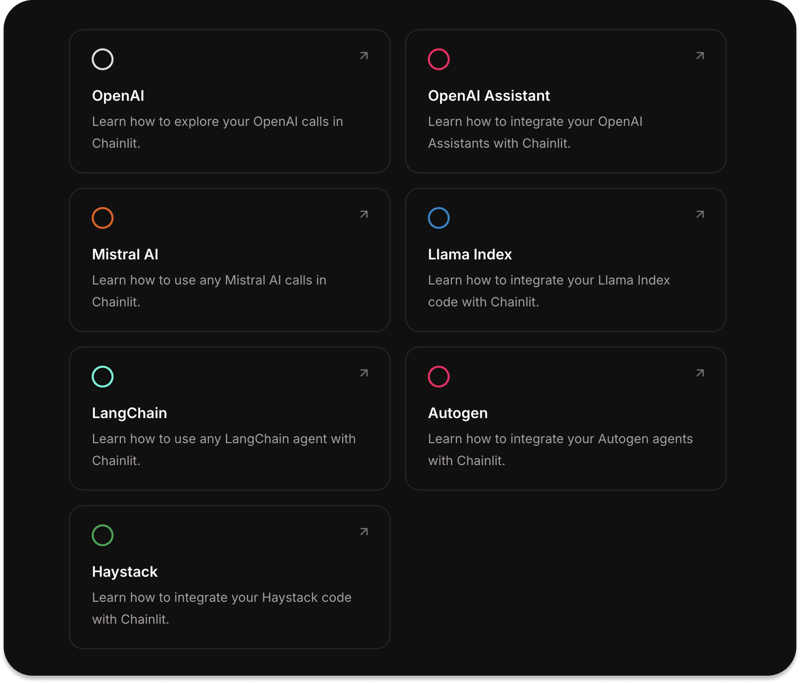
- Integrations: Build a Chainlit UI and integrate it with popular Python libraries and APIs like Mistral AI, Autogen, and Haystack.
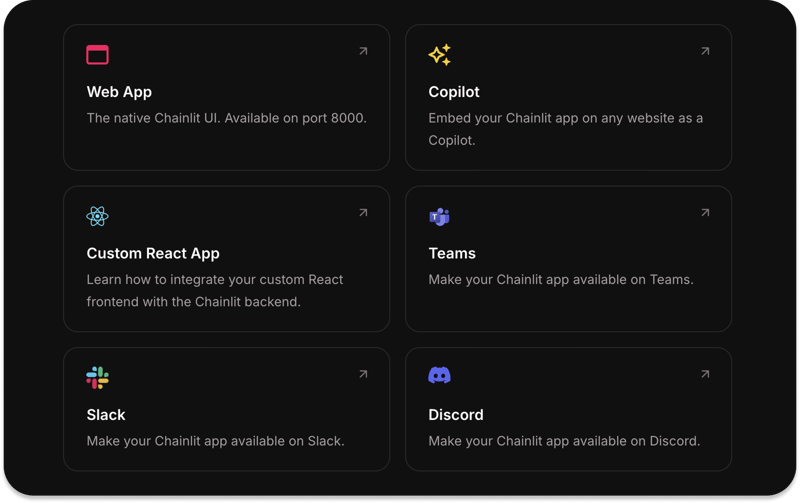
- Deployment: Create Chainlit UIs and use them as standalone AI web apps or in-app features for applications like Slack, Discord, and Microsoft Teams.
Build a Chainlit UI to Access 100+ LLMs
In this section, we create a local Chainlit UI powered by the LiteLLM platform. LiteLLM is a gateway that provides model access and spend tracking across hundreds of LLMs in an OpenAI-compatible format. This example uses one of the distilled models of DeepSeek R1 via Ollama for local access.
Begin by installing Ollama as discussed in one of the previous sections and the following.
pip install chainlit
pip install litellm
Next, create a new Python file in your favorite editor and use this code sample to fill its content.
import chainlit as cl
import litellm

@cl.on_message
async def on_message(message: cl.Message):
  msg = cl.Message(content="")
  await msg.send()

  system_message = {
    "role": "system",
    "content": """You are an advanced AI assistant powered by the deepseek-r1:8b model.

Your strengths:
- Providing clear, accurate, and thoughtful responses
- Breaking down complex topics into understandable explanations
- Offering balanced perspectives on questions
- Being helpful while acknowledging your limitations

Guidelines:
- If you're uncertain about something, acknowledge it rather than making up information
- When appropriate, suggest related questions the user might want to ask
- Maintain a friendly, respectful tone
- Format your responses with markdown when it improves readability
"""
  }

  response = await litellm.acompletion(
    model="ollama/deepseek-r1:8b",
    messages = [
      system_message,
      {"role": "user", "content": message.content}
    ],
    api_base="http://localhost:11434",
    stream=True
  )

  async for chunk in response:
    if chunk:
      content = chunk.choices[0].delta.content
      if content:
        await msg.stream_token(content)

  await msg.update()
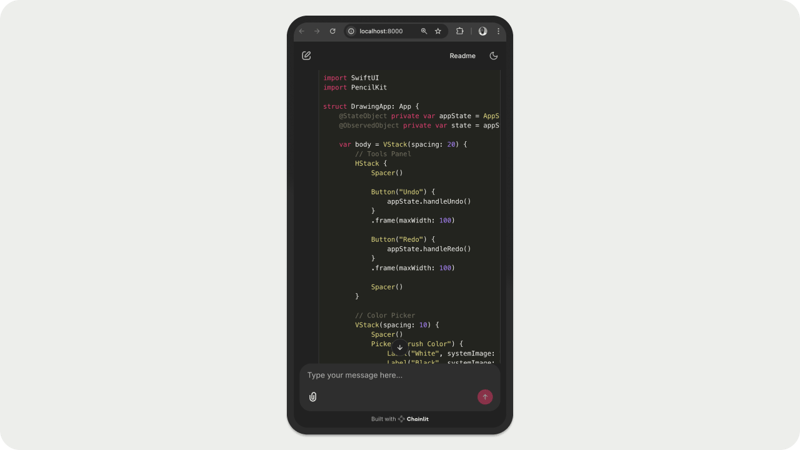
Running the Python code above will display a Chainlit AI chat interface similar to the preview below. You are now up and running with the DeepSeek R1 model powered by Ollama and LiteLLM. To test with different models for AI chat and content generation, you can, for example, pull the SOTA reasoning model, QwQ-32 with ollama run qwq in the Terminal.

Other Frameworks To Build AI App UIs in Python
As discussed earlier in this article, you can build the front end of your Python-based AI application using many different solutions. In addition to the three leading libraries mentioned above, you can use the following and other platforms like Flask to create web UIs for AI apps, although some have broader use cases than solely AI.
- Messop: Similar to Chainlit and Streamlit, Messop allows developers to rapidly create AI apps in Python with tens of UI components. Although it is not as widely used and feature-rich as the UI building frameworks above, its GitHub repo indicates it is used by an engineering team at Google.
- FastHTML allows developers to build modern web applications entirely in Python without touching JavaScript or React. As its name implies, it is quicker to begin with FastHTML. However, it does not have pre-built UI components and styling. Getting the best out of this framework requires the knowledge of HTMX and UI styling using CSS libraries like Tailwind and Bootstrap.
- Reflex: Build your AI app's frontend and backend in Python. Check out the Reflex website’s implementation examples for AI image generation and chatbots.
Final Thoughts on Chat UIs for AI Apps
Choosing a framework for building chat UIs for AI applications requires many considerations, including features, scalability, integration with other AI technologies and platforms, and deployment options. This article explored real-world examples of building chat UIs for AI apps using industry-leading platforms like Gradio, Streamlit, and Chainlit. Hopefully, you enjoyed the different use cases and capabilities unlocked from each AI UI building framework. Stream offers an alternative in-app AI assistant integration approach using six platforms' pre-built AI chat UI components. To begin, check out how to create an AI assistant and start coding AI apps with Stream for free.

Top comments (1)
Thank you for sharing these gems! 🫶🔥