

Want to avoid that situation where a random family member or coworker walks into the background of your Zoom meeting because they didn't know you were live?
Have you tried to program microcontrollers past blinking an LED and gave up from frustration?
Do you wish to wield the power of webhooks in your hardware project?
Join me on a journey to create an automated on-air light that updates based on my Zoom meeting status, powered by an ESP32 and Viam.
My son is starting become more mobile and explore all the different spaces around my house. I've always wanted some sort of indicator to him, my wife, and anyone else in the house that I'm currently in a meeting without needing to remember turn it on or off. It would also be useful if it could help me remember when the meeting has started; I think we've all been there when a reminder for a meeting comes up 5 minutes before it starts and then it completely slips your mind until 5 minutes after it starts. 😅
To accomplish this task, I used a cardboard box, an ESP32, an RGB LED, and a USB battery (along with the wires and cables to connect them all together). The ESP32 is a very popular microcontroller because it provides Wi-Fi, Bluetooth, plenty of GPIO, and a solid amount of memory and storage for its form factor while staying relatively low-power, so it can run all day using the USB battery. Since I didn't need to worry about connecting to an outlet, the light can be mounted wherever I like.
This also gave me a chance to try the latest release of the Viam micro-RDK, so I could securely connect to and program the device with my choice of languages. Typically, when a network-connected device in a home (or office) needs to communicate with the world wide web, there are a few methods to do it:
Some code on the device could check in with a cloud service to see if there is any relevant information with which it can take action; this is called "polling", which is a quick and valid approach when you're not worried about power or checking the service too often for updates.
The device could also "subscribe" to updates from a messaging service in the cloud using MQTT or another "pub/sub" protocol. This is more efficient for the device and can be useful for scaling those updates to many devices, which is not a concern for my project; plus it adds a layer of complexity to the stack to maintain this project over time.
There is also "hard mode": opening a public port on the network router and forwarding a request to the public IP address to the device, which could have security implications if done incorrectly and it's not guaranteed that the IP address will always stay the same since typical home service providers can reassign them at will.
Devices connected to Viam take a different approach entirely. The RDK and micro-RDK use gRPC to establish a secure peer-to-peer WebRTC connection with the Viam cloud service and any programs using one of Viam's SDKs. This means any communication goes directly to/from the device without worrying about exposing private networks to the public internet or managing additional cloud services in-between.
To control the light automatically based on my Zoom status, I created a webhooks-only app written in Python connected to my account. I deployed it to Fly since they make it so easy to launch web applications for free.
Check out the working demo video below and read the build instructions to learn how to set up a smarter on-air light for yourself!
Supplies
1 x ESP32 development board compatible with the Viam micro-RDK
1 (or more) x RGB LED
1 x breadboard to hold the components
4 (at least) x jumper wires (can be a mix of male-to-male, female-to-female, or female-to-male)
1 x USB data cable that will connect to the development board and your computer
1 x USB battery
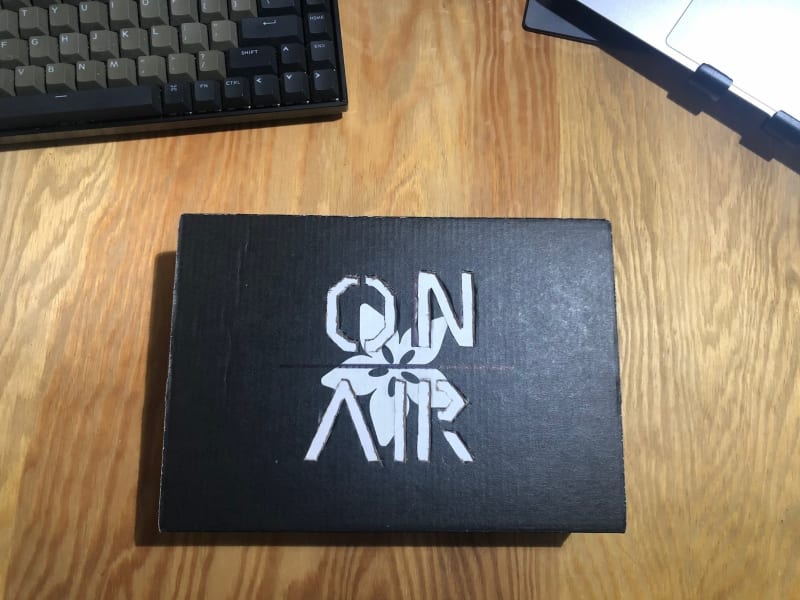
1 x container to hold the components and battery (I used a cardboard box with "On Air" cut out )
Build Instructions
1. Wiring the Components
We'll start off by wiring the RGB LED to the ESP32:
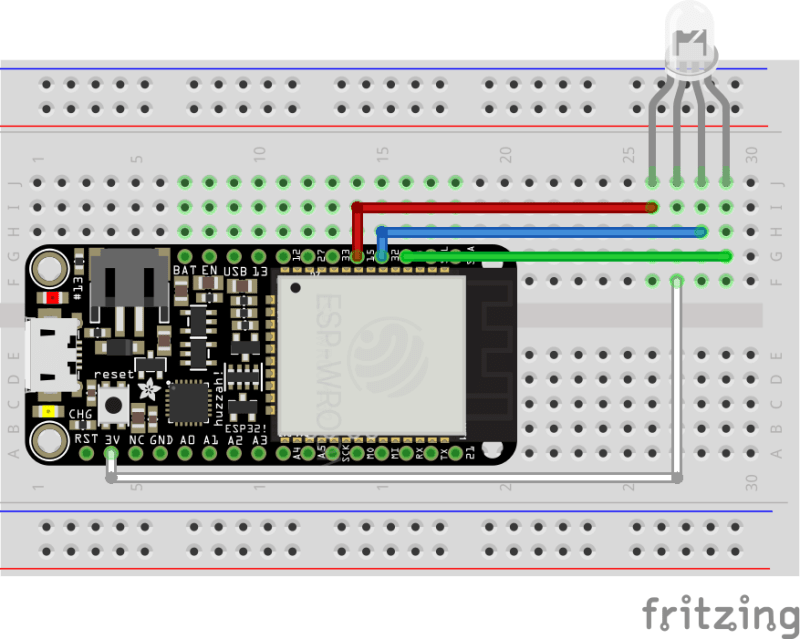
The diagram above shows a breadboard for clarity, but the RGB LED and ESP32 could be wired directly together using male-to-male jumpers if you choose.
Take note of the GPIO pin numbers connected by red, blue, and green jumper wires to three of the LED legs, any GPIO that support digital output or pulse width modulation (PWM) will work; check your board's pinout to verify. Here we're using GPIO pins 15, 32, and 14. Those values will be important for configuring the development board in the Viam app and the Python code later. The jumper connecting the 3V pin on the ESP32 board to the LED will provide power to the component when the board is connected to your computer or the battery over USB.
2. Flash and Configure the ESP32 in Viam
Next is creating a new robot in the Viam app and following the "Setup" instructions to flash the ESP32 with the micro-RDK.
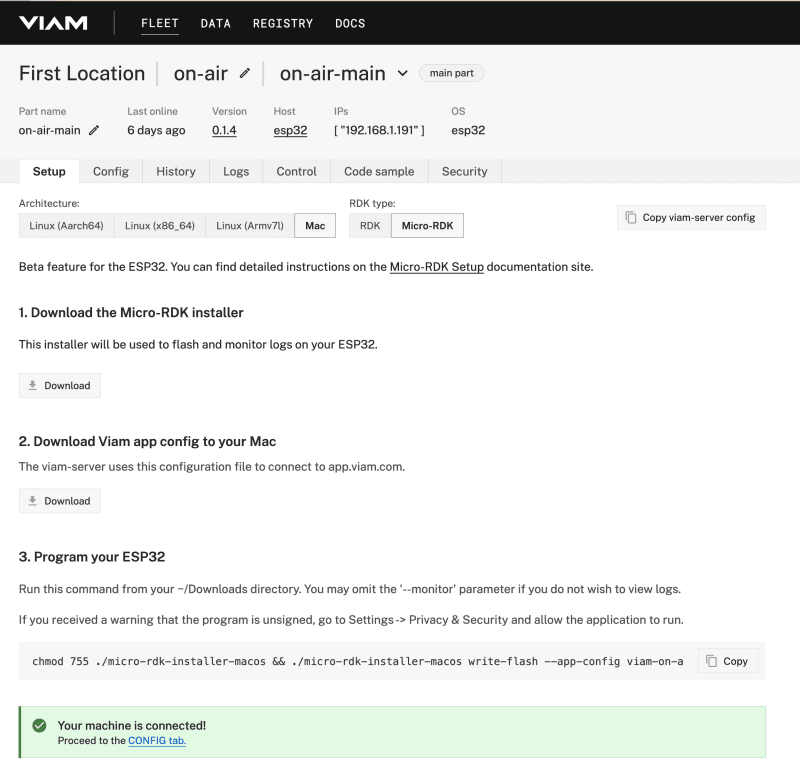
Once you've confirmed that it is connected to Viam (you should see a "Live" status under "Last online" in the header of the app), configure the board component and relevant pins using the following JSON:
{
  "components": [
    {
      "attributes": {
        "pins": [
          15,
          32,
          14
        ]
      },
      "depends_on": [],
      "name": "board",
      "model": "esp32",
      "type": "board",
      "namespace": "rdk"
    }
  ]
}
Remember to replace the numbers in the list of pins with the ones matching the physical wiring of the project.
Restart the ESP32 to confirm a working configuration. If there is a "reset" button on the development board, use that; otherwise, unplugging and plugging in the board also works. You can look at the Control tab in the app to read and write the configured pin values to control the LED. Try setting all the pins to 1 or 0 or a floating number in between like 0.5 to see what happens.
3. Web Application Setup
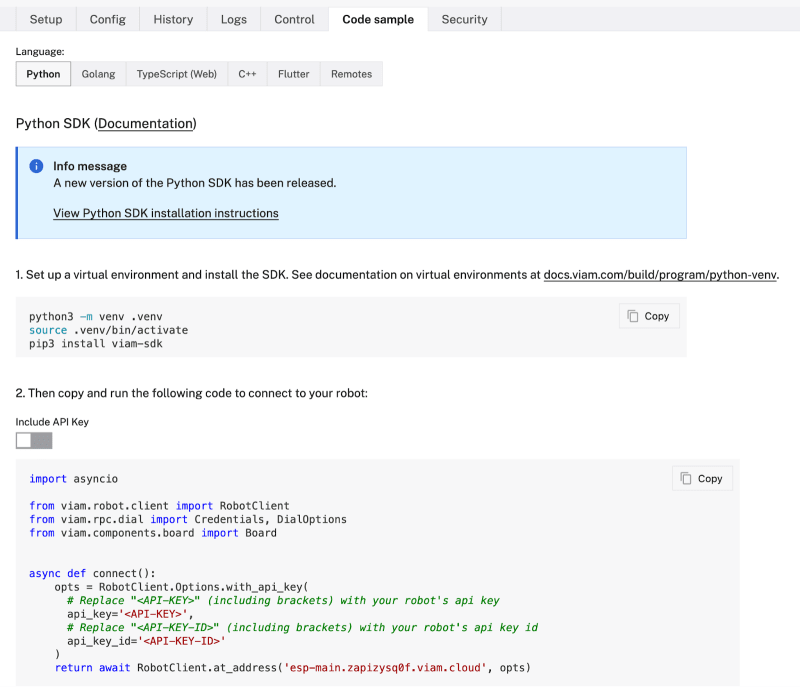
Now to build the web application that will accept webhook requests from Zoom and control the light, we'll use the Viam Python SDK with the Starlette async web framework. Clone the working project from GitHub.
git clone https://github.com/HipsterBrown/viam-on-air.git
To configure the application with the required API key, API key ID, and location address for the Viam SDK and the secret token from Zoom, make a copy of the .env.example file and call it .env.
Get the Viam API and location values from the "Code Sample" tab when viewing the machine details in the app. Toggle the "Include API Key" switch to reveal the API Key and API Key ID in the code where "" and "" is seen initially.
Get the Zoom secret token by creating a webhook-only app in the Zoom App Marketplace and subscribing to the following events when adding an event subscription:
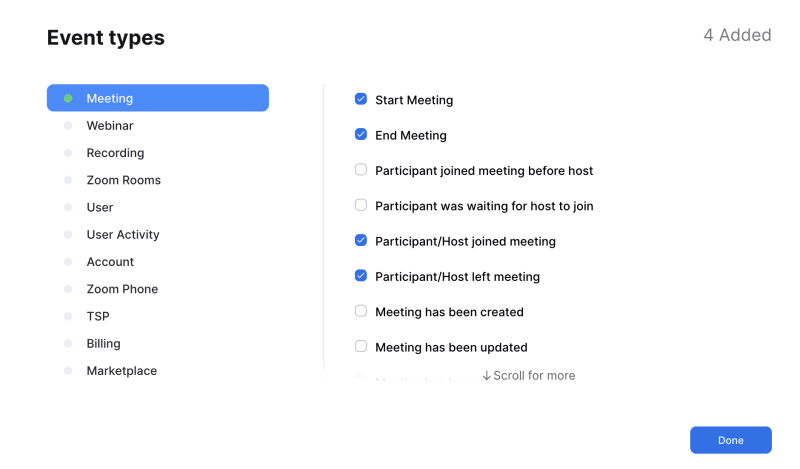
Update the .env file with the relevant values, including the configured pins from Viam as RGB_PINS and your Zoom username to make sure the light only updates when you join or leave a meeting.
With a working Python development environment, run the install command to get the dependencies in the cloned project repository:
pip install -e .
Start the web application:
python -m viam_on_air
This will connect to the ESP32 and start a webserver on 0.0.0.0:8000 (a.k.a localhost:8000).
❯ python -m viam_on_air
INFO:   Started server process [96243]
INFO:   Waiting for application startup.
2023-11-22 17:40:02,956         INFO    viam.rpc.dial (dial.py:286)     Connecting to socket: /tmp/proxy-LSL4xP2F.sock
INFO:   Application startup complete.
INFO:   Uvicorn running on http://0.0.0.0:8000 (Press CTRL+C to quit)
Now that we've confirmed it is working, let's take a quick look at some of the code involved!
Using Starlette's Config class, the values from the .env file (as well as variables set in the execution environment, i.e. your computer or server) are set as Python variables:
app_config = Config(".env")

ZOOM_SECRET_TOKEN = app_config("ZOOM_SECRET_TOKEN", cast=Secret)
ZOOM_USERNAME = app_config("ZOOM_USERNAME", cast=str)
VIAM_API_KEY = app_config("VIAM_API_KEY", cast=Secret)
VIAM_API_KEY_ID = app_config("VIAM_API_KEY_ID", cast=Secret)
VIAM_ADDRESS = app_config("VIAM_ADDRESS", cast=str)
BOARD_NAME = app_config("BOARD_NAME", cast=str, default="board")
RGB_PINS = app_config("RGB_PINS", cast=CommaSeparatedStrings, default=["18", "5", "19"])
To share the long-running WebRTC connection to the ESP32 with each webhook request coming into the application, rather than establishing the connection each time a request occurs, Starlette's lifespan feature is handy for managing the async context:
@contextlib.asynccontextmanager
async def lifespan(_app: Starlette) -> AsyncIterator[State]:
    async with create_robot(
        api_key=str(VIAM_API_KEY),
        api_key_id=str(VIAM_API_KEY_ID),
        robot_address=VIAM_ADDRESS,
        board_name=BOARD_NAME,
        rgb_pins=tuple(RGB_PINS),
    ) as robot:
        yield {"robot": robot}
The create_robot method encapsulates the logic for creating a new RobotClient instance from the Viam Python SDK and wrapping it in a custom Robot class for managing the RGB LED controls. It will automatically close the connection to the ESP32 when the server shuts down since it is provided as an async context:
@contextlib.asynccontextmanager
async def create_robot(
    api_key: str, api_key_id: str, robot_address: str, board_name: str, rgb_pins: Tuple[str, str, str]
):
    opts = RobotClient.Options.with_api_key(
        api_key=api_key,
        api_key_id=api_key_id,
    )
    client = await RobotClient.at_address(robot_address, opts)
    board = Board.from_robot(client, board_name)

    robot = Robot(board=board, rgb_pins=rgb_pins)
    await robot.setup()
    try:
        yield robot
    finally:
        await robot.close()
        await client.close()
The Robot class controls the RGB LED by setting the pulse-width modulation (PWM) duty cycle for each GPIO pin configured by the RGB_PINS environment variable. The asyncio.gather method is used to perform each async task concurrently:
class Robot:
    def __init__(self, board: Board, rgb_pins: Tuple[str, str, str]):
        self._board = board
        self._rgb_pins = rgb_pins
        self.logger = getLogger(__name__)

    async def setup(self):
        self._pins = await asyncio.gather(
            # red, green, blue
            *[self._board.gpio_pin_by_name(pin_name) for pin_name in self._rgb_pins]
        )
        await asyncio.gather(*[pin.set_pwm_frequency(3000) for pin in self._pins])

    async def set_color(self, color: Tuple[float, float, float]):
        # (red, green, blue) = color
        await asyncio.gather(*[pin.set_pwm(color[idx]) for idx, pin in enumerate(self._pins)])

    async def blink(self, color: Tuple[float, float, float], duration: float = 5, freq: float = 0.25):
        count = duration / freq
        current = 0
        is_on = True
        while current <= count:
            current += 1
            await self.set_color(color if is_on else (1, 1, 1))
            is_on = not is_on
            await asyncio.sleep(freq)
        await self.set_color((1, 1, 1))

    async def close(self):
        await self.set_color((1, 1, 1))
The webhook request to the application is handled by a ZoomHandler class that uses the shared robot instance from the Request. Controlling the LED is executed as a background task to ensure the response is sent as quickly as possible:
async def zoom(request: Request):
    handler = ZoomHandler(request=request, zoom_token=str(ZOOM_SECRET_TOKEN), zoom_username=ZOOM_USERNAME)
    return await handler.handle()

RED = (0.0, 1.0, 1.0)
GREEN = (1.0, 0.0, 1.0)
BLUE = (1.0, 1.0, 0.0)
PURPLE = (0.0, 1.0, 0.0)

class ZoomHandler:
    _body: Mapping[str, Any] | None = None

    def __init__(self, request: Request, zoom_token: str, zoom_username: str) -> None:
        self._request = request
        self._robot: Robot = request.state.robot
        self._zoom_token = zoom_token
        self._username = zoom_username

    async def handle(self) -> Response:
        body = await self._get_body()
        event: Literal[
            "endpoint.url_validation",
            "meeting.started",
            "meeting.ended",
            "meeting.participant_joined",
            "meeting.participant_left",
        ] = body["event"]

        if event == "endpoint.url_validation":
            return self.validate_endpoint()
        if event == "meeting.participant_joined":
            return await self.welcome_participant()
        if event == "meeting.started":
            return await self.inform_participant()
        if event == "meeting.participant_left":
            return await self.dismiss_participant()
        if event == "meeting.ended":
            return await self.dismiss_meeting()
        return JSONResponse({"message": f"Event type {event} unknown"}, status_code=404)

    def validate_endpoint(self):
        assert self._body is not None

        plain_token = self._body["payload"]["plainToken"].encode()
        zoom_token = self._zoom_token.encode()
        encrypted_token = hmac.new(zoom_token, plain_token, hashlib.sha256).hexdigest()
        return JSONResponse({"plainToken": plain_token.decode(), "encryptedToken": encrypted_token})

    async def welcome_participant(self):
        participant = self._get_participant()
        if participant["user_name"] != self._username:
            return JSONResponse({})

        LOGGER.info(f"Welcome {participant['user_name']}!")
        task = BackgroundTask(self._robot.set_color, color=RED)
        return JSONResponse({}, background=task)

    async def dismiss_participant(self):
        participant = self._get_participant()
        if participant["user_name"] != self._username:
            return JSONResponse({})

        LOGGER.info(f"Goodbye {participant['user_name']}!")
        task = BackgroundTask(self._robot.blink, color=RED)
        return JSONResponse({}, background=task)

    async def inform_participant(self):
        meeting = self._get_meeting()
        LOGGER.info(f"Meeting {meeting['topic']} has started!")
        task = BackgroundTask(self._robot.set_color, color=GREEN)
        return JSONResponse({}, background=task)

    async def dismiss_meeting(self):
        meeting = self._get_meeting()
        LOGGER.info(f"Meeting {meeting['topic']} has ended!")
        task = BackgroundTask(self._robot.blink, color=PURPLE)
        return JSONResponse({}, background=task)

    async def _get_body(self):
        if self._body is None:
            self._body = await self._request.json()

        return self._body

    def _get_participant(self):
        assert self._body is not None

        return self._body["payload"]["object"]["participant"]

    def _get_meeting(self):
        assert self._body is not None

        return self._body["payload"]["object"]
4. Local Testing

To confirm this all works together and start receiving webhook events from Zoom, the webhook endpoint needs to be validated first. To do this without deploying to a live server, use a service like ngrok , zrok , or something else to provide a secure proxy to the local server.
For example, install zrok with Homebrew and start a proxy by running:
brew install zrok
zrok share public localhost:8000
The endpoint URL configured for the webhook should end in /webhooks/zoom. Click the "Validate" button to confirm the app is working as expected:
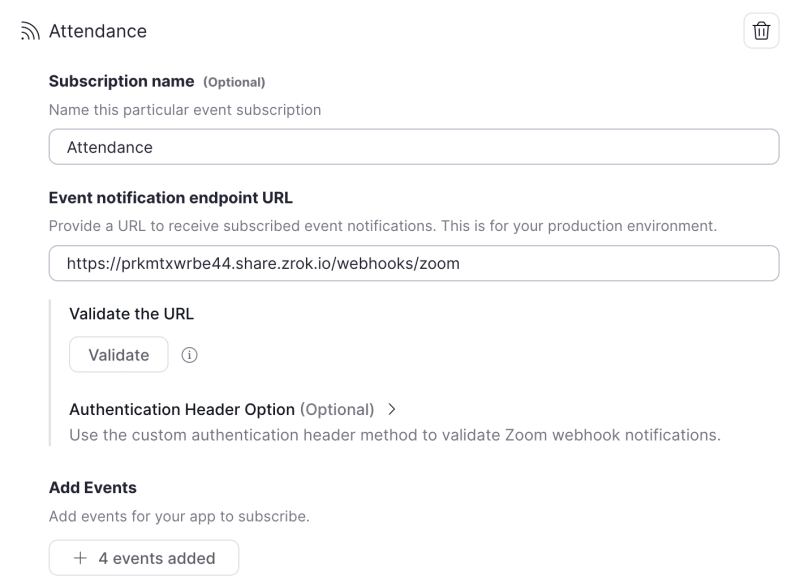
The hostname (the part before the /webhooks/zoom) should be the proxy URL returned by the secure tunnel tool.
Once the Zoom webhook-only app has been successfully activated, you can start joining some meetings and see the on-air light in action!
Green = A meeting has started
Red = You have joined the meeting
Blinking Red for 5 seconds = You left the meeting
Blinking Purple for 5 seconds = The meeting has just ended
5. Web Application Deployment
Keeping the secure tunnel running all the time is not a viable solution in the long term, so let's take a look at deploying the Python app to a service like Fly.
With the flyctl CLI installed, log in or create an account before continuing. The project repository contains the required fly.toml and Procfile to deploy the application to a Fly Machine.
#
# See https://fly.io/docs/reference/configuration/ for information about how to use this file.
#

app = "viam-on-air"
primary_region = "ewr"

[http_service]
  internal_port = 8080
  force_https = true
  auto_stop_machines = true
  auto_start_machines = true
  min_machines_running = 0
  processes = ["app"]

[build]
  builder = "paketobuildpacks/builder:base"
  buildpacks = ["gcr.io/paketo-buildpacks/python"]

[env]
  ZOOM_USERNAME="Your Username"
  BOARD_NAME="board"
  RGB_PINS="18,5,19"

[[vm]]
  cpu_kind = "shared"
  cpus = 1
  memory_mb = 1024
Before deploying, you can update the app value in the fly.toml to create a different hostname for the running application, as well as update the [env] section with your environment variables from the .env file. While we could include the .env file in the deployed application image, there are security concerns with storing secrets like the Viam API key and Zoom secret token in plain text on a server that could be compromised. For those secrets, use the expected fly command:
fly secrets set ZOOM_SECRET_TOKEN="" VIAM_API_KEY="" VIAM_API_KEY_ID="" VIAM_ADDRESS=""
The empty "" after each secret name should be filled in with the associated value.
Finally, deploy the application:
fly deploy
After a minute or two, you will get a success message:
Watch your deployment at https://fly.io/apps/viam-on-air/monitoring

-------
Updating existing machines in 'viam-on-air' with rolling strategy

-------
 ✔ Machine 7811110f907408 [app] update succeeded
-------

Visit your newly deployed app at https://viam-on-air.fly.dev/
You can visit the deployed app URL to see a {"message": "Ok"} JSON response. Then update the Zoom app configuration to use that new URL hostname instead of the secure tunnel and re-validate the endpoint.
6. Wrapping Up
Unplug the ESP32 from the computer and power it from the USB battery. Mount all the components in your container. I used a cardboard box with "ON AIR" cut from the front and lined it with printer paper to diffuse the RGB LED shining through.
In practically no time at all, you now have a battery-powered, automated on-air light that you can hang whenever you'd like to signal your current meeting status. If you ever want to monitor the status of the light from your computer or phone, you can view it in the Viam app and learn about extending the functionality of the project.
Share your builds with the community in Discord! Thanks for following along!

Top comments (2)
Very good idea, can it be made into a finished product?
Like something that could be sold in a store? For sure!
By updating the web application with a frontend to allow users to connect their Zoom account and pair their light, it would be possible to support many of these projects.