
Repository for this first part is available at branch initial-setup
 AndreVarandas
/
mood-sentences
AndreVarandas
/
mood-sentences
✨ Mood sentences
First things first
Let's start by creating our git repository. I like to create the repository in Github first. This way, when I run npm init -y a lot of stuff will be populated for me (such as author, description, issues and git links, etc.)
Head to https://github.com/new to create the new repository. Name it something like mood-sentences. The rest is up to you. I usually add node .gitignore and a license file. Here is a screenshot of my configuration:
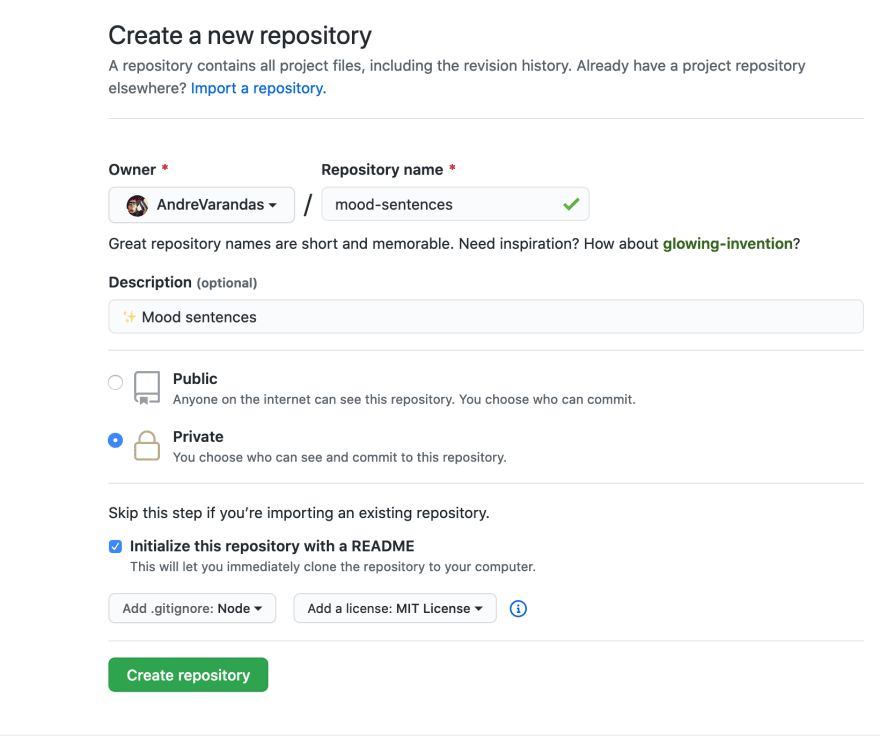
Yes, the repository is private for now, but we will change that in the future. By the time you read this, it should be already public - this tutorial only covers public packages. 😉
Hit that Create repository green button! Let's clone the project into our machine. git clone https://github.com/YOURUSERNAME/mood-sentences.git
Change directory into mood-sentences and run npm init -y on it. Magically, a package.json file will appear at the root, containing information about our package, such as issues, homepage links, author, etc.
This file will contain all the useful scripts and dependencies for our app. For now, it's just the skeleton, and we have everything ready to start shaping our app!
Let's change the package name, so it is now part of an organization @varandas/mood-sentences. (more on the last chapter)
{
  "name": "@varandas/mood-sentences",
  "version": "1.0.0",
  "description": "✨ Mood sentences",
...rest
This avoids clashing with other existing packages - and I encourage you to add your name as a prefix as well.
If anything goes wrong during the tutorial, check my full
package.jsonfile in the https://github.com/AndreVarandas/mood-sentences/tree/initial-setup.
node_modules
When I start a new package I like to add a few things (packages!) right away. As we are including those packages in our project we call those our app dependencies. These are pieces of code that are installed directly into a special folder, that you've probably already seen, called node_modules. This folder contains all of our app dependencies.

When we install a new dependency we can specify if it's a development dependency or a dependency.
We can do that while installing a new dependency with npm install package-name --save-dev for a dev dependency or npm install package-name --save for a dependency.
A devDependency as the name implies is a dependency that we only use for development purposes - and will not be included in our final product. It's good idea to avoid bundling dev dependencies into our final package.
Adding our first dependency
To show this, let's start by adding eslint and a few plugins to keep our code clean of errors. I like to use the standard configuration.
npm install --save-dev eslint eslint-config-standard eslint-plugin-import eslint-plugin-node eslint-plugin-promise eslint-plugin-standard
This "train" of packages, will add a new entry to our package.json file named devDependencies and a new node_modules folder including the eslint and plugins packages.
Now that we have eslint installed we can configure our code editor to format on save using eslint and add new scripts to package.json so that we can use them from the console:
...rest..
"scripts": {
    "test": "echo \"Error: no test specified\" && exit 1",
    "lint": "eslint . --ext .js",
    "lint:fix": "eslint --fix --ext .js ."
  },
...rest...
When you add an entry to the scripts section, you'll be able to run
npm run script-nameand it will be executed.
Now we can run npm run lint to check for syntax errors and npm run lint:fix to fix them.
Let's add another development dependency that is going to help us writing better commit messages. I usually go with commitizen https://github.com/commitizen/cz-cli - it basically asks us a few questions when we add a new commit. Besides forcing us to write good commit messages it also plays nice with semantic-release package that we are also going to use for managing release versions.
Install with:
npx commitizen init cz-conventional-changelog --save-dev --save-exact
This will also add a few configurations to our package.json between them is a config.commitizen property that is going to be used by the package itself.
The only thing we need now is to add a new commit script to our package.json so it now looks like:
...rest...
"scripts": {
    "commit": "npx git-cz",
    "test": "echo \"Error: no test specified\" && exit 1",
    "lint": "eslint . --ext .js",
    "lint:fix": "eslint --fix --ext .js ."
  },
...rest...
Now whenever commit new changes, we use npm run commit instead of git commit for it to generate beautiful commit messages.
We should also install a testing framework (everybody tests their apps right? 🤓), we are going to use jest:
npm install --save-dev jest
Create a new configuration file for jest named jestconfig.json at the root of the folder with the following contents:
{
  "testRegex": "(/__tests__/.*|(\\.|/)(test|spec))\\.(js?)$",
  "moduleFileExtensions": [
    "js",
    "json",
    "node"
  ],
  "collectCoverage": true
}
This will tell jest where to look for the tests, what file extensions to use, and to collect code coverage.
And update the test script so we can use it later:
...rest...
  "scripts": {
    "commit": "npx git-cz",
    "test": "jest --config jestconfig.json",
    "lint": "eslint . --ext .js",
    "lint:fix": "eslint --fix --ext .js ."
  },
...rest...
As a final step for this initial setup, let's also install another devDependency called husky. Husky will enable us to run npm scripts when certain actions occur, such as when we commit or push code to git.
npm install --save-dev husky
Then update package.json to run some scripts when we commit. Later we will also a pre-push hook to run our tests - I recommend adding this before the last closing bracket:
...rest...
"husky": {
    "hooks": {
      "pre-commit": "npm run lint:fix && npm run lint"
    }
  }
...rest..
Wow, that was a lot of work for just setting up our project. But it will pay out - I promise. This is all the setup I usually do when writing packages.
Lastly, let's commit and push our changes using our new commands:
git add -Anpm run commit
You will now be prompted by commitizen, and you should pick feature and add a small commit message.
After that husky will fix any lint errors and report back if any is left and not auto-fixable 🤓.
Don't forget that you can check this first part on https://github.com/AndreVarandas/mood-sentences/tree/initial-setup
Thanks for reading! We will continue our journey on building our first package in the next chapter, and actually write some code!

Top comments (0)