Hey folks!
So it’s day 01 of my 100daysofcode journal. Today, we’ll do setup and first GET call for flask api.
Here is a list of what we’ll be covering today:
- Environment Setup
- Project Setup
- Making first API call 🤩
Environment Setup:
So I am using a Mac machine, so for my environment setup I have to install following software:
- Python3
- MongoDB
- Pipenv
- Flask
let’s go one by one over the dependencies and software
Python 3:
In order to install python3 on a Mac you need to install Homebrew first. You can go to following link to install homebrew and simply follow the instructions.
Once you have hombrew install simply run following command
brew install python3
If everything goes well, you shall be able to run following command on Iterm or Terminal and get output in return as shown below, run
python – –version

Python Version
MongoDB
Now that we have Python3 installed on machine, we need to install MongoDB on mac machine. We will be using brew for this purpose also. So open the terminal again and run following set of commands.
brew tap mongodb/brew
This will add mongodb formula. Done? let’s install the MongoDB community edition. To do so, we will run next command
brew install mongodb-community@4.2
This shall install mongo on your system. To double check run
mongod --version
You will get following output
pyguy@Himanshus-MacBook-Pro ~ % mongod — version
db version v4.2.1
Now, we need to make sure that mongodb is running as a service in the background. so we will execute
brew services start mongodb-community@4.2
So we’re all set with MongoDB , it’s running in the backend, silently 🤫.
We’ll move come back to mongoDB later at some point. Let’s move on to next step.
Project Setup
Pipenv, Flask & flask_pymong
Now, In order to install pipenv & flask, we have to first create a code directory, so create one with any name using UI or command line. I mostly prefer command line so yeah…
mkdir pyguy
Once that’s created cd into the directory and let’s install pipenv using pip3 which is already installed when we install python3 using brew. Ok, so now run
pip3 install pipenv
Okay now that pipenv environment is setup in the code directory a Pipfile will be created.
Let’s activate this 😁. you need to run
pipenv shell
You will see something like this once it’s activated.

Pipenv is activated
See that (pyguy), in front of our terminal window? That means environment is ACTIVE!!
All good, now we will install our dependencies. Now that our pipenv is active, we will install flask and pymongo. To do so we will run
pip3 install flask_pymongo flask
Alright, we have our dependencies installed so all we need to do right now is do directory setup.
Directory Setup
We will segregate our backend and frontend for our project. As we will be having a separate front end that will be React. So this is how our directory structure will be like.
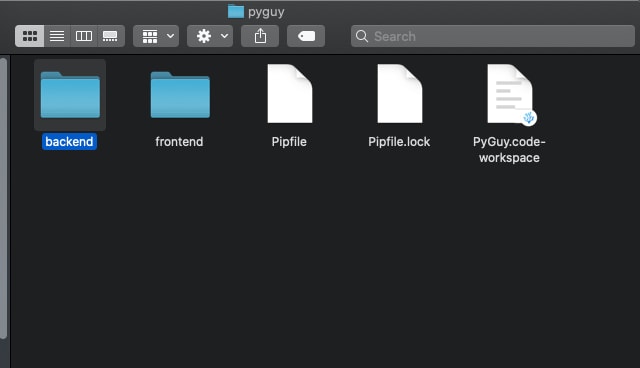
Directory structure
You can ignore the Pipfile.lock , PyGuy.code-workspace files. Pipfile.lock will auto-generate and the other one is generated by my vscode, because I have saved it as workspace.
Making first API call 🤩
Now that we’ve everything setup, let’s buckle up and make our API call.
Go into backend directory and then create app.py file. The app.py file will be our very base file. Open the file in your favourite editor and paste following code. I will explain the code one by one.
'''Flask App For PyGuy WebSite'''

from flask import Flask, jsonify
from flask_pymongo import PyMongo

#App Definitions & Configs
app = Flask(__name__)
app.config["MONGO_DBNAME"] = 'pysite'
app.config["MONGO_URI"] = "mongodb://localhost:27017/pysite"
mongo = PyMongo(app)

#This will be the index route ....


"""
Defining all API routes.
"""


@app.route("/", methods=['GET'])
def index():
    return "<h1> Hi I am Himanshu :)</h1>"


    @app.route('/posts', methods=['GET'])
    def articles():
        articles = mongo.db.articles

        output = []

        for q in articles.find():
            output.append(
                {'title': q['title'], 'description': q['description'], 'tags': q['tag']})
        return jsonify({'result': output})


    if __name__ == "__main__":
        app.run(debug=True)
Let’s go through the code….
'''Flask App For PyGuy WebSite'''
This is our app definition.
Than let’s import flask and jsonify to convert things to json. Also, import PyMongo in order to connect to our MongoDB.
from flask import Flask, jsonify
from flask_pymongo import PyMongo
Next, we are defining App definitions & configs. The very first line is where we set our current class. Here, we’ve set Flask as our name.
app = Flask(__name__)
Now, we’ll set our app configs to set, dbname, mongo db uri and then define the MongoDb connected using PyMongo passing app as parameter.
app.config["MONGO_DBNAME"] = 'pysite'
app.config["MONGO_URI"] = "mongodb://localhost:27017/pysite"
mongo = PyMongo(app)
Okay, next we will make our index call. Here is how we define index route with GET method and returning a H1 text when you browse to index of api.
@app.route("/", methods=['GET'])
def index():
    return "<h1> Hi I am Himanshu :)</h1>"
Okay, so in order to list our posts, we will create our routes as follows. First, we define the url we will be using to go to particular api route. In our case its /posts. Next, we will write definition which will tell us what to do. We want to list all the posts so in that case we will query through our collection. By setting article variable with mongo.db.articles value. Here, mongo is coming from our definition above, we use .db.articles to access the articles collection that’s in our mongoDB.
@app.route('/posts', methods=['GET'])
def articles():
    articles = mongo.db.articles
In the code below, we have initialized a blank array, output. Once we’ve collection accessed, we will do a for loop to query through the articles defined above. We will append each q key value in our output and will return jsonified output in result key.
output = []

    for q in articles.find():
        output.append(
            {'title': q['title'], 'description': q['description'], 'tags': q['tag']})
    return jsonify({'result': output})
This very last line will run the named program which is app as our main application. app.run statement with debug=True will run our application in debug mode.
if __name__ == "__main__":
    app.run(debug=True)
Now to run our flask application open terminal(activate pipenv if not already) and navigate to our “backend” folder and issue flask run command. This will give a similar output in terminal like below.
(pyguy) pyguy@Himanshus-MacBook-Pro backend % flask run
Environment: production
WARNING: This is a development server. Do not use it in a production deployment.
Use a production WSGI server instead.
Debug mode: off
Running on [http://127.0.0.1:5000/](http://127.0.0.1:5000/) (Press CTRL+C to quit)
If you want to see if your api calls are working, go to http://localhost:5000/, you shall see something like this on index page
Hi I am Himanshu :)
This tutorial doesn’t covers creating collections on MongoDB, which I will cover in 2nd part of same. That’s all for today, if you have comments, feel free to comment.

Top comments (2)
I'm not a python user, but good for you for doing the 100 days of code challenge
Hey Thanks!! Actually I have been a python user but didn't touched flask till now. Also wanted to have my projects finished. Can't find much better way to get rid of my laziness 😁