Technical Architecture

Continuous Integration and Deployment (CI/CD) is an essential skill in any DevOps workflow. Various cloud providers offer seamless solutions using GitLab. AWS simplifies the process with services like Elastic Beanstalk. This allows applications to be deployed efficiently while passing through a robust testing pipeline.
In this article, I will walk you through deploying an application using AWS Elastic Beanstalk, AWS CodeBuild, and AWS CodePipeline.
Prerequisite
An AWS account: If you don’t have one, sign up here.
A GitHub repository: This is for storing your source code. If you don’t have a GitHub account, you can create one here.
An Integrated Development Environment (IDE) such as Visual Studio Code or Sublime Text.
A basic knowledge of Node.js

Step-by-Step Guide to Building the Application
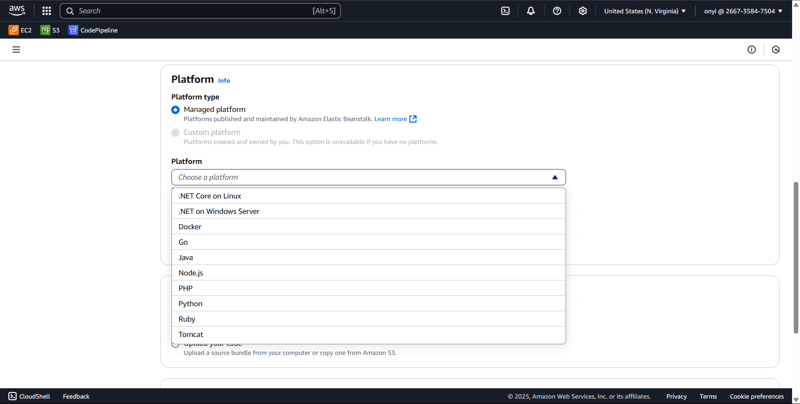
STEP 1: Deploying to AWS Elastic BeanStalk
What is AWS Elastic BeanStalk?
AWS Elastic Beanstalk is a cloud service that makes it easy to deploy and manage applications without handling the underlying infrastructure. It automatically handles provisioning, load balancing, scaling, and monitoring for your application.
Key Features of AWS Elastic Beanstalk:
- Supports multiple languages (Node.js, Python, Java, PHP, etc.).
Automatically manages servers, scaling, and updates.
Integrates with AWS services like RDS, S3, and CodePipeline.
For you to use AWS CodeBuild and AWS Pipeline, certain services have to be integrated using AWS IAM, like AWS S3, which will automatically store the artifact built from AWS CodeBuild. i.e., a policy has to be set to give those services permission. So to do this, follow this AWS guide
Final Result
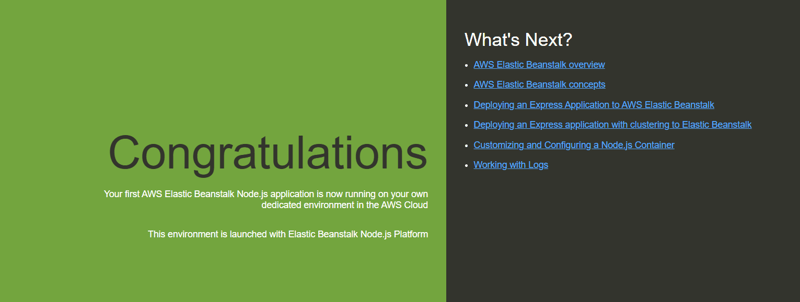
The image above shows that AWS Elastic Beanstalk is successfully configured and the environment is set up.
With this, we can now move on to AWS CodeBuild.
Step2: Configuring AWS CodeBuild
What is AWS Codebuild?
AWS CodeBuild is a fully managed continuous integration (CI) service that compiles source code, runs tests, and produces build artifacts that can be deployed. It eliminates the need to manage your build servers.
Key Features of AWS CodeBuild:
No Server Management – AWS handles everything, so you don’t need to set up or maintain build servers.
Scales Automatically – It adjusts to your workload, running multiple builds at once when needed.
Supports Many Languages – Works with Java, Python, Node.js, Go, and more.
Works Well with other AWS services – Easily connects with CodePipeline, S3, CloudWatch, and IAM.
Purpose of AWS CodeBuild in This Project
AWS CodeBuild plays a key role in this project by:
Compiling the source code – It automatically pulls the latest code, compiles it, and prepares it for deployment.
Running tests – It ensures the code is working properly before deployment.
Generating build artifacts – It packages the application files and stores them in S3 for deployment.
Automating the CI/CD pipeline – It integrates with AWS CodePipeline to streamline the build and deployment process.
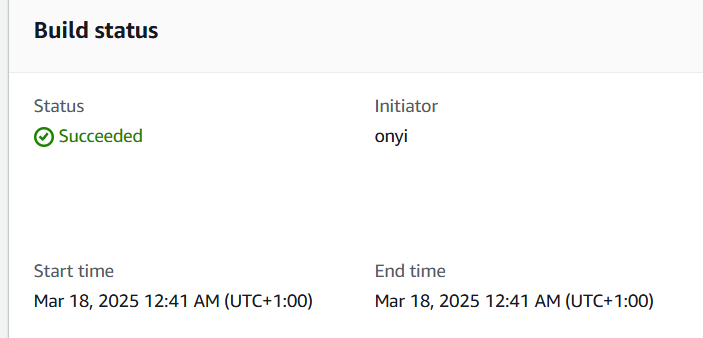
In short, AWS CodeBuild helps automate the process of building, testing, and preparing the application for deployment, making DevOps workflows faster and more efficient.
Step 3: Deploying with AWS CodePipeline
What is AWS CodePipeline?
AWS CodePipeline is a continuous integration and continuous delivery (CI/CD) service that automates the process of building, testing, and deploying applications. It helps streamline software delivery by managing the workflow from code changes to deployment.
Key Features of AWS CodePipeline:
- Fully Managed – AWS handles the automation, so no manual intervention is needed.
- Automated Workflow – Code changes trigger builds, tests, and deployments automatically.
- Integrates with AWS Services – Works with CodeBuild, CodeDeploy, S3, Lambda, and Elastic Beanstalk.
- Customizable – Allows you to define your own CI/CD steps based on your needs.
- Supports Multiple Code Repositories – Works with GitHub, AWS CodeCommit, and Bitbucket.
How It Works:
- Detects code changes from a repository (GitHub, CodeCommit, etc.).
- Sends code to CodeBuild for compilation and testing.
- Deploys the application using services like Elastic Beanstalk or CodeDeploy.
Why Use AWS CodePipeline?
It automates the entire deployment process, reducing manual work, improving efficiency, and ensuring that code changes are quickly and reliably delivered to production.

When setting up CI/CD for your application, it must go through the necessary stages. Once completed, you can return to AWS Elastic Beanstalk to deploy the application.
For further guidance on creating a continuous integration and deployment pipeline, I will link another helpful resource below.
Step 4: Cleaning Up AWS Resources
Once you're done with the practice, make sure to delete your resources. This includes AWS Elastic Beanstalk, AWS CodeBuild, and AWS CodePipeline to avoid unnecessary charges. Don't forget to remove the S3 bucket that was automatically created to store your build artifacts.
Also, check AWS EC2, as Elastic Beanstalk provisions EC2 instances as part of the deployment process.
Challenges & Troubleshooting
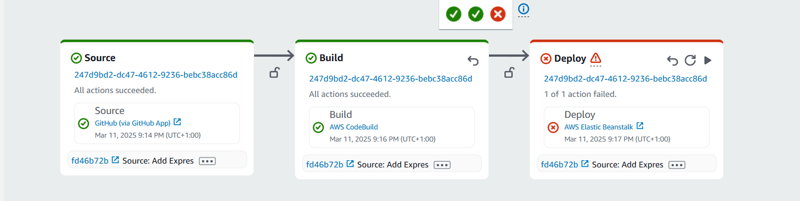
During this project, I encountered a pipeline failure. To fix it, I deleted the environment in AWS Elastic Beanstalk, restarted the configuration, and checked my AWS IAM settings. If IAM isn't set up correctly, it can cause deployment issues, so I ensured everything was properly configured.
Conclusion
This article explored how to set up a CI/CD pipeline using AWS Elastic Beanstalk, AWS CodeBuild, and AWS CodePipeline. These services work together to automate application deployment, making the process more efficient and reliable.
If you found this article helpful, share it with others who may find it interesting.
Stay updated with my projects by following me on Twitter, LinkedIn and GitHub.
Resources & Further Reading
Thank you for reading.

Top comments (0)