
Preamble
Today, Im happy to release Iotapp Beta , a IoT platform for helping developers build decentralized IoT applications and software. In the following tutorial, we'll use Vue.js and Iotapp to build a simple home security Dapp that will demonstrate the technology behind Iotapp and show how it can be used to build a new kind of decentralized application. So without further ado, lets get started!
Dependencies
Hardware
To make the sensor, we're gonna need some hardware. All these components listed below can be found for a few dollars on Ebay, Amazon and similar monoliths.
- ESP8266 or ESP32 Board
- Generic PIR Motion Sensor
- Jumper Wires
- Micro USB C
Building the Motion Sensor
ESP8266 Wiring
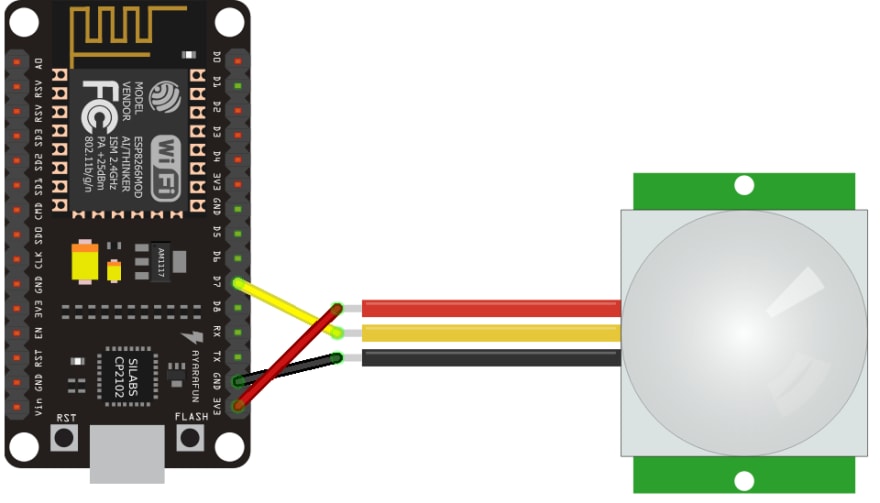
| PIR Sensor | ESP8266 |
|---|---|
| VCC (Red) | 3.3v |
| Data (Yellow) | D7 |
| Ground (Black) | Ground |
ESP32 Wiring

| PIR Sensor | ESP32 |
|---|---|
| VCC (Red) | 5V |
| Data (Yellow) | P12 |
| Ground (Black) | Ground |
Console Signup
The Iotapp web console is a backend tool that saves your device data to the Iotapp Blockchain.
First, sign up for a new account. Then, log in to the console. You'll see two channels. These channels are used to capture and display incoming device data. They also contain one-click functions that will automatically save your device data to the blockchain.
For now, notice the channel URL.

We'll use this URL to make POST requests to the channel and save any incoming movement data.
Uploading the Device Code
First, open Arduino IDE
If you haven't already done so, you'll need to install the binaries for ESP8266 or ESP32. Dont worry, its easy. Here's a guide for each board below:
- ESP8266 IDE Install
- ESP32 IDE Install Credit and Thanks to Random Nerd Tutorials
There's just one more dependency and then we can get cookin'. The 'Arduino JSON' library will format our data to JSON. In the IDE, simply go to Tools -> Manage Libraries.
Type in "ArduinoJson" and install the package by that name.
Now, plug in your board with the Micro USB, and open a new Arduino sketch.
Depending on which board you have, open the URL below and copy in the code.
- ESP8266 Code: - https://github.com/FlynnDerek/iotapp-device-library/blob/master/ESP8266/ESP8266_home_security_app.ino
- ESP32 Code: - https://github.com/FlynnDerek/iotapp-device-library/blob/master/ESP32/ESP32_home_security_app.ino
Troubleshooting: If your board wont connect, make sure that your Micro USB has Data I/O capability. Some Micro USB cables are for charging only. Generally, if the cable is thin, then you may have problems connecting the board. A thicker, high quality cable is recommended.
Paste in the code to a blank sketch. We just need to make 3 changes to the code:

-
wifiName- Your wifi network name -
wifiPass- Your wifi password -
YOUR_IOTAPP_CHANNEL_URL- The URL you copied from your channel earlier.
We can now upload the code. Click the little arrow button in the top left corner of the IDE.

Note: On ESP32 boards, you may need to hold down the "boot" button in order for the sketch to upload. The boot button is the tiny black button next to the USB connector on the board.

Hardware Testing
After the sketch has finished compiling, open up the serial monitor in the IDE: Tools -> Serial Monitor.
Pass Your hand over the PIR sensor bulb. Every time movement is detected in the sensor, a function called pushToConsole() is called. The function response will show up in the serial monitor. The function also pushes the data "Movement Detected" to the console via an HTTPS POST request.
Return to the console and activate your channel by clicking the switch at the top. You should now see the incoming data being shown in the channel's readout section. Click on the streamData() function at the bottom. All incoming data will now be automatically saved to the iotapp Blockchain.
The Application
Demo
Now that we have built, configured and integrated the hardware, we can now begin building the Dapp itself. To build the application, we are going to use Vue.js, Vue CLI and the iotapp API.
We'll start by creating a new Vue app with the Vue CLI:
vue create iotapp-security-dapp
I'd recommended you simply select the default options. (Just hit enter each time). Then, change directory to the new Vue app.
cd iotapp-security-dapp
First, we'll start by installing the Iotapp API package.
npm i iotapp-api
Before we start coding, we'll need to get your channel's API key from the console. You can find it by clicking on the key symbol at the top-right corner of the console toolbar.

We're going to use the API functions to query the blockchain for your saved movement data. This is done by passing your API key into the function as an argument.
For example, the API has a function called getPrivateChain(). Doing this will return all data that was saved under that channel key.
iotapp.getPrivateChain("cCtRMrdvzMvghIBgnxeRE7LperQnfvLb");
The Code
Open the project in your favorite code editor, mine is VS Code. For the sake of simplicity, Ill be writing the code in the HelloWorld.vue component.
We'll start by importing the API. Then, we'll declare an array called chainData where we'll store the saved movement data.
import as iotapp from "iotapp-api";

export default {
data () {
    return {
      chainData: [],
    }
},
Then, in the mounted section, we'll call our first function, getPrivateChain().
 mounted() {
// Returns all movement history.
iotapp.getPrivateChain("YOUR_CHANNEL_API_KEY")
  .then(data => this.chainData = data)
  .catch(err => console.log("Error occurred:", err))
  },
}
First the response data is declared and passed to the chainData array. Then, we'll make a table to display it.
<template>
 <table>
        <thead>
              <tr>
                <th>Block Height</th>
                <th>Block Hash</th>
                <th>Previous Hash</th>
                <th>Timestamp</th>
                <th>Transactions</th>
              </tr>
         </thead>
            <tbody>
              <tr v-for="alias in chainData" :key="alias.index">
                <td>{{alias.index}}</td>
                <td>{{alias.hash}}</td>
                <td>{{alias.prevHash}}</td>
                <td>{{alias.timestamp}}</td>
                <td>{{alias.transactions[0][1]}}</td> <!-- Show just the data: [0][1][0] -->
              </tr>
            </tbody>
          </table>
</template>
In the table we'll use one of my favorite Vue features: the v-for loop. This will loop through each iteration of response data, and display each instance. We have 5 data points we can display:
-
index- This is the block number that the data was saved to. -
hash- The block's hash value -
prevHash- The previous block's hash. -
timestamp- The time the transaction was made -
transactions- The transaction itself. Contains the signed API Key as well as the device data.
The API also contains other functions, check out the documentation here.
getLatestTx() - Returns the latest saved data for a given API key. In this case, it would return the most recent movement. Pass you channel API key(s) as an argument.
getPublicChain() - Returns a full copy of the blockchain, minus the private transactions. Use this function for blockchain and node validation.
Full Code
getLatestTx() function code is included
HelloWorld.vue
<template>
<div>
  <!-- Latest Movement Table -->
 <table>
        <thead>
              <tr>
                <th>Block Height</th>
                <th>Block Hash</th>
                <th>Previous Hash</th>
                <th>Timestamp</th>
                <th>Transactions</th>
              </tr>
         </thead>
            <tbody>
              <tr v-for="alias in latestData" id="tRow" :key="alias.index">
                <td>{{alias.index}}</td>
                <td>{{alias.hash}}</td>
                <td>{{alias.prevHash}}</td>
                <td>{{alias.timestamp}}</td>
                <td>{{alias.transactions[0][1][0]}}</td>
              </tr>
            </tbody>
          </table>

<!-- Movment History Table -->
 <table>
        <thead>
              <tr>
                <th>Block Height</th>
                <th>Block Hash</th>
                <th>Previous Hash</th>
                <th>Timestamp</th>
                <th>Transactions</th>
              </tr>
         </thead>
            <tbody>
              <tr v-for="alias in chainData" id="tRow" :key="alias.index">
                <td>{{alias.index}}</td>
                <td>{{alias.hash}}</td>
                <td>{{alias.prevHash}}</td>
                <td>{{alias.timestamp}}</td>
                <td>{{alias.transactions[0][1][0]}}</td>
              </tr>
            </tbody>
          </table>
</div>
</template>
<script>
import iotapp from "iotapp-api" //Linked NPM module

export default {
data () {
    return {
      chainData: [],
      latestData: []
    }
},

  mounted() {
//returns movement history
iotapp.getPrivateChain("YOUR_IOTAPP_APP_KEY(S)")
  .then(data => this.chainData = data)
  .catch(err => console.log("Error occurred:", err))

//returns latest movement
iotapp.getLatestTx("YOUR_IOTAPP_API_KEY(S)")
      .then(data => this.latestData = data)
      .catch(err => console.log("Error occurred:", err))
  }
}

</script>
Finally, serve the application.
npm run serve

First you'll be able to see the latest movement from the sensor displayed in the first table. Below you can see a history of all movements.
You can clone the app repo here
Conclusion
Thats a wrap folks! If you made it this far, congratulations!. By now maybe you've noticed that there's no need to configure a blockchain node. The API allows us the build a serverless application, with the web console taking responsibility for blockchain node validation.
One of the main goals of the project was to make the connection between the device and the application as seamless as possible. By removing the need to spin up a server or a blockchain node, backend configuration has been greatly reduced. This is a concept I've dubbed Blockchain-as-a-Backend. Its a simple enough idea, being that the blockchain itself functions as an application's backend, and a simple API is used to query that backend via API keys.
The motivation for this type of architecture was made from a desire to lessen the complexity that is often associated with decentralized app development. I believe this approach will allow the developer to focus more on the application itself while still storing data in a secure, immutable and decentralized manner.
More proof-of-concepts and tutorials are on the way! If you'd like to learn more about Iotapp, check out the Docs.
You can also connect with me on these platforms:
 iotapp@iotapp1
 iotapp.network beta testing is live :)
#dapps #blockchainasaservice #iot #internetofthings #iotsecurity #blockchain06:08 AM - 06 Aug 2020


Top comments (1)
Oh, that's interesting! I believe that your application will be popular among developers. Especially nowadays people are getting into this sphere a lot. I know that because my friend introduced Ajax systems to me, and I got pretty interested. He told me that I could easily turn off the lights, turn my appliances on or off, and I can do everything remotely. I believe it's really convenient, so your app will be in demand for sure.