Welcome to the fifth article in this series. In Part 1 we talked about the idea for this pool bot, Part 2 covered the hardware behind it. In Part 3 we push data up to the Particle Cloud. Then we saved event data to Azure Table Storage using Azure Functions in Part 4.
This article will cover:
Now let's build a user interface!
User Experience
Before throwing a UI together let's think through the User Experience. Bad UX sucks no matter how fancy the UI looks. Great UX can save a terrible looking UI. We'll try to make both great, but when in doubt it's function over fashion.
Important questions for good UX/UI:
-
What does the user really need?
- Sensor data of course! Pool Temperature, Pump Status, etc.
- Some indicator that tells me if should I go swimming.
- Ability to turn the pump on or off with the click of a button.
- Latest alerts / events
-
How will this information be accessed?
- Needs to be mobile friendly and viewable from anywhere on a smartphone.
-
Who are the different personas using this?
- Swimmer: Wants to know the temperature and swimming conditions.
- Caretaker: Ability to turn the pump on/off, know when maintenance needs performed.
Vue Front End
I'm a huge fan of Vue.js, it's simple and powerful. For this front end, I also used vuetify which is a material design library. For http calls, Axios. Lastly, I grabbed Apex Charts to make some sweet line graphs.
I'm not going to cover setting up a Vue project, just go grab the Vue CLI and follow their docs, it's super simple. What I will cover is lessons learned, and a few tips/tricks.
State Management
If you've done Angular or React you may have done some flux/redux. Personally, I'm not a fan and think they are overkill for most apps. Vue offers Vuex.
“Flux libraries are like glasses: you’ll know when you need them.” - Vuex
This app is going to be pretty small, and not have much state. We should be able to get away with a simple store pattern. For this we'll just make a global state store, I called mine Bus:
// bus.ts
import Vue from 'vue';

/**
 * Bus is a global state storage class with some helper functions
 */
const Bus =
    new Vue({
        data() {
            return {
                loading: 0,
                error: null,
            };
        },
        methods: {
            /*
             * Called from http utility, used by the loading component
             * adds 1 to the loading count
             */
            addLoading() {
                if (this.loading === 0) { this.error = null; }
                this.loading += 1;
            },
            /*
             * Called from http utility, used by the loading component
             * removes 1 from the loading count
             */
            doneLoading() {
                this.loading -= 1;
                if (this.loading < 0) { this.loading = 0; }
            },
            /*
             * Called from http utility, used by the loading component
             * stores the last AJAX error message
             */
            errorLoading(error: { message: null; }) {
                this.loading -= 1;
                if (this.loading < 0) { this.loading = 0; }
                if (error) { this.error = error.message; }
                console.error(error.message);
            },
        },
    });

export default Bus;
For now the only state we are tracking is a loading count (number of pending http calls, so we can show a spinner) and any errors (so we can show a message box).
Axios Interceptors
Now, let's wire this Bus to Axios so we can track http calls and errors.
// http-services.ts
import axios from 'axios';
import Bus from '../bus';

/*
 * Configure default http settings
 */
axios.defaults.baseURL = 'https://poolbot.azurewebsites.net/api';

/*
 * Before each request, show the loading spinner and add our bearer token
 */
axios.interceptors.request.use(function(config) {
  Bus.$emit('loading');
  return config;
}, function(err) {
  return Promise.reject(err);
});

/*
 * After each response, hide the loading spinner
 * When errors are returned, attempt to handle some of them
 */
axios.interceptors.response.use((response) => {
  Bus.$emit('done-loading');
  return response;
},
  function(error) {
    Bus.$emit('done-loading');
    // redirect to login when 401
    if (error.response.status === 401) {
      Bus.$emit('error-loading', 'Unauthorized!');
    } else if (error.response.status === 400) {
      // when error is a bad request and the sever returned a data object attempt to show the message
      // see messageBox component
      if (error.response.data) {
        Bus.$emit('error-msg', error.response.data);
      }
    } else {
      // all other errors will be show by the loading component
      Bus.$emit('error-loading', error);
    }
    return Promise.reject(error);
  },
);
We just told Axios to emit a few events, next we'll use a component to react to them.
// loading.vue
<template>
  <div>
    <div v-if="loading">
      <div class="loading-modal"></div>
    </div>
    <div id="errorMessage" v-if="!!error">
      <v-alert type="error" :value="!!error" dismissible>{{error}}</v-alert>
    </div>
  </div>
</template>
<script>
// Loading component handles wiring loading events from http utility back to global store
// This component also handles showing the loading spinner and unhnadled error messages
export default {
  data() {
    return {};
  },
  computed: {
    loading() {
      return this.$Bus.loading;
    },
    error() {
      return this.$Bus.error;
    }
  },
  mounted() {
    this.$Bus.$on("loading", this.$Bus.addLoading);
    this.$Bus.$on("done-loading", this.$Bus.doneLoading);
    this.$Bus.$on("error-loading", this.$Bus.errorLoading);
  },
  beforeDestroy() {
    this.$Bus.$off("loading");
    this.$Bus.$off("done-loading");
    this.$Bus.$off("error-loading");
  },
  methods: {}
};
</script>
<style>
.alert {
  margin-bottom: 0;
}

.loading-modal {
  position: fixed;
  top: 0;
  left: 0;
  width: 100%;
  height: 100%;
  background: rgba(0, 0, 0, 0.2) url("../assets/loading.gif") center center
    no-repeat;

  z-index: 1111;
}

/* When the body has the loading class, we turn
   the scrollbar off with overflow:hidden */
body.loading {
  overflow: hidden;
}

#errorMessage {
  position: fixed;
  top: 25px;
  left: 0;
  width: 100%;
  z-index: 999;
}
</style>
Now when ever there is a pending http call we'll get a nice loading spinner. 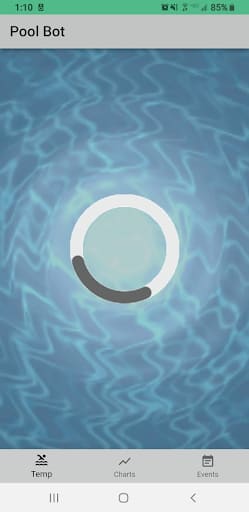
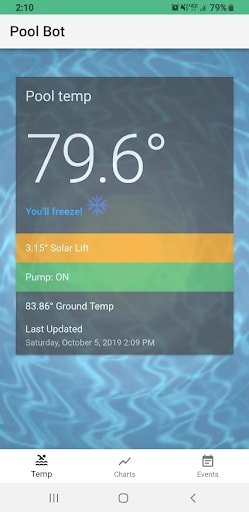
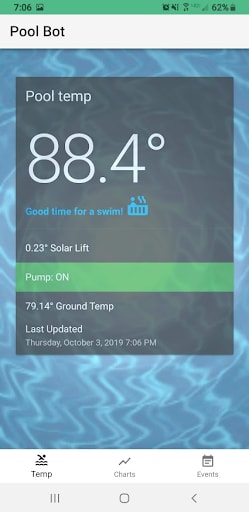
There is nothing really groundbreaking in this app, it's your typically SPA. Fire some http calls, get some data, show data on a page. On the main page I wrote some logic to give at a glance swimming conditions (data.t3 is water temperature):
<h1 class="display-4">{{ formatDecimal(data.t3,1) }}°</h1>
<h3 v-if="data.t3 < 80" class="blue--text">
You'll freeze!
<v-icon x-large color="indigo">ac_unit</v-icon>
</h3>
<h3 v-if="data.t3 > 80 && data.t3 < 84" class="light-blue--text text--darken-2">
A little cold, but not too bad
<v-icon x-large color="blue">pool</v-icon>
</h3>
<h3 v-if="data.t3 > 84 && data.t3 < 90" class="light-blue--text">
Good time for a swim!
<v-icon x-large color="light-blue">hot_tub</v-icon>
</h3>
<h3 v-if="data.t3 > 90 && temp.t3 < 97" class="red--text text--lighten-3">
It's pretty warm!
<v-icon x-large color="red">hot_tub</v-icon>
</h3>
<h3 v-if="data.t3 > 97" class="red--text">
It's a gaint Hot tub!
<v-icon x-large color="red">hot_tub</v-icon>
</h3>
I also added some logic around pump status to highlight different modes:
<v-list-item :class="{orange: pumpOverrode, green: data.ps, red: !data.ps}">
  <v-list-item-content>
    <v-list-item-title>
      Pump: {{ pumpStatus }}
      <span v-if="pumpOverrode">(Override!)</span>
    </v-list-item-title>
  </v-list-item-content>
</v-list-item>
Here is script for this component:
<script>
export default {
  data() {
    return {
      data: null
    };
  },
  computed: {
    device() {
      return this.$Bus.Device;
    },
    lastUpdated() {
      return this.moment(this.data.Timestamp).format("LLLL");
    },
    pumpStatus() {
      return this.data.ps > 0 ? "ON" : "OFF";
    },
    pumpOverrode() {
      return !(this.data.ps === 0 || this.data.ps === 1);
    }
  },
  mounted() {
    this.getData();
  },
  beforeDestroy() {},
  methods: {
    getData() {
      let self = this;
      this.$http.get(`SensorData/Latest`).then(response => {
        self.data = response.data;
      });
    },
    formatDecimal(value, d) {
      if (d == null) d = 2;
      return value.toFixed(d);
    },
    formatDate(value) {
      if (value) {
        return moment(String(value)).format("M/D/YYYY h:mm a");
      }
    }
  }
};
</script>
Charts
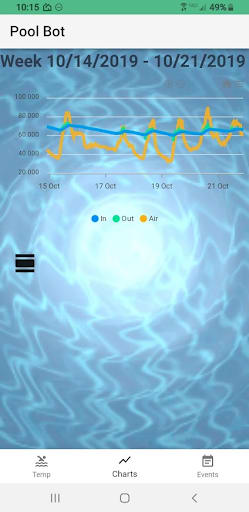
Adding Apex Charts wasn't too bad, I mostly followed their docs with a little trial and error. It's one line of html to add a chart:
<apexchart :options="options" :series="series"></apexchart>
As for getting your data into the chart... Apex has a ton of settings and examples. For my needs, I built a line chart with three lines:
let range = dataRange.map(m => m.RangeStart);
let avgInTemp = dataRange.map(m => m.IntakeTempAvg);
let avgOutTemp = dataRange.map(m => m.ReturnTempAvg);
let avgAirTemp = dataRange.map(m => m.GroundTempAvg);

this.options = {
  ...this.options,
  ...{
    xaxis: {
      categories: range
    }
  }
};

this.series = [
  { name: "In", data: avgInTemp },
  { name: "Out", data: avgOutTemp },
  { name: "Air", data: avgAirTemp }
];
This will show either a daily or weekly range of data.

Enabling PWA awesomeness
Progress Web Apps help bridge the gap between web sites and native applications. They are "installed" on the device. They can cache content and are tied to a background service worker. PWAs are configured with a manifest.json file. Vue CLI has a nice PWA plugin to make this easy.
The manifest for this app:
{
  "name": "Pool Data",
  "short_name": "Pool",
  "icons": [
    {
      "src": "./img/icons/android-chrome-192x192.png",
      "sizes": "192x192",
      "type": "image/png"
    },
    {
      "src": "./img/icons/android-chrome-512x512.png",
      "sizes": "512x512",
      "type": "image/png"
    }
  ],
  "start_url": "./",
  "display": "standalone",
  "background_color": "#7EB7E1",
  "theme_color": "#7EB7E1"
}
The plugin also created registerServiceWorker.ts for us, for now I'm not going to touch it. Building a great service worker could be an article in itself.
Web Hosting with Azure Blob Storage
Ok, we have this web app and PWA coded, let's deploy it! Since I already have an Azure Storage Account setup for the sensor data and azure functions, we can reuse it to also host static content!
Microsoft has a nice step by step guide for doing this. One note, some tools did not set the correct content type when I uploaded javascript files. I found VS Code with the Azure extensions did this correctly. If you have issues with serving JS files check the content type!
Now this site could be accessed from the storage account url, something like https://NameOfStorageAccount.zone.web.core.windows.net/. But we would need to setup cross-origin resource sharing (CoRS) to hit our azure function http endpoints.
Azure Function Proxies
What if we proxied the static content to be at the same URL as our backend APIs? In the Azure Function project we'll just add a proxies.json file.
I've set up three different proxies here:
- Root / - pointed to static content
- /API/* - pointed to the backend APIs
- /* - everything else will be pointed to static content
{
    "$schema": "http://json.schemastore.org/proxies",
    "proxies": {
      "proxyHomePage": {
        "matchCondition": {
          "methods": [ "GET" ],
          "route": "/"
        },
        "backendUri": "https://NameOfStorageAccount.zone.web.core.windows.net/index.html"
      },
      "proxyApi": {
        "matchCondition": {
          "methods": [ "GET" ],
          "route": "/api/{*restOfPath}"
        },
        "backendUri": "https://localhost/api/{restOfPath}"
      },
      "proxyEverythingElse": {
        "matchCondition": {
          "methods": [ "GET" ],
          "route": "/{*restOfPath}"
        },
        "backendUri": "https://NameOfStorageAccount.zone.web.core.windows.net/{restOfPath}"
      }
    }
  }
Here are some docs explaining what is going on. Also note, we can use localhost for anything running in the same project, since the proxy is deployed with the http functions, localhost works for the APIs.
Now we can hit (https://poolbot.azurewebsites.net/), it will go to the Azure function proxy, match the root path and send us the index.html from blob storage.
Next we'll cover sending commands from Vue to the Pump



Oldest comments (0)