(Heroku and Salesforce - From Idea to App, Part 13)
This is the 13th and last article documenting what I’ve learned from a series of 13 Trailhead Live video sessions on Modern App Development on Salesforce and Heroku. In these articles, we’re focusing on how to combine Salesforce with Heroku to build an “eCars” app—a sales and service application for a fictitious electric car company (“Pulsar”). eCars allows users to customize and buy cars, service techs to view live diagnostic info from the car, and more. In case you missed my previous articles, you can find the links to them below.
Modern App Development on Salesforce and Heroku
Jumping into Heroku Development
Data Modeling in Salesforce and Heroku Data Services
Building Front-End App Experiences with Clicks, Not Code
Custom App Experiences with Lightning Web Components
Lightning Web Components, Events and Lightning Message Service
Automating Business Processes Using Salesforce Flows and APEX
Scale Salesforce Apps Using Microservices on Heroku
More Scaling Salesforce Apps Using Heroku Microservices
APEX Unit Testing on Salesforce
Deploying Salesforce and Heroku Apps with Ease
I’ve been following this Trailhead Live video series to brush up and stay current on the latest app development trends on these platforms that are key for my career and business. I’ll be sharing each step for building the app, what I’ve learned, and my thoughts from each session. These series reviews are both for my own edification as well as for others who might benefit from this content.
The Trailhead Live sessions and schedule can be found here:
https://trailhead.salesforce.com/live
The Trailhead Live sessions I’m writing about can also be found at the links below:
https://trailhead.salesforce.com/live/videos/a2r3k000001n2Jj/modern-app-development-on-salesforce
https://www.youtube.com/playlist?list=PLgIMQe2PKPSK7myo5smEv2ZtHbnn7HyHI
Last Time…
Last time, we went over methods of packaging and deploying applications with npm with Javascript as well as several frameworks for packaged and unpackaged development for Salesforce.
Now that we’ve built and deployed our eCars app, it makes sense that the capstone session of this series reviews the overall application development lifecycle and also covers some ways to automate these processes to make our lives as developers easier.
Application Development Lifecycle
Every application, even when successful, requires maintenance, upgrades, and feature additions in order to stay relevant and keep up with the rapidly changing software application world. As a result, we need a well-regimented process for releasing with confidence that avoids common pitfalls when tinkering with an application’s code that is already out in the wild as well as when many developers are working on a single codebase. Collectively, this is referred to as “Application Lifecycle Management” or ALM. Some examples of things that we want to avoid and problems we want to solve with ALM are:
- Developers’ changes getting overwritten by other developers’ changes and deployments
- Not knowing exactly what changes are going into a release
- Knowing a change was made to the app but not knowing who made it, when, and why
- Manually managing the release process and deploy code
- Releasing a change, having it break critical functionality, and the need to roll it back easily
For Salesforce admins who have used Changesets to push releases from sandboxes to Production, you are all probably intimately familiar with the gaps that that release model creates. Ever try to quickly roll back a Changeset? It’s basically not possible…
This is why the modern application lifecycle management model involves multiple steps and tools that help make this process more effective.

Modern Application Lifecycle Management (ALM)
As you can see, we have tools and processes for each major step of ALM. Most of these elements have been covered in previous articles in this series from IDEs/CLIs/extensions to help developers manage code to automated unit tests.
Continuous Integration/Deployment for Salesforce
In my opinion, a major key for Salesforce administrators and developers is to shift away from a limiting “org-based” development model where the production and sandbox orgs themselves serve as the source of truth of the application to a source-driven development model. In a source-driven model, the source code, managed in git, serves as the source of truth. After adopting this concept, it becomes much easier to work with ALM and avoid some of the problems mentioned above.
An example of such source-driven development and automation can be seen in the diagram below.

Source-driven Automation
Using a git repository that houses the Salesforce application’s code, we can manage the environments (orgs) and branches of the application to avoid things like overwriting code and allow for precise tracking of features and fixes.
Rather than simply deploying changes directly from sandbox to production with a difficult-to-track and impossible-to-rollback changeset, a source drive automation could proceed as follows:
- The admin/developer checks out a new feature branch from the most up-to-date branch
- The admin/developer makes their changes to the app in a sandbox or scratch org and then verifies and commits their changes to their feature branch
- They then make a “pull request” to an upstream branch such as an integration or QA/UAT branch that is tied to a dedicated integration or QA sandbox (typically a partial or full copy). In this step, GitHub does some magic and compares the pull request to the target branch and detects if there are any conflicts in the code that need to be resolved before merging the pull request. Typically you’ll also want to require the developers to write a summary of the pull request and have reviewers review the pull request before merging it. This is where you can prevent developers from overwriting code as well as other quality checks.
- Automated unit and regression tests can also be invoked around this step to make sure that all automated tests pass.
- The updated codebase can then be deployed to the QA or UAT Salesforce environment for demos and end-user testing.
- If all passes there, then you can version the QA/Integration branch and merge it into the production branch that is tied to the Production environment. Here, you can have a continuous deployment or continuous integration job automatically deploy the updates from the branch to the target production org to save time deploying things manually.
While this list may seem longer than a simpler deployment model, using source management tools like Github and Github Actions and continuous integration/continuous deployment (CI/CD) or DevOps workflow tools like Copado and Gearset can significantly automate and streamline this process. Sometimes the deployment of certain functionality may involve not just metadata but data in the objects themselves, such as when important configuration information in managed packages are stored in the object data layer. In this case, Github wouldn’t be able to help with tracking and deploying the data itself. And for these situations, I like to use tools like Prodly and sfAPEX to help manage deployments that involve actual data.
Heroku Deployments and Heroku Flow
In a previous article, we deployed our Heroku application from the CLI from our local repository directly to Heroku. To involve Github workflows into this process and take advantage of all of the source control features of Github, we can create an integration between Heroku git and Github so that once our code changes get pulled to a certain branch, such as the production or master branch. The updates get deployed automatically to our live Heroku app thus automating a repetitive aspect of the developer workflow.
To make this magic happen, we can use a feature of Heroku called Heroku Flow. Heroku Flow, compared to Github Actions, is “more opinionated.” In other words, setting up Heroku Flow is easier to automate deployments in the particular way that Heroku Flow works, but Github Actions has the possibility to be more customizable and deviate from the way Heroku Flow works. However, in my opinion, Heroku Flow is likely to work for the vast majority of CI/CD workflows.
To set up the basics of Heroku Flow to deploy apps directly from a GitHub repo, follow these steps:
- Set up a Github repo for the code for the app.
- Log into the app on Heroku and go to the Deploy tab.
- On the Deploy tab, you’ll see under the Deployment method area an option to ‘Connect to Github’. This is how we’ll get Heroku talking to the Github repo for the app.
- Click on ‘Connect to Github’ and authorize Heroku to connect with your Github credentials.
- After authorizing Heroku to Github, search for the repository you want to connect to and hit the ‘Connect’ button.
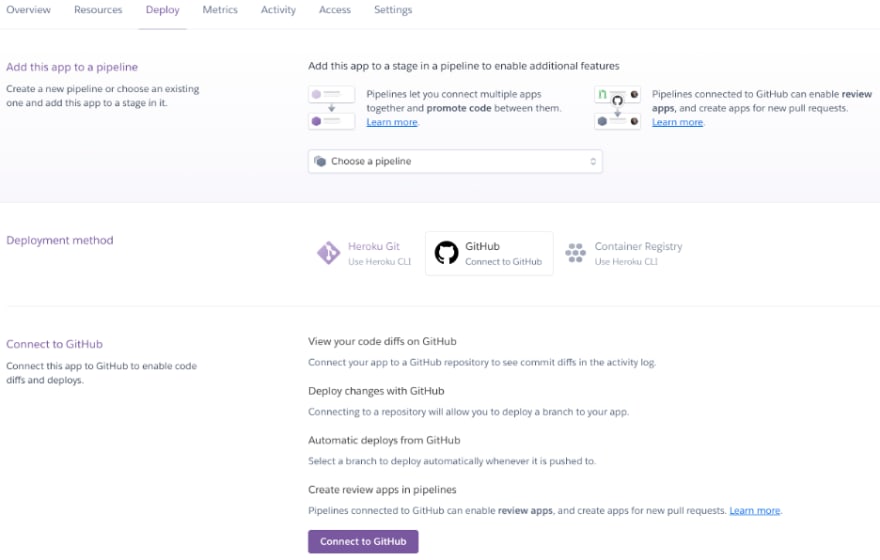
Connect to Github
- After connecting to the desired Github repo, the ‘Automatic deploys’ and ‘Manual deploy’ sections of the page become available.
- Under the ‘Automatic deploys’ area, select the branch to deploy (typically master or Production) and then hit the ‘Enable Automatic Deploys’ button. If you have any tests as part of your CI process (and you should), you can check the ‘Wait for CI to pass before’ checkbox to instruct Automatic deploys to wait for the CI tests to pass before allowing each automatic deploy.
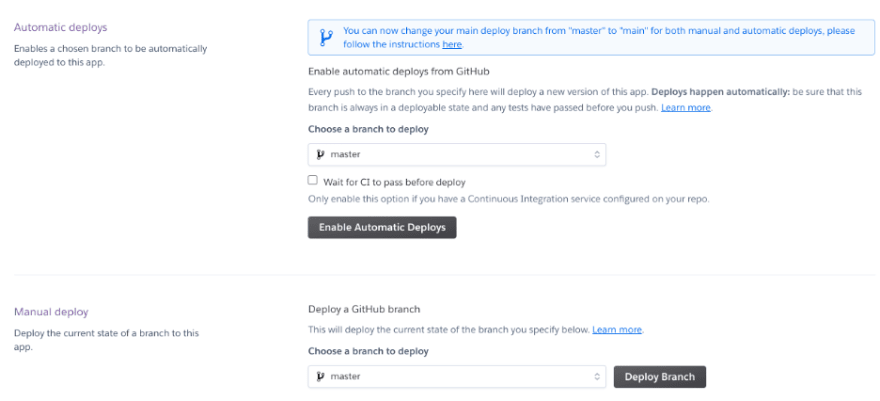
Automatic Deploys
After this last step, all of the approved commits and pull requests that merge into the selected branch will automatically deploy to the Heroku app. Viola! One piece of the DevOps lifecycle automated.
If for some reason, a manual deploy is necessary, go to the ‘Manual deploy’ area and manually deploy a branch from the repository.
Creating a ‘Deploy to Heroku’ Button on Github
In addition to the Heroku Flow automated deployments, we can also add a handy ‘Deploy to Heroku’ button to our Github repository to allow deployments to Heroku directly from the Github repository. This allows anyone with access to the repo to quickly deploy the app to Heroku with a click of a button!

There are few prerequisites to set up before we get our button working.
- First we need an app.json file that contains descriptions and attributes of our app and optionally all of the ‘atoms’ of the application. If you do add atoms to the app.json file, then these atoms will be automatically created when the button is invoked—a very handy feature.
An app.json file might look something like this:
{
  "name": "Node.js Sample",
  "description": "A barebones Node.js app using Express",
  "repository": "https://github.com/heroku/node-js-getting-started",
  "logo": "https://node-js-sample.herokuapp.com/node.png",
  "keywords": ["node", "express", "static"]
}
- Once we have the app.json file set up, the next step is to render the button itself. The button can be rendered using an implicit template markdown or raw HTML. The implicit template is handy for embedding the button in the readme section of the Github repo. Use the HTML version if you’re rendering the button somewhere else like on a web page for the app. The implicit template is a bit more convenient because it can use the referrer header from the repo when someone clicks on the button from Github and avoids hard-coding the specific repository URL into the button. This allows forks and branches of the repository to work properly without a change to the button href URL itself. You can also add URL parameters to the buttons.
An example of an implicit template with URL parameters:
[](https://heroku.com/deploy?template=https://github.com/heroku/node-js-getting-started)
An example of the HTML version with URL parameters:
<a href="https://heroku.com/deploy?template=https://github.com/heroku/node-js-getting-started">
  <img src="https://www.herokucdn.com/deploy/button.svg" alt="Deploy">
</a>
After adding the button code to the readme file in the repo or to the website, clicking on the button will automatically take you to the ‘deploy app’ menu in Heroku and you’re off to the races deploying the app to Heroku.
Another powerful feature of the ‘Deploy to Heroku’ button method is the ability to add and pre-fill different environment variables and create variations of your Heroku app deployment by populating different environment variables that you have set up for your app.
Heroku Pipelines
A common requirement for DevOps is to have a single app living on multiple separate environments such as one for staging and one for production. To fulfill and automate this use case, we can use Heroku Pipelines. To get started creating a new pipeline, from the main menu in Heroku, select the ‘New’ dropdown and select ‘Create new pipeline’.

Then we will need to fill out the information for our new pipeline and connect it to a Github repo.
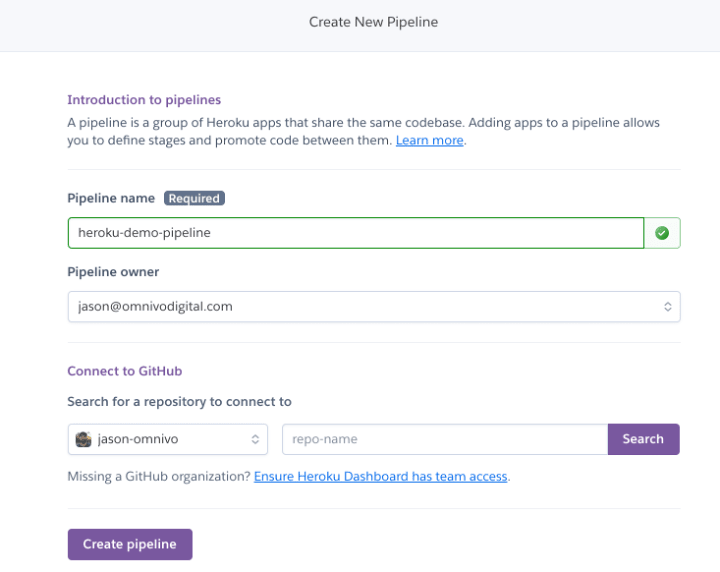
Create new pipeline
Once we hit ‘Create pipeline’ we can start setting up the pipeline.
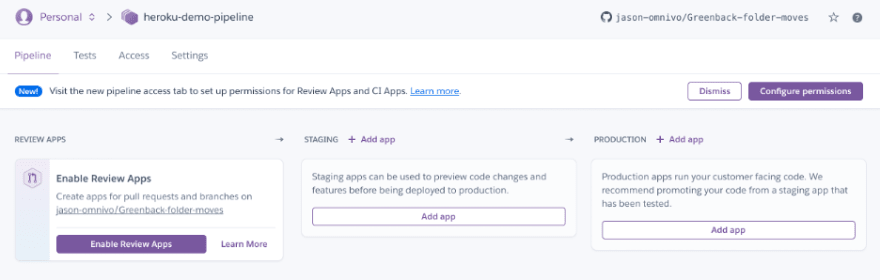
From here, we can add our app to the Staging step of our pipeline and connect our Github repo’s staging branch and also set up automatic deployments as we did earlier. This makes it so that each commit/merged pull request to that branch will automatically deploy to the staging app on our pipeline. We can then connect the live branch of our app to the Production step of the pipeline but NOT enable automatic deployments. The whole point is that we want to first validate that everything is working in the staging environment before going ahead and promoting to production.
Finally, the ‘Enable Review Apps’ functionality is very useful for creating a test app each time a pull request is created against the branch. Setting up and enabling Review Apps on Heroku this way will allow you to conveniently create a test app for the pull request so that you and any reviewers of the pull request can test out the new features and perform any manual regression tests needed before approving the pull request. Then, once the pull request is merged into a branch that has been set up with Automatic Deployments, it will get automatically deployed to the next step of our pipeline.
And with that, some really nice automation has been added to our app’s DevOps processes so that the developers have ‘easy buttons’ that do the heavy lifting on some of these repetitive tasks allowing the developers to focus on the build aspects of the app!
Concluding Thoughts
For Salesforce admins and developers, I think that the ease of configuration and adding new functionality to the Salesforce application has gotten us somewhat ‘spoiled’ versus a more traditional DevOps process. As a result, I have noticed some resistance in adopting a more defined DevOps process because, in the beginning, it has a tendency to slow things down for the admins and developers who might be used to quickly deploying new features and changes from sandbox to production or even making the changes in the production environment itself.
However, the Salesforce or Heroku app will eventually increase in size and scope and eventually outgrow the simple processes in place when it was just one or two people working on it. And before that happens, you’re going to want to set up a sustainable and future-proofed application lifecycle management process or struggle with every single release trying to manage all of the steps of the process and its dependencies manually.
And since this is the last article of this series, I want to thank everyone for reading my content and following me along in this journey in learning more about modern application development on the Salesforce and Heroku ecosystems!
For more information, Trailhead modules, and advanced topics related to Salesforce and Heroku app deployment and packaging, check out the links to the resources below:
- Continuous Integration Using Salesforce DX
- Sample Starter Kit for CI/CD Automation for Salesforce Projects
- Automatic Deployments with GitHub
- Creating a Deploy to Heroku Button
- Heroku Pipelines
- Review Apps
- Github Actions
- Sample Workflow Using Github Actions
- Salesforce DX with Github Actions
- SFDX Git Delta Deploy CLI Plugin
If you haven’t already joined the official Chatter group for this series, I certainly recommend doing so. This will give you the full value of the experience; in the group, you can also pose questions and start discussions with other members. There are often valuable discussions and additional references available, such as presentation slides and other resources and references.
About me: I’m an 11x certified Salesforce professional who’s been running my own Salesforce consultancy for several years. If you’re curious about my backstory on accidentally turning into a developer and even competing on stage on a quiz show at one of the Salesforce conventions, you can read this article I wrote for the Salesforce blog a few years ago.

Top comments (0)