(Heroku and Salesforce - From Idea to App, Part 12)
This is the 12th article documenting what I’ve learned from a series of 13 Trailhead Live video sessions on Modern App Development on Salesforce and Heroku. In these articles, we’re focusing on how to combine Salesforce with Heroku to build an “eCars” app—a sales and service application for a fictitious electric car company (“Pulsar”). eCars allows users to customize and buy cars, service techs to view live diagnostic info from the car, and more. In case you missed my previous articles, you can find the links to them below.
Modern App Development on Salesforce and Heroku
Jumping into Heroku Development
Data Modeling in Salesforce and Heroku Data Services
Building Front-End App Experiences with Clicks, Not Code
Custom App Experiences with Lightning Web Components
Lightning Web Components, Events and Lightning Message Service
Automating Business Processes Using Salesforce Flows and APEX
Scale Salesforce Apps Using Microservices on Heroku
More Scaling Salesforce Apps Using Heroku Microservices
APEX Unit Testing on Salesforce
Just as a quick reminder: I’ve been following this Trailhead Live video series to brush up and stay current on the latest app development trends on these platforms that are key for my career and business. I’ll be sharing each step for building the app, what I’ve learned, and my thoughts from each session. These series reviews are both for my own edification as well as for others who might benefit from this content.
The Trailhead Live sessions and schedule can be found here:
https://trailhead.salesforce.com/live
The Trailhead Live sessions I’m writing about can also be found at the links below:
https://trailhead.salesforce.com/live/videos/a2r3k000001n2Jj/modern-app-development-on-salesforce
https://www.youtube.com/playlist?list=PLgIMQe2PKPSK7myo5smEv2ZtHbnn7HyHI
Last Time…
Last time, we went through unit testing of Salesforce Apex code and learned about the unique unit testing framework that the Salesforce platform provides.
Now that we’ve built all the pieces of our eCars app, it’s time to move onto the exciting part: deploying the app so it can be accessed and enjoyed by our end users! We’ll cover packaging and deployments for both JavaScript as well as Salesforce apps.
Creating JavaScript Packages with npm
We’re going to start off with how to create packages for our Javascript application using npm. It’s important to know that npm is the JavaScript package registry—where all of the Node.js and JavaScript packages live. It’s basically the world’s biggest vault of useful app development libraries, utilities and other useful things you might need to import to your project in order to generate charts, render PDFs, or create 3D graphics. Everything on npm is open-source, so you and other developers are actively contributing to the open-source ecosystem when packaging with npm.
To get started with npm, you’ll have to first register for an account at https://npmjs.com/signup. Enabling two-factor authentication is highly recommended for your npm account. There have been some nightmare stories in the past where some people’s npm accounts have become compromised and bad actors were able to publish versions of their packages with malicious code in it!
Once you have npm up and running, from the command line, you can execute a few steps to start preparing your npm package.
1. Create a package.json file by running `'npm init' `from the VS Code terminal
The package.json file contains all the metadata for your app such as the name, the components, dependencies, etc. The above command will take you to a wizard-like process in the command line to fill out some information to generate your package.json file.
2. Add any secret files to the `.npmignore `file
This file is similar to .gitignore or .forceignore and will prevent any specified files from being published to the public npm registry. Any files that contain secrets, keys, or other sensitive information should be added to the file so they aren’t exposed to the public.
3. Preview the package with the `'npm pack'` command to view what is going to be published
This is a good way to check if there are any files you need to add to the .npmignore file in step 2.
4. Login with `'npm login'` if you are not already logged in and use `'npm publish'` to publish the package and watch the magic happen
At some point, you’ll likely want to update your package, make improvements, fix bugs, or otherwise push an update to your package. This process is pretty simple and after making your needed updates, you can push them out with the following process:
1.     Run `'npm version patch/minor/major'` to bump your package to another version


2.     Run `'npm publish'` again to publish your new package version
When versioning your packages, you should follow the “Semantic Versioning” or semver nomenclature with a format that resembles 2.0.1 or MAJOR.MINOR.PATCH. Generally, this means the following:
- MAJOR version when you make incompatible API changes,
- MINOR version when you add functionality in a backward-compatible manner,
- PATCH version when you make backward-compatible bug fixes.
Semver isn’t just for npm or JavaScript packages; it should be followed for any kind of app package versioning including unmanaged and managed Salesforce packages.
For more about semver, check out this link: https://semver.org/
Types of npm Packages and Naming Guidelines
There are three major types of npm packages, each with some distinct features and use cases.
Unscoped Public Packages
- Available to all users
- Have unique names
- Examples:
- Express
- Fastify
- Moment
These are the common global, public packages that you will frequently come across when it comes to importing a particular package for your app.
Scoped Public Packages
- Available to all users
- Are published under a scoped namespace
- Require an npm organization
- Must have a unique name
- Examples:
- @lwc/engine
- @lwc/compiler
- @heroku/foreman
These are often forked versions of unscoped public packages that may have some unique modifications to them to suit a particular use. They’re scoped in their own namespace so as to be isolated from the unscoped public packages.
Private Packages
- Available to users of a paid npm enterprise organization
- Can be org scoped, user scoped, or have no scope
Private packages are used when an organization wants all the benefits of npm but is developing packages that will not be published in the public npm registry. These could be home-grown apps that are only used for a particular organization.
Now that we know about the different types of packages, let’s go over some package naming guidelines. In general, package names should abide by the following guidelines:
- Names are unique
- Names are descriptive
- Names meet npm name policy guidelines and do not use offensive or trademarked words
In case you’re choosing a name for an unscoped package, you should also:
- Choose a name that is not already owned by someone else
- Not be spelled in a similar way to another package (so as to avoid confusion)
- Not confuse others about the authorship of the package
Follow the guidelines above and you’ll avoid receiving any nasty letters from law firms!
Salesforce Development Models and Packaging
When I was starting out as a Salesforce administrator, the concepts of “deployment” and “packaging” did not come up very often. I was usually configuring things using point-and-click methods directly in the production environment (gasp!). Every now and then, I might deploy an APEX class or trigger from a sandbox environment to the production environment using the Changesets tool. That was because admins had to deploy those types of custom code from a sandbox at that time in order to get them into production. As a result, most Salesforce administrators may be more familiar with the aforementioned process of customizing the org itself. This is referred to as “org development” or “unpackaged” development. The other possible development model is “package development,” which you may only come across if you have created unmanaged, managed, or unlocked packages— perhaps in the course of creating a Salesforce app for distribution on the AppExchange.

The key for each development model is in the “source of truth” for the application. In org development—the one Salesforce folks are likely most familiar with—the org itself is the source of truth. That’s different from package development, where the source of truth is typically a git repository for the application’s code and metadata.
When comparing to JavaScript app packaging, think of org development as a private package for use with that specific Salesforce org. Meanwhile, package development is more like creating a public package that’s intended for public use in other Salesforce orgs.
Let’s say that you or your company want to become a Salesforce ISV and go for package development. It’s then important to know all about Salesforce packaging and requirements.
In general, Salesforce packages:
- Represent a container of metadata. This includes all customizations and custom code
- Must compile and validate in order to deploy to other orgs
- Usually require you to map a package to a directory in the project workspace (when packaging with Salesforce DX Source format)
One obvious advantage of unpackaged/org development on Salesforce is that it’s fast and gives you immediate gratification. In other words, the org that’s being used gets to realize the benefits of the development changes immediately. However, it’s important to also realize how beneficial package development can be, despite having more steps and creating some overhead tasks.
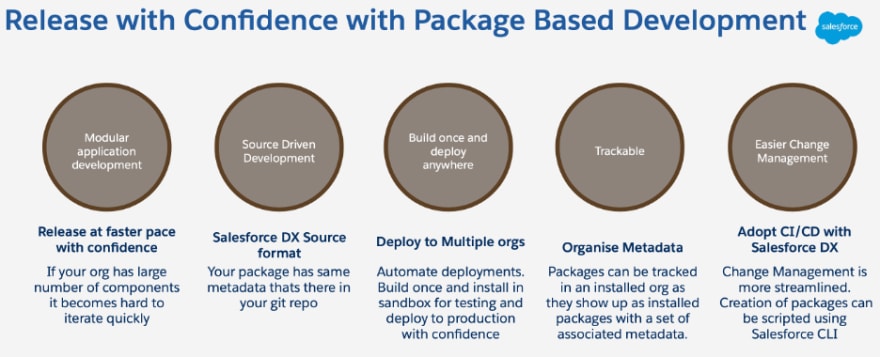
Some benefits of package-based development
In addition to the benefits shown above, I would also argue that package development forces Salesforce admins and developers to adopt a sense of discipline when it comes to being organized and planning for the future maintenance, scalability, and iterability of the application. Unpackaged development, while fast, can end up creating a great deal of technical debt that eventually has to be paid back once the org becomes difficult to maintain and manage.
There are different types of Salesforce packages as well.
Managed Packages – These are the types of packages that are geared towards Salesforce ISV partners and publishers of apps on the AppExchange. With 2GP managed packages, the ISVs also get additional features like push upgrades and access to the License Management tool.
Unlocked Packages – Unlocked packages are primarily used to address the packaging needs of individual customers and their Salesforce orgs. This is the ideal fit for those Salesforce orgs that are not going to publish to the AppExchange but want to adopt a package-based approach for the benefits mentioned above.
Under the category of Unlocked Packages, there are two subtypes also.
Org Independent – Org independent packages are packages that don’t have dependencies on the org itself. They can support multiple different orgs while still maintaining the core business process and functionality. Dependencies are validated during package creation and dependencies on other packages can be set.
Org Dependent (Runtime Packages) – Org dependent packages might be used for massive orgs where untangling the dependencies may not be an option. The dependencies are validated during package installation instead of at package creation and can depend on other packages as well as the target org itself. It’s recommended to use sandboxes with a source tracking tool with these packages.
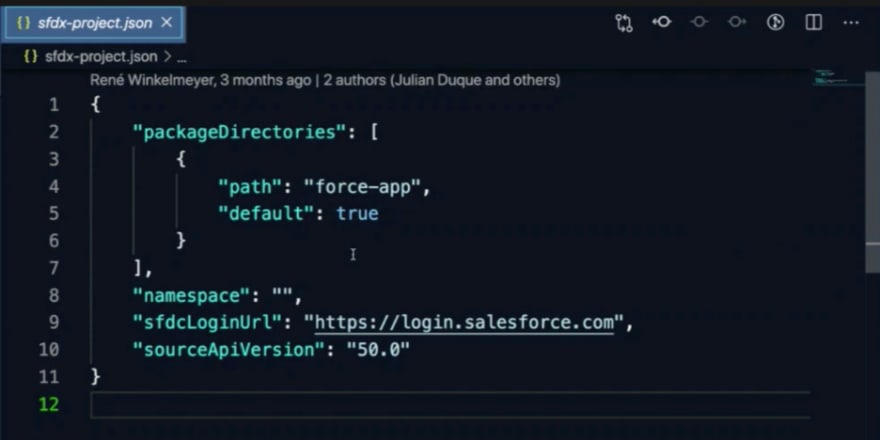
Creating a Salesforce Package in VS Code
When working with SalesforceDX and VS Code, an sfdx-project.json file is created automatically that contains some packaging information for the app. This is just like the package.json file we have for JavaScript applications deployed on npm. Note that you can add a “namespace” to the file. Doing so will add a namespace prefix to all of the components in the package such as custom fields, objects, APEX classes, etc. This step will ensure that the package components will not collide with metadata in target installation orgs. It will also make the package components easy to spot and identify once they are installed.
After the app is ready to be packaged, running the following command on the command line will initialize the Salesforce package and update the sfdx-project.json file.
sfdx force:package:create -n [name of the package] -t [type of package] -r [directory of package]
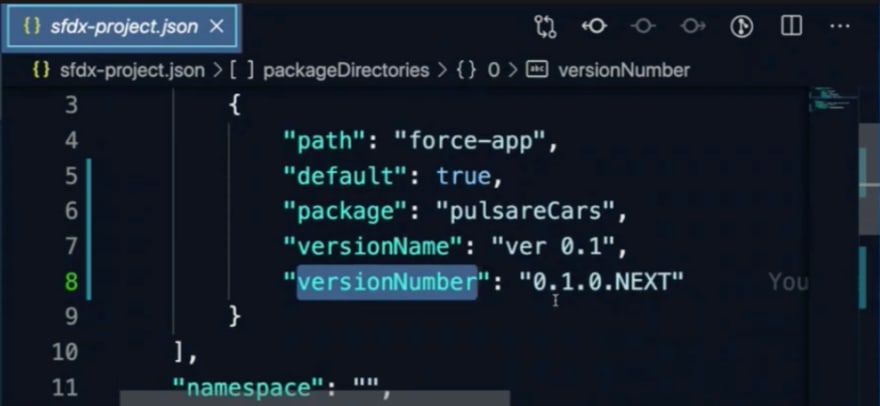
The sfdx-project.json file after running the force📦create command
As you can see, we have the first version of the package initialized. In this step, a package ID gets generated. Next, if we wanted to bump a version of the app, we would use the following comment.
force:package:version:create - p [package id] -x/-k [optional password]
Note that the -k with optional password attribute will lock the package with a specific password, whereas using the -x parameter indicates that there is no password and that this will be more of an open-source project.
This particular command/process takes some time to complete because it’s actually creating a scratch org, compiling all of the metadata, checking dependencies, and running all APEX tests to make sure that everything validates. Once it does though, you’ll have a beautiful and updated sfdx-project.json file with all of the correct package information!
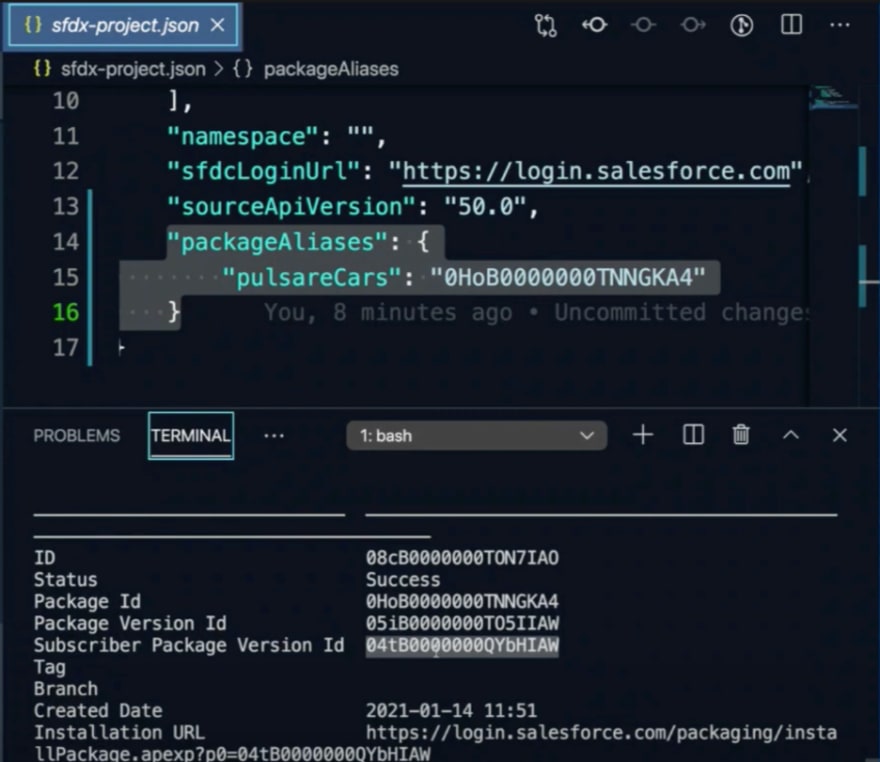
Packaged and gift-wrapped eCar application
The installation URL is where people will go to actually install the package into their respective orgs. Now, we can offer the eCars app to Salesforce orgs across the entire ecosystem!
Concluding Thoughts
As mentioned earlier, Salesforce admins and developers may not naturally approach things from a package-based development perspective. However, the whole concept of organizing code and metadata and their respective dependencies into a neat and cohesive container can pay dividends. Those payoffs exist even if the organization is not planning to publish their solution on the AppExchange. This is super relevant, especially for orgs that grow in size and complexity. Adopting a package-based approach as soon as things start getting complicated will ensure that the discipline inherent in package-based development will keep the org scalable, maintainable, and manageable. I have seen many orgs bury themselves beneath a mountain of technical debt that has resulted from undisciplined development and configuration. Hopefully, more members of the Salesforce ecosystem will start adopting package-based development with Unlocked Packages!
For more information, Trailhead modules, and advanced topics related to Salesforce and Heroku app deployment and packaging, check out the links to the resources below:
- Creating Node.js Modules
- npm publish Documentation
- npm version Documentation
- Unlocked Packages for Customers
- Package Based Development Model
- Successfully Creating Unlocked Packages
- Explore: Easy Spaces Sample Gallery App
In the next article, we’ll go through the final topic in the series: managing the app development lifecycle and automating developer workflows.
If you haven’t already joined the official Chatter group for this series, I certainly recommend doing so. This will give you the full value of the experience; in the group, you can also pose questions and start discussions with other members. There are often valuable discussions and additional references available, such as presentation slides and other resources and references.
About me: I’m an 11x certified Salesforce professional who’s been running my own Salesforce consultancy for several years. If you’re curious about my backstory on accidentally turning into a developer and even competing on stage on a quiz show at one of the Salesforce conventions, you can read this article I wrote for the Salesforce blog a few years ago.

Top comments (0)