We will discuss authentication and authorization using the JWT token and different cryptographic algorithms and techniques. So, we will be looking at the following things one by one.
Introduction of JWT Token
- Why JWT Token
- Structure of JWT Token
- Client-Server Scenario with JWT Token
- Client-Server Scenario with JWT Refresh Token
Let’s start one by one with the basics and real-time scenarios.
Basically, JWT is used for the authentication and authorization of different users.
Authentication
- In this process, we send the username and password to the authentication server.
- Authentication Server will validate those credentials and store them somewhere on the browser Session and Cookies and Send the ID to the end-user.
Authorization
- In, the Authorization we check whatever credential entered by the user while the Authentication process and that same user will have granted access to the resource using the credential which we store in the Authentication Process and then Authorize that particular user.
So, this is all about authentication and authorization, normally.
Introduction of JWT Token
- JSON Web Token is the Open Standard (RFC 7519) Self-Contained way that will be used to transmit the data securely over the different environments as a JSON Object.
- RFC (Request for Comment) is the shortened form of Remote Function Call and Formal Document from the Internet Engineering Task Force. RFC 7519 JSON Web Token (JWT) May 2015 Copyright Notice Copyright © 2015 IETF Trust and the persons identified as the document authors. All rights reserved.
- JWT is the trusted way of authentication because it is digitally signed and secret using HMAC Algorithm or sometimes using a public/private key using RSA.
- Basically, HMAC stands for Hashed-based Message Authentication Code, it uses some great cryptographic hashing technique that provides us great security.
- Also, the JWT is part of great Authentication and Authorization Framework like OAuth and OpenID which will provide a great mechanism to transfer data securely.
Why JWT Token
- The User will Authenticate using JWT Token and It is a digitally signed signature with a secret key issued by the issuer. So that will use to Authenticate the User Securely and Also, manage the claims, and many more.
- Instead of storing information User Credentials somewhere on the Server that will get easily by attackers over the internet. So, we use JWT, and using that we maintain user secrets with different Cryptographic Algorithms and Encoded that to Authenticate Users.
- That’s why many web applications use JWT for authentication of users securely
Structure of JWT Token
Basically, The JSON Web Token consists of three parts which are used to store user information in the Token separated by dots(.)
For example –

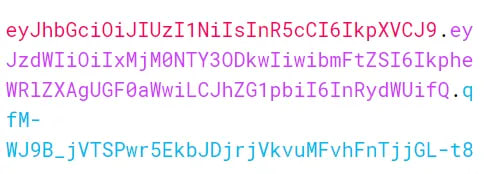
As you see in the above diagram, it is an encoded Base64 URL that stores user secrets and information in three parts.
1. Header
The header stores information about the JWT token, like the type of token and whatever algorithm we used to create it.
For Example –
{

  "alg": "HS256",

  "typ": "JWT"

}
2. Payload
Payload is the second part of the JWT token, which is used to store information about users like claims, roles, subjects, and some additional information related to a user.
For Example-
{

  "sub": "1234567890",

  "name": "Jaydeep Patil",

  "admin": "true"

}
3. Signature
Signature is used to check user information that is present in the header and payload and validate things with the secret key and data that is present in the base64-encoded string. Basically, the secret key is present on the server, which we use while creating the token. That secret key prevents external attackers from cracking the token. So, in this process, a Base64-encoded string is created to be used for authentication and authorization.
HMACSHA256(

  base64UrlEncode(header) + "." +

  base64UrlEncode(payload),//This is the Secret Key which is store at server side and use in signature

your-256-bit-secret)
So, these are the three parts of the token that are present in the Base64Url string, which is separated by a dot and stores secret information of the user for validating users.
Client-Server Scenario with JWT Token
You can see in the following diagram how the authentication process works for the user when he wants to access the resources from the backend server.

- First, the user sends a request to the Authentication Server with credentials like User Name and Password.
- Then, the Authentication server will validate that information and whatever information is provided by the user that will be correct and successfully authenticate then Auth Server will issue the JWT Valid Access Token to the user.
- Next, The User Sends the first request to the backend server with a Valid JWT Access Token and the Server will provide the requested resource to the user.
- Later on, if the user wants to access another service from the backend server then he will send a second request to the server.
- Now, as you see in the diagram when the user sends the second request to the server to access the protected resource but at that time the token is expired so the server responds to the end-user.
- Finally, as you see in the last part of the diagram user again needs to be login and send the user credential to the authentication server to get a new JWT Valid Access Token and store it somewhere on the client-side in the Local Storage and something like that in the Base64Url Encoded URL.
- So, this way the normal authentication process will work.
Client-Server Scenario with JWT Refresh Token
- You can see in the following diagram how the JWT Refresh Token will work step-by-step.
- First, the user will send the request to the Authentication Server with credentials like User Name and Password.
- Next, the Authentication Server validates the user information and credentials that will be correct then the server will provide the JWT Valid Access Token and Refresh Token. Then, the user will store that token somewhere on the client-side in the Local Storage and something like that as per need and requirement.
- Later on, the user sends the first request to the backend server to access the protected resources with JWT Valid Access Token in the header.
- Next, the backend server checks the roles and permission of the user like the login user is authorized to get the protected resources and that will valid and proper then the backend server provides the requested protected resource to the end-user.

- In the meantime, the user sends the second request to the backend server to access another service and if meanwhile the JWT Valid Access Token is expired in that case the server will respond to the end-user as you see above image.
- In that case, when the JWT Valid Access Token is expired then the user sends the authentication request to the Auth Server with Refresh Token to get a new JWT Access Token.
- Next, the server will validate the user information and provide a new access token with a refresh token to the end-user and the refresh token have more life than the Simple JWT Valid Access Token
- So, all the above steps are executed continuously while navigating the web application and accessing the new services and resources over the internet.
So, this is all about the JWT token and how things are going to work during the authentication and authorization process.
I hope you understand all things related to JWT and now have a basic idea about it.
Happy coding!

Top comments (0)