Another important part of the backend is the database. I will go over how the databases are structured and go over what libraries and tools Nestjs provides to work with a database. This post will go over SQL databases. Let's first begin by thinking of SQL databases as tables like those used in Microsoft Excel or Google Sheets.
There are three key words that we need to understand before we move on.
- Entity(table): basically, the name of the table
- Attribute(column): the titles of the columns in the table
- Relation(primary key, foreign key): this exlains the relationship between different tables. This is problably the hardest part to grasp when working with SQL databases.
The above will hopefully make more sense with the examples I provide below.
What are entities and attributes?
Let's imagine a web page that has a post that was written by a user and a comment written by another user. In this case we have three different "entities": the author, the post, and the comment. All these entities have different attributes. For example, the post entity might have attributes such as the text of the post, the time it was written, and the title of the post. Once all those attributes are determined, the entity is converted into a table.
What are the relations among the entities?
The relations between the three entities we mentioned above are that the user writes posts and comments, and every comment is associated with a post (this is because comments cannot standalone like posts, they have to be a comment on some post). The diagram below provides a visual representation of the relations between the different entities.

Can you connect the diagram above with the tables below?
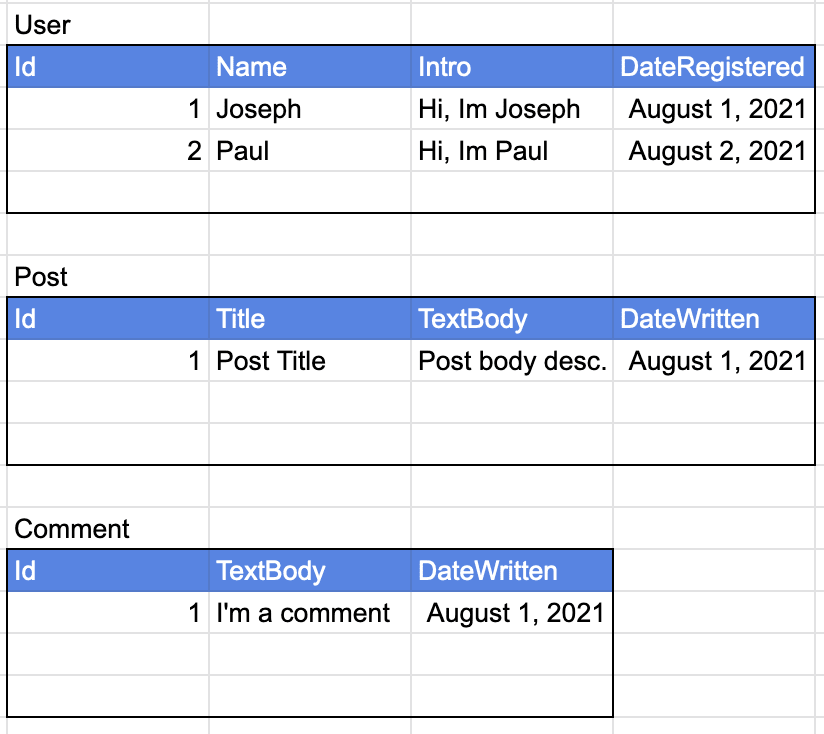
To see the relations between the tables you can do something like this:

You can join the tables together. As you can see, I highlighted the primary key in red and the foreign key in green. Primary keys are IDs that are unique, meaning that it can never be the same for any row. For example, for the user, if you use the name as the primary key there may be some people with the same name so you'll have a problem there. But, the userId is unique to that user which is why it was chosen as the primary key for that entity. Foreign keys are basically the the keys that refer to another table. The Post table has a foreign key of UserId. This means that the IDs in that column refer to the UserId in the User table.
Now that we have a gist of the relations between tables let's dive a little deeper with concepts called cardinality and optionality.
What is cardinality?
There are three types of cardinality relationships: one-to-one, one-to-many, and many-to-many which can be see in the ERD diagram I created below.

Using the example above,
1) Let's go over the relation between the user and the comment. One user can write numerous comments but each comment can be written by one user. So this is a one-to-many relation (one user, many comments).
2) The user and post relation is a many-to-many relation. Of course, this may differ according to how you're creating your app but in this case, the user can write numerous posts and any one post can have several users. Imagining a wikipedia page will probably help (many users, many comments).
3) Hopefully, you can now guess what a one-to-one relationship is.
What is optionality?
Optionality, as the name suggests, is a way to show if the relation is optional or not. As you can see in the diagram below, the O signifies that the relation is optional while the straight line signifies that it is mandatory.
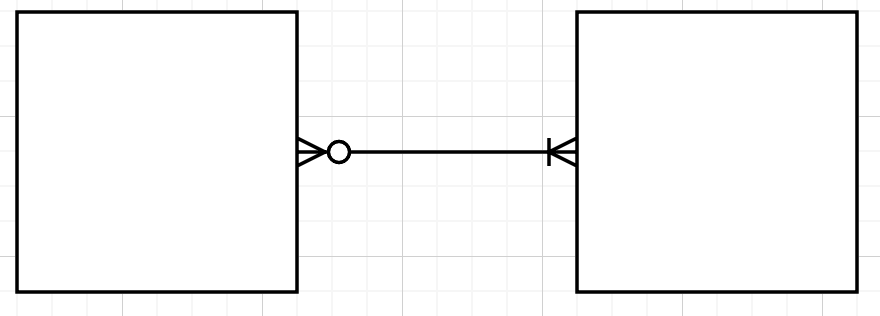
Going back to our example, let's see the relation between the user and comment in terms of optionality. The comment is optional to the user which means that the user is not required to write a comment. However, if a comment exists then it is mandatory for it to have a user who wrote it because comments can't write themselves.
Now that we have a general understanding of SQL databases, let's see how Nestjs implements these concepts.
In my other post, I go over five main functions of the server which are the following:
- Pipe - validation
- Guard - authentication
- Controller - routing
- Service - business logic
- Repository - accessing a database.
I covered all of them in the other post except the repository function which I will cover now.
What is the repository function?
The repository is the class that communicates directly with the database. Fortunately, unlike the other functions where we have to create the classes ourselves, the repository class is created by an external library that we will be using called TypeORM. All the methods in TypeORM can be summarized into CRUD(create, read, update, and delete) functions.
Although we don't have to worry about creating a separate repository because TypeORM does that for us, we still need to create an entity that TypeORM will use to create a table that will be stored in the database.
import { OneToMany, Entity, Column, PrimaryGeneratedColumn } from "typeorm";

@Entity()
export class User {
    @PrimaryGeneratedColumn() //primary key (this is generated automatically by TypeORM)
    id: number;

    @Column()
    name: string;

    @Column()
    intro: string;

    @Column()
    dateRegistered: Date;

    //@OneToMany()
    //TypeORM provides one-to-many, one-to-one, many-to-many, etc. decorators
}
Can you make the connection between this entity in Nestjs with the entity diagram I drew above? This entity will be created in to a table and saved into an SQL database. There are a couple extra steps you need to take with the modules in order to help Nestjs recognize the entities but I will not get into that here.
Now that an entity is created, let's see how we can actually use the repository functions that TypeORM made for us within our project.
import { Injectable } from "@nestjs/common";
import { Repository } from "typeorm";
import { InjectRepository } from "@nestjs/typeorm";
import { User } from "./user.entity"; //the folder name is just a random one I made up

export class UserService {
  constructor(@InjectRespository(User) private userRepository: Repository<User>) {}

  createUser(name:string, intro: string) {
    const user = this.userRepository.create({name, intro});
    return this.userRepository.save(user);
  }
}
Notice that you have to use DI to inject the repository into the service that we're going to use. The "create" and "save" methods used in the example above are methods provided by TypeORM. Just think of them as functions in the repository class that TypeORM automatically generated for us. If you check the TypeORM website you can find all the methods that you can use to CRUD your data in the database.

Top comments (0)