
In this tutorial, you'll learn how to get set up with Unity's ML-Agents toolkit and train your own agent using reinforcement learning. No previous experience with Unity will be needed.
What's Unity ML-Agents?
ML-Agents is an add-on for the existing Unity platform. It provides researchers and game developers with the ability to build complex 3D environments and train intelligent agents in them — all while leveraging the powerful Unity engine and UI.
Before we start...
If you're looking for some background on reinforcement learning, check out:
- A (Long) Peek into Reinforcement Learning
- Getting started with reinforcement learning using OpenAI Gym
Next, you'll need to install both Unity and the ML-Agents add-on. Follow the installation instructions here.
You'll want to follow the optional instructions for cloning the ML-Agents Toolkit Repository, since this will contain the example environments we'll be playing around with in this tutorial.
Getting familiar with Unity ML-Agents
Once everything's installed, load the sample Unity Project provided by ml-agents.
- In the Unity Hub explorer, go to
Projects > Add - Navigate to wherever you cloned or downloaded the
ml-agentsrepository - Select the 'Project' folder, and click 'Select Folder' in the file browser
The provided Project includes 18+ example environments for us to play with out-of-the-box.

Start by loading the provided PushBlock environment.
- Find the Project tab
- Navigate to Assets > ML-Agents > Examples > PushBlock > Scenes.
- Double-click the
PushBlock.unityscene to load it.
You should see a scene like this show up:

💡 Select the hand tool in the Toolbar and click + drag to move around the view. Hold Alt (Windows) or Option (macOS) and left click to rotate around an object.
A note on scenes:
In Unity, scenes are assets that contain part of a game or application. In our case, this scene contains 32 'Area' objects. Each 'Area' object contains an 'Agent' object as well as other objects that make up our Push Block environment.
These agents all act independently but share the same model. This is done to speed up training since all agents contribute to training in parallel.
The agents in our scene are already preloaded with a trained model. Click the ▶️ button just above the Scene panel to see them in action.
Training an agent to solve Push Block
In the Push Block environment, the goal is to push the block to the green goal area. The reward function is:
- +0.0025 for every step
- +1.0 if the block touches the goal.
Run in your terminal from the root directory of the ml-agents repository:
mlagents-learn config/ppo/PushBlock.yaml --run-id=pb_01
This command will start the training process using some default configurations. If you open up the PushBlock.yaml file at the path config/ppo/PushBlock.yaml you'll see:
behaviors:
  PushBlock:
    trainer_type: ppo
    hyperparameters:
      batch_size: 128
      buffer_size: 2048
      learning_rate: 0.0003
      beta: 0.01
      epsilon: 0.2
      lambd: 0.95
      num_epoch: 3
      learning_rate_schedule: linear
    network_settings:
      normalize: false
      hidden_units: 256
      num_layers: 2
      vis_encode_type: simple
    reward_signals:
      extrinsic:
        gamma: 0.99
        strength: 1.0
    keep_checkpoints: 5
    max_steps: 2000000
    time_horizon: 64
    summary_freq: 60000
You can experiment with different hyperparameters by simply modifying this file. You might also notice that there are other algorithms provided, namely PPO, SAC, POCA (developed by the ML-Agents team), and Imitation Learning.
If you've installed ml-agents correctly, you'll be greeted with the following:

Now go to your Unity project and click the ▶️ button to start the training process. You can click the ▶️ button to stop the training process. At any time you will be able to resume training by adding the --resume flag:
mlagents-learn config/ppo/PushBlock.yaml --run-id=pb_01 --resume
While training, you'll receive information about the training progress from the console. You'll also be able to visualize the training by running in a separate terminal:
tensorboard --logdir results
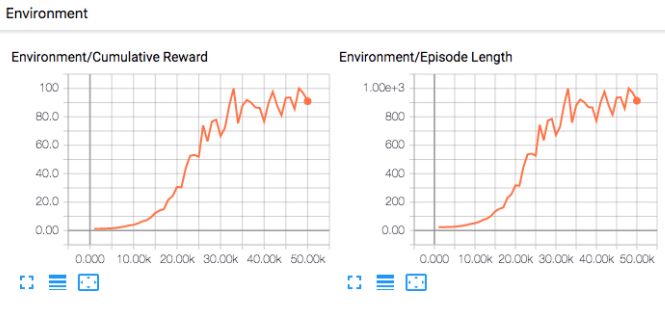
You can also watch our agent training in real-time within Unity:

Our agent starting to learn how to push the block after ~100,000 steps:

Once training has been completed, your model will be located at results/pb_01/PushBlock.onnx. To load this model:
- Rename it so you don't confuse it with the provided
PushBlock.onnxmodel. - Drag this
.onnxfile into the TFModels folder under Assets > ML-Agents > Examples > PushBlock - In the Project panel go to Assets > ML-Agents > Examples > PushBlock > Prefabs
- Double click the PushBlockArea prefab.
- In the Hierarchy panel, select the Agent object.
- Drag your model into the Model field under Behavior Parameters in the Inspector panel.
- Set inference device to CPU (for most of the models generated with the ML-Agents toolkit, CPU will be faster than GPU)
Note on prefabs:
In Unity, a Prefab is a reusable asset that can be used in a scene. In our case, the Push Block scene we loaded earlier contains 32 instances of the PushBlockArea prefab.
By updating the model in the Prefab instead of the Scene, the settings for all 32 instances of this agent will be updated at once. Click ▶️ as before and watch your trained agent!

Next steps
Unity ML-Agents is a powerful tool that makes it easy to train and experiment with reinforcement learning algorithms.
However, what makes ML-Agents a powerful toolkit is the ability to leverage Unity's engine and create complex, physics- and graphics-rich 3D environments. Creating your own custom environments will require you to become more familiar with Unity.
Up next, we'll show you how to create your own custom environment for training reinforcement learning agents within Unity.

Top comments (0)