If your OS is Ubuntu 19.10, you don't need to install python3 separately.
Because Ubuntu comes with Python3.
You can check it by typing:
$ python3 --version
jsguru@ubuntu:~$ python3 --version
Python 3.7.5
Then, the first step is to install pip for Python3
$ sudo apt-get install python3-pip
Working on a python project in an isolated python environment is recommended so that python modules and packages don't meddle with that of other projects or even that of the operating system. Thus, a virtual environment is needed eminently.
We can achieve it with virtualenv or virtualenvwrapper.
virtualenvwrapper is better choice than virtualenv.
Creating and deleting virtual environments is easy with virtualenvwrapper.
For installation it run:
$ sudo pip3 install virtualenvwrapper
And
$ mkdir ~/Envs
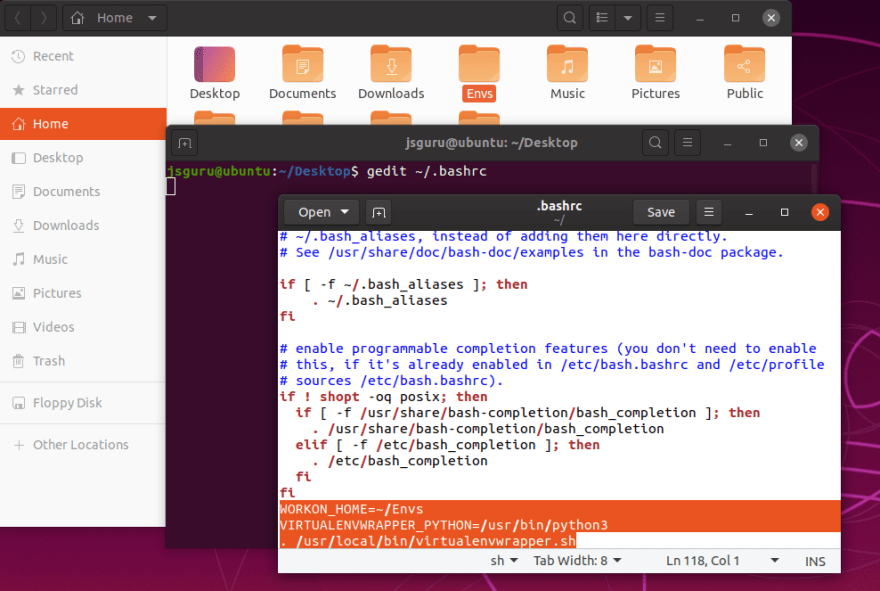
After running the commands above, open the .bashrc file via gedit or any other tool you prefer.
$ gedit ~/.bashrc
And add below lines at the end of .bashrc file.
WORKON_HOME=~/Envs
VIRTUALENVWRAPPER_PYTHON=/usr/bin/python3
. /usr/local/bin/virtualenvwrapper.sh
You can now use mkvirtualenv, rmvirtualenv and workon commands to create, remove and list virtual environments.
Create a new virtualenv
$ mkvirtualenv myproject
jsguru@ubuntu:~$ mkvirtualenv myproject
Using base prefix '/usr'
New python executable in /home/jsguru/Envs/myproject/bin/python3
Also creating executable in /home/jsguru/Envs/myproject/bin/python
Installing setuptools, pip, wheel...
done.
virtualenvwrapper.user_scripts creating /home/jsguru/Envs/myproject/bin/predeactivate
virtualenvwrapper.user_scripts creating /home/jsguru/Envs/myproject/bin/postdeactivate
virtualenvwrapper.user_scripts creating /home/jsguru/Envs/myproject/bin/preactivate
virtualenvwrapper.user_scripts creating /home/jsguru/Envs/myproject/bin/postactivate
virtualenvwrapper.user_scripts creating /home/jsguru/Envs/myproject/bin/get_env_details
(myproject) jsguru@ubuntu:~$
Load or switch between virtualenvs
$ workon myanotherproject
(myproject) jsguru@ubuntu:~$ workon
myanotherproject
myproject
(myproject) jsguru@ubuntu:~$ workon myanotherproject
(myanotherproject) jsguru@ubuntu:~$
Deactivate a virtualenv
$ deactivate
(myanotherproject) jsguru@ubuntu:~$ deactivate
jsguru@ubuntu:~$
Remove a virtualenv
$ rmvirtualenv myanotherproject
jsguru@ubuntu:~$ workon
myanotherproject
myproject
jsguru@ubuntu:~$ rmvirtualenv myanotherproject
Removing myanotherproject...
jsguru@ubuntu:~$ workon
myproject
jsguru@ubuntu:~$

Top comments (4)
virtualenvwrapper is sometimes confusing for beginner who started with python. If you're newbie you can start with virtualenv first. and then move ahead with virtualenvwrapper.
but it great tools for those people who already working on multiple projects. because we can manage all env and at one place and do everything from anywhere using terminal.
Personally i love it.
Hi Devang
I started with virtualenvwrapper when learning Python so that I could use
workoncommand that's why.We can list, activate, and switch virtual environments easily with
workon.From what I've heard,
pyenvis the hot environment manager these days, rather than virtualenv. They do a very similar job though.Hi Ben
As you know,
pyenvis a tool for managing multiple Python versions.And you can create virtual environment using the
pyenv-virtualenvextension.$ pyenv virtualenv 3.8.0 my-python-project-envWe can compare it to creating a gemset in ruby.
$ rvm gemset create my-ruby-project-envWhat you can see here is that when you create a virtual environment you can set python version with
pyenv.