
I have been wanting to build a Slack bot for a while now, not for any specific reason, but simply just to try it out for myself.
Luckily, there are many great tools out there to simplify the process for us. I used the Botkit framework to build out a bot that interacts with users in [Slack] to create new projects in GitLab and Codeship without leaving the Slack application.
What Is ChatOps?
ChatOps isn't any one specific thing, but more of the interconnection of many things. At its core, it connects people with tools and automation to ease the communication issues that are inherent in software development.
You can connect many tools directly to Slack, and create communication channels that can alert you when servers are down, pull requests are merged, or traffic goes up.
In this example, I wanted to create a process for team members to create new projects and repositories with a dialog box right inside Slack.
Why is this important? I'm glad you asked! Streamlining any process can make everyone's life a little easier. As a developer, I can create a project in seconds, not minutes (or longer even). As a DevOps engineer, I can create templates that can easily be recreated and tweaked without training time to roll out. As a dev manager, I can see production times go up, and frustration go down.
Create A Slack App
Slack has created a framework for app development that is really simple to get started. I won't spend too much time in this article covering all of the various possibilities that come with build a Slack app, but I do want to cover how to get started.
Create New App
- Go to https://api.slack.com/apps?new_app=1
- Give your app a name
- Select the workspace where you want to attach the app
- Click
Create App

I named mine "Shipwright" since it's building shippable things. Feel free to name yours anything you'd like.
Once you have created the app, you should see this screen.

For now, we can skip most of this, and come back to it later. You will, however, need the app credentials to get started.

Building The Bot
I decided to use Botkit to build my chat bot. They have a great framework to build different bots, and it works well with Slack.
You can download the code at https://gitlab.com/kellyjandrews/shipwright.
Setting up the Environment Variables
The project is setup using Docker and Docker Compose. You will need to have those installed to run this project as well. In the docker-compose.yml there is a reference to a .env file you will need to set up.
SLACK_TOKEN=
SLACK_ID=
SLACK_SECRET=

GITLAB_TOKEN=

CODESHIP_USER=
CODESHIP_PW=
CODESHIP_ORG_NAME=
Slack
The SLACK_TOKEN, SLACK_ID and SLACK_SECRET environment variables are from the app we set up in the previous step. Copy and paste those directly after the equal sign.
Codeship
The Codeship API will use your username and password to authenticate. It is recommended to create a user specifically for API usage.
This will require the API user to have access to the correct team in Codeship, as well as a Gitlab user that matches in order to connect the service to Codeship.
For initial testing purposes, you can use your current user and make sure you have Gitlab setup as a connection. You can locate your connected services at https://app.codeship.com/authentications.

This example uses only the organization name from Codeship. During API authentication, it will match the name to create the project in the proper org.
You can find the organization name in the settings screen.
Gitlab
First, make sure you are logged into the same user that is connected to Codeship. Then, in the upper right corner of the Gitlab UI, click the user icon to access the drop-down menu, and select Settings. Then navigate to Access Tokens on the left side menu. On this screen, you can create a personal access token.

You will only require API access. Give it a name, and then click Create personal access token. The page will refresh and display the token at the top. You will only see this once, so make sure to copy it now, and paste it into the .env file.

Running Your Bot Locally
Slack uses webhooks to communicate with apps. Prior to pushing your bot to production, you want to test out the functionality with your local dev environment, and one of the easiest ways I've found to do this is using Ngrok.
Ngrok will open a secure URL to allow you to connect directly to your localhost. Installation is easy, and the instructions can be found here - https://ngrok.com/download.
Once installed, you need to start a session that will connect the outside world to your localhost on port 3000.
$ ngrok http 3000

ngrok by @inconshreveable                                                                                                                                 (Ctrl+C to quit)

Session Status                online
Version                       2.2.8
Region                        United States (us)
Web Interface                 http://127.0.0.1:4040
Forwarding                    http://1234ABCD.ngrok.io -> localhost:3000
Forwarding                    https://1234ABCD.ngrok.io -> localhost:3000

Connections                   ttl     opn     rt1     rt5     p50     p90
                              0       0       0.00    0.00    0.00    0.00
At this point, we can start up the Docker container, and finish the app setup over in Slack.
$ docker-compose up

// build output

Initializing Botkit v0.6.8
info: ** Using simple storage. Saving data to ./db_slackbutton_bot/
debug: Setting up a handler for spawned
debug: Setting up a handler for heard_trigger
debug: Setting up a handler for command_triggered
debug: Setting up a handler for remote_command_end
debug: Setting up a handler for slash_command
debug: Setting up a handler for dialog_submission
info: ** Starting webserver on port 3000
info: ** Serving webhook endpoints for Slash commands and outgoing webhooks at: http://0.0.0.0:3000/slack/receive
info: ** Serving login URL: http://0.0.0.0:3000/login
info: ** Serving outh return endpoint: http://0.0.0.0:3000/oauth
If you run into trouble, verify your environment variables, stop the container and rebuild. If you have other issues, feel free to open an issue and let me know, we can try to figure it out.
What Is This Code?
The Botkit documentation is, at times, hard to sort through. The difficulty with any framework is that there are so many options that you can easily get lost trying to find what you need exactly.
I'm not going to cover everything regarding Botkit but wanted to highlight a few items from the project that might help you figure out what is happening, and give you a jump on your bot.
Starting the Webserver
I'm using some interactive items, which requires us to use OAuth and webhooks. Using Botkit, it will create the correct endpoints needed to interact with Slack, so I don't have to worry about that.
// set up a botkit app to expose oauth and webhook endpoints
controller.setupWebserver(process.env.port, () => {
  controller.createWebhookEndpoints(controller.webserver);

  controller.createOauthEndpoints(controller.webserver, (err,req,res) => {
    if (err) {
      res.status(500).send('ERROR: ' + err);
    } else {
      res.send('Success!');
    }
  });
});
Handling the Slash Commands
Slash commands are handled using one event handler in Botkit. I set it up so that I can easily add additional functionality later using a switch statement. The message object has a command property you can match against.
controller.on('slash_command', (bot, message) => {
  let command = message.command;

  switch (command) {
  case '/create':
    return createDialog(bot, message);
  default:
    return;
  }

});
Creating the Dialog
The interface for creating dialog elements in Botkit is really quite useful, and the docs make it easy to understand.
function createDialog(bot, message) {
  var dialog = bot.createDialog('Create New Project','callback_id','Create')
    .addText('Project Name','projectName','')
    .addSelect('Project Type','projectType',null,[{label:'Pro',value:'pro'},{label:'Basic',value:'basic'}],{placeholder: 'Select One'});
  bot.replyPrivate(message, 'Ok, let\'s create a new project');
  bot.replyWithDialog(message, dialog.asObject());
}
During the project setup, I want to get a name and project type to pass to Gitlab and Codeship. The possibilities here are quite exciting - but for now I kept it simple.
Submitting the Dialog
Once the dialog is submitted, I wanted to communicate back to the user via the bot's direct messaging abilities. This part was more tricky than expected, but after some trial and error, I was able to get what I wanted.
controller.on('dialog_submission', (bot, message) => {
  const projectType = message.submission.projectType;
  const projectName = message.submission.projectName;

  bot.dialogOk();
  bot.createPrivateConversation(message, (err,dm) => {
    dm.say(`I am now creating the Codeship ${projectType} project and \`${projectName}\` repo.`);
    gitlab.createRepo(projectName)
      .then(gitlab_res => {
        dm.say(`The GitLab Url is ${gitlab_res.web_url}`);
        return codeship.createProject(gitlab_res.ssh_url_to_repo, projectType);
      })
      .then(codeship_res => {
        dm.say(`The Codeship Project Url is https://app.codeship.com/projects/${codeship_res.project.id}`);
        dm.activate();
      })
      .catch(err => {
        // respond with error messages here
        console.log(err);
      });
  });

});
Overall, the code is not too complex, which made me happy. Botkit allowed me to create some solid functionality without much headache. The project also has some code for connecting the Gitlab and Codeship APIs which you can check out as well.
Adding Functionality
Now that you have the bot up and running, Slack needs a few permissions set up and then installed on your team.
Return to https://api.slack.com/apps from the earlier step, and click on the app you have created.
Interactive Components
In order for the dialog box to work correctly, you will need to set up the interactive components request URL using the ngrok path and /slack/receive.

Slash Commands
I decided to use a slash command to allow users to start the workflow. My current set up doesn't expect any additional details, but just uses the /create command. The request URL is the same as the interactive components URL with /slack/receive.

If I wanted, you can get the command text from the user as well, which might save a dialog box as well. The text value is available in the Botkit object returned in the slash command.
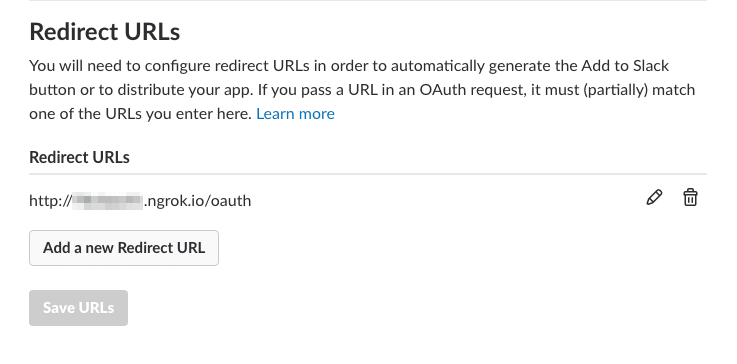
OAuth & Permissions
This section allows you to add scopes to the app, which we don't need to do in this case for now. We do need to add a redirect URL, for the initial set up.
Again, you will need your ngrok URL, and add the route /oauth.
Bot User
Finally, you need to add your bot user. This will be the name that is displayed in Slack directly. I called mine shipwright here as well, but feel free to name your bot something that makes sense to you.

Install the App
Once you have everything setup, you now need to install the app into Slack. Click on the Install App menu item and install the app from here. As you are building, this is also where you can reinstall the app if you change permissions and need to authorize those.


Log Into Your App
Once you have installed the application, you will also need to login to authorize your user.
From a web browser, visit you will need to point to http://1234abcd.ngrok.io/login. Then click the authorize button. This will authorize the application and save the team information to the db_slackbutton_bot directory.
Test it Out
With everything installed, running and authenticated, you should now be able to go into Slack and type the command /create. This will bring up the dialog box for you to enter the information.

Once you add your info and click create, the bot will then update you when complete in a direct message, providing you the URLs you need to get going.
Considerations
A couple things I have not put much time into on this project yet - error handling, and security.
Currently if something fails, it's not going to go well. There is a couple failure points with the external API calls that can easily fail - duplicate projects, auth failure, and so on.
Also, anyone can make projects at this point if they have the access to Slack. I would most likely need to add some additional piece here to ensure that those who can create is limited.
In general, the reward here is terrific. I can eventually create some templated projects to duplicate for a starter, I can setup the functionality for each project in less than a minute. Prior to this, it took multiple clicks on two apps to get things set up. The Codeship API allows me to create specific pro/basic configurations as well, for consistency.
In addition to Codeship and Gitlab, I could also set up error logging and app metrics applications or anything else I typically need on a project. With the dialog box, you can also add checkboxes to make those optional. Lots of potential here for some great functionality.
As a first project in the world of ChatOps, I feel really good about how things came about. There are still quite a few more items I want to add, and would love to hear your suggestions as well - feel free to add an issue on the repo https://gitlab.com/kellyjandrews/shipwright/issues.

Top comments (7)
We use Slack for monitoring and definitely bookmarking this for reference when we want to inevitably trend in this direction.
I'm a huge fan of what Slack has rolled out in the past 6 months with their workflow builder. I work on a project that makes it easy to connect Slack workflow builder with 3 party infrastructure tools and interact with them.
I see this ChatOps has the future of software development. There is actually a community we've built of ChatOps builders if you want to check it out! w.cto.ai/community
Great post - thanks for the info. It does seem that your gitlab repo is private (I get a 404) - I'd love to see your code. Thanks again.
Ack - thanks! Updated to public repo now.
Nice write-up! Our team is working on a Slack integration as well, tons of interesting use cases for teams to work more efficiently.
By the way - maybe you're interested in posting slack messages from real user
github.com/vvscode/slack-missing-t...
Hope it helps!