
Have you ever come across a website that made you scroll over it again just to see the motions and transitions and made you GASP, thinking how hard it must be to create these amazing animations, One such animation I saw on keploy website, the parallax effect which made me go through there Developer section twice! Let's dive into creating that spellbinding parallax effect together, transforming your website into a journey your visitors will want to take again and again(and raise its retention rate🤫).
Why GSAP Stands Out
GSAP can animate pretty much anything JavaScript can touch, in any framework. Whether you want to animate UI, SVG, Three.js, or React components, GSAP covers you. While you might think, "Can't we just use native CSS for these animations, then why load an extra library ?", but believe me, after using and exploring GSAP you will fall in love with it! The simplicity and power of complex animations it provides! It can ease challenging scroll-triggered effects animation with which we are going to create our parallax effect.
The Building Blocks: Tween and Timelines
At the core of GSAP, we have Tweens and Timelines:
Tween
A Javascript object which will instruct GSAP to implement the animation with the method,target element,and parameter that we will pass.
Syntax:
gsap.method(element, var, duration)
Timeline
A tool that create sequences of animations. When you add tweens to a timeline, they chain together multiple animations and by default, they'll play one-after-another in the order they were added.A typical timeline is written like so:
let tl = gsap.timeline();
Majorly we are going to use these methods in tweens:
gsap.to() - This is the most common type of tween. A to() tween will start at the element's current state and animate "to" the values defined in the tween.
gsap.from() - Like a backwards .to() where it animates "from" the values defined in the tween and ends at the element's current state.
gsap.set()- Instantly sets properties without animation, like a zero-duration .to() tween.
Let's look at them in action!
Now, with our building knowledge of GSAP's tween methods, let's get started on building the captivating parallax effect in which pinned image will get replaced in each section.
Making the Parallax Effect
Step1 : Install GSAP
Here’s how you can set up GSAP in your project:
Using the CDN:
Or, if you're using npm:
npm install gsap

For the yarn enthusiasts:

yarn add gsap
Step2: Creating the layout
Lets start with out HTML code We will create layout in which there will be be three sections in which section class="s3" act as the primary container for a set of images and text. In this section, we will have our nested diffImgContainer which will contain the images each tagged with classes s3Img, s4Img, s5Img, and s6Img respectively.
In the other section, we will have the text These sections do not contain images themselves but are placeholders for textual content or other web elements.
<section class="s3">
  <div class="diffImg">
        <div class="bgImg">
          <div class="diffImgContainer">
            <img class="s3Img"src="https://picsum.photos/816/375" alt="collaboration img">
            <img class="diffSecImg s4Img" src="https://picsum.photos/816/376" alt="img">
            <img class="diffSecImg s5Img" src="https://picsum.photos/816/377" alt="img">
            <img class="diffSecImg s6Img" src="https://picsum.photos/816/378" alt="img">
          </div>

      </div>
      </div>
  <div class="contain">
          <h1>Hello and Welcome!</h1>
  </div>
</section>
<section class="s4">
  <div class="contain">
 <h1>Delighted to Meet You!</h1>
  </div>
</section>
<section class="s5">
  <div class="contain">
     <h1>Ready to Explore?</h1>
  </div>
</section>
<section class="s6">
  <div class="contain">
    <h1>Let's Dive In Together!!!</h1>
  </div>
</section>
Step3: Setting Up GSAP and ScrollTrigger
To register our GSAP plugin with ScrollTrigger, ScrollTrigger is what will allow us to control animations based on scroll positions
gsap.registerPlugin(ScrollTrigger);
Pin and Move Background:
let bgImg = document.querySelector(".bgImg");
ScrollTrigger.create({
  trigger: bgImg,
  pin: true,
  pinSpacing: false,
  start: "center center",
  end: () => "+=" + (document.querySelector(".s6").getBoundingClientRect().bottom - bgImg.getBoundingClientRect().bottom)
});
Now as we want our .bgImg to be fixed at one position when scroll happens we will use ScrollTrigger.create() to create a new animation instance and pass pin: true , property which is used in ScrollTrigger to fix the .bgImg container vertically as the user scrolls.
The animation is controlled by a new ScrollTrigger instance, where:
trigger is the section element that triggers the animation.
start sets the scroll position where the animation should begin, calculated as the top of the section plus 50% of the viewport height plus half the height of the pinned .bgImg container.
end sets the scroll position where the animation should end, calculated as the start position plus the height of the pinned .bgImg container.
scrub: true creates a "scrubbing" effect, making the animation smoothly follow the scroll position, even if the user scrolls back and forth.
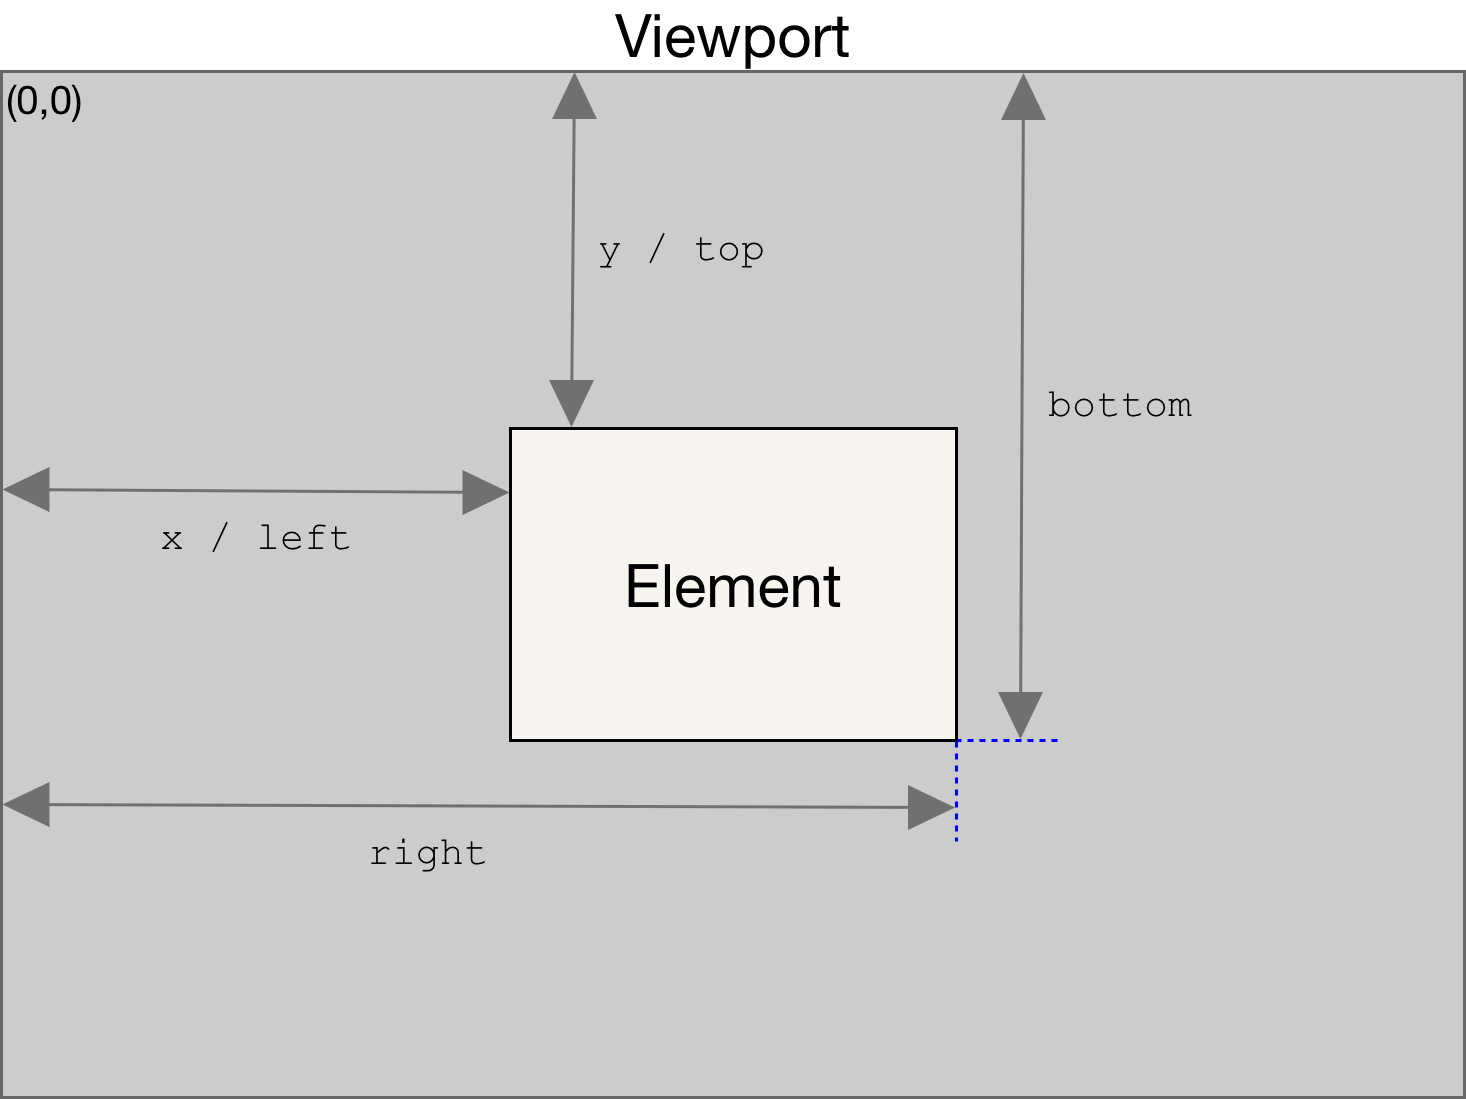
If I break down the end function , it is using getBoundingClientRect to get the dimensions in and around element inside the viewport, like distance from x, y
https://cdn.hashnode.com/res/hashnode/image/upload/v1711795840728/d72762db-1ff3-4824-bcdf-23a2567382e8.png
Sliding Images Into View
javascriptCopy code[".s4", ".s5", ".s6"].forEach(s => {
  let section = document.querySelector(s),
      image = document.querySelector(s + "Img");
  gsap.set(image, { y: 0, yPercent: 100 });
  gsap.to(image, {
    yPercent: 0,
    ease: "none",
    scrollTrigger: {
      trigger: section,
      start: () => "top 50%+=" + (bgImg.offsetHeight / 2) + "px",
      end: "+=" + bgImg.offsetHeight,
      scrub: true
    }
  });
});
This code loops through the sections (.s4, .s5, and .s6) and sets up a ScrollTrigger animation for each one. Here our tweens comes!
For each section, we first select the corresponding image element (e.g., .s4Img). We use gsap.set to initially position the image at its original vertical position (y: 0) but with a yPercent of 100%, which means it's vertically translated down by 100% of its own height, effectively hiding it from view.
Then, we use gsap.to to create an animation that transitions the yPercent of the image from 100% to 0%, sliding it into view from the bottom. The ease: "none" property ensures the animation has a linear movement, without any easing.
Voila! Our parallax effect is ready for scroll :
if you're curious to see more, you can explore the detailed version in this GitHub repository.
Conclusion
Alright if you came this far you now know how to create the "Cool Parallax Effect" and that's the scoop on GSAP! Animation can be tricky to get right, but GSAP gives us tons of options to play around. The key is finding that sweet spot - a few subtle animations here and there to grab attention and delight visitors without going overboard and the Possibilities are endless!
FAQ's
What is the primary advantage of using GSAP for animations over native CSS
GSAP offers unparalleled flexibility and power, allowing animations for various elements regardless of the framework. Its simplicity and capability to handle complex animations make it a preferred choice over native CSS.
Describe the key components of GSAP and their functions in animation creation.
GSAP primarily consists of Tweens and Timelines. Tweens instruct GSAP to animate properties, while Timelines sequence multiple animations. Tweens like gsap.to() animate from the current state, gsap.from() animates backward, and gsap.set() sets properties instantly without animation.
How does ScrollTrigger enhance the animation experience with GSAP
ScrollTrigger allows animations to be triggered based on scroll positions, offering precise control over animations as users navigate through the webpage. It enables effects like pinning elements, scrubbing, and controlling animations based on scroll positions, enhancing the overall user experience.
Explain the process of creating a parallax effect using GSAP and ScrollTrigger.
To create a parallax effect, you first set up GSAP and ScrollTrigger, then pin the background image. Next, you slide images into view using gsap.to(), with animations triggered by ScrollTrigger based on scroll positions of corresponding sections. This creates a captivating parallax effect as users scroll through the page.
What role does the "scrub: true" property play in ScrollTrigger animations?
The "scrub: true" property in ScrollTrigger animations creates a smooth, scrubbing effect where animations follow the scroll position seamlessly. Even if users scroll back and forth, the animations smoothly adjust, providing a fluid and engaging experience throughout the scrolling journey.
Why is finding the right balance of animations crucial for website engagement
While animations can enhance user engagement, finding the right balance is crucial. Subtle animations can grab attention and delight visitors without overwhelming them. GSAP offers a wide range of animation options, allowing developers to strike the perfect balance between visual appeal and usability, ultimately improving website engagement and user experience.

Top comments (0)