Table of Contents
Introduction
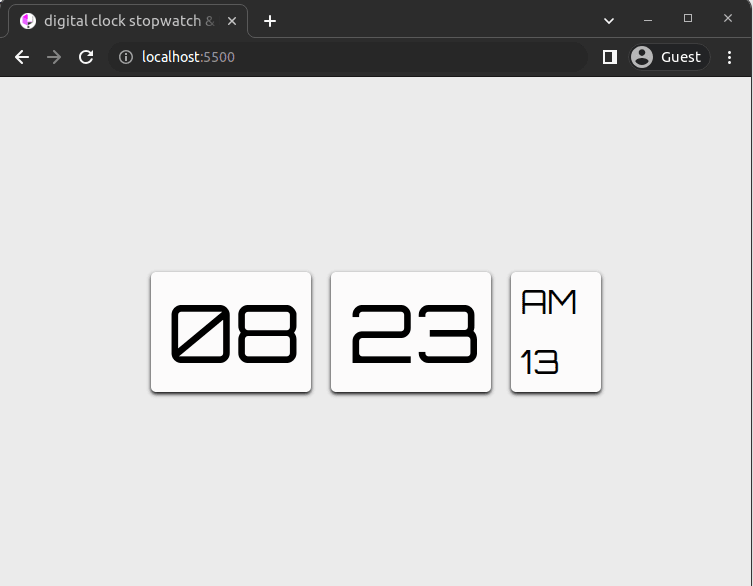
In this article, we will learn about building a Clock using HTML, CSS, and Javascript. By building the clock we learn about javascript Date object. We will build 12 hours Clock and we will be working with time in the Date object.
Final Result
Let's start building Clock
Creating an HTML document
<!DOCTYPE html>
<html lang="en">
  <head>
    <meta charset="UTF-8" />
    <meta name="viewport" content="width=device-width, initial-scale=1.0" />
    <link
      rel="shortcut icon"
      href="./assets/images/favicon.ico"
      type="image/x-icon"
    />
    <link rel="stylesheet" href="./styles/style.css" />
    <title>digital clock stopwatch & timer</title>
  </head>
  <body>
    <main>
      <div class="clock">
        <p class="value" id="hours"></p>
        <p class="value" id="minutes"></p>
        <div class="value seconds">
          <p id="suffix"></p>
          <p id="seconds"></p>
        </div>
      </div>
    </main>
    <script src="./scripts/index.js"></script>
  </body>
</html>
- I have added style and script in HTML.
Using Date object for getting time
- Creating date object
const date = new Date();
console.log(date);
- How the date object looks
- Getting hours, minutes, seconds
const date = new Date();
let hours = date.getHours();
let minutes = date.getMinutes();
let seconds = date.getSeconds();
console.log(`${hours}:${minutes}:${seconds}`);
-
But this time is staying constant and it is not updating. To update this we use
setInterval
setInterval(() => {
  const date = new Date();
  let hours = date.getHours();
  let minutes = date.getMinutes();
  let seconds = date.getSeconds();
  console.log(`${hours}:${minutes}:${seconds}`);
}, 1000);
We have the date now but we have to show it to normal users using DOM
- We to get elements from this HTML document
<main>
  <div class="clock">
    <p class="value" id="hours"></p>
    <p class="value" id="minutes"></p>
    <div class="value seconds">
      <p id="suffix"></p>
      <p id="seconds"></p>
    </div>
  </div>
</main>
- javascript code for getting each element
const hoursDisplay = document.getElementById('hours');
const minutesDisplay = document.getElementById('minutes');
const secondsDisplay = document.getElementById('seconds');
const suffix = document.getElementById('suffix');
-
Now, we can make changes to each element. Then let's add hours, minutes, seconds
- we should keep that in mind it should be within
setIntervalso that it keeps on updating
- we should keep that in mind it should be within
hoursDisplay.innerText = hours;
minutesDisplay.innerText = minutes;
secondsDisplay.innerText = seconds;
-
We will make sure that always two digital are visible. We will add leading zeros to single digits
- we create a function for that
function leadingZeros(num) {
  if (num < 10) {
    return '0' + num;
  }
  return num;
}
- use that function to modify our variables
hours = leadingZeros(hours);
minutes = leadingZeros(minutes);
seconds = leadingZeros(seconds);
-
We will make it a twelve it a twelve hours clock using two functions. One for converting 24-hour format to 12 hours format. One for setting suffixes like 'AM' or 'PM'.
- for deciding on suffix
function timeSuffix(hours) {
  if (hours < 12) {
    return 'AM';
  }
  return 'PM';
}
- for converting the format
function twelveHour(hours) {
  if (hours % 12 === 0) {
    return 12;
  }
  return hours % 12;
}
Final Javascript Code
const hoursDisplay = document.getElementById('hours');
const minutesDisplay = document.getElementById('minutes');
const secondsDisplay = document.getElementById('seconds');
const suffix = document.getElementById('suffix');

setInterval(() => {
  const date = new Date();
  let hours = date.getHours();
  let minutes = date.getMinutes();
  let seconds = date.getSeconds();

  suffix.innerText = timeSuffix(hours);

  hours = twelveHour(hours);

  hours = leadingZeros(hours);
  minutes = leadingZeros(minutes);
  seconds = leadingZeros(seconds);

  hoursDisplay.innerText = hours;
  minutesDisplay.innerText = minutes;
  secondsDisplay.innerText = seconds;
}, 1000);

function leadingZeros(num) {
  if (num < 10) {
    return '0' + num;
  }
  return num;
}

function timeSuffix(hours) {
  if (hours < 12) {
    return 'AM';
  }
  return 'PM';
}

function twelveHour(hours) {
  if (hours % 12 === 0) {
    return 12;
  }
  return hours % 12;
}
-
NOTE: order of using
timeSuffixandtwelveHourshould be correct.
Styling clock
- I have kept styling simple and easy.
- Yet there are some things that should be kept in mind that we should fix element size because it will change the shape constantly while updating time.
/* GLOBALS */
* {
  padding: 0;
  margin: 0;
}

/* FONTS */
@font-face {
  font-family: 'Orbitron';
  src: url('./../assets/fonts/Orbitron-Regular.ttf');
  font-weight: 400;
}

body {
  min-height: 100vh;
  display: flex;
  justify-content: center;
  align-items: center;
  font-family: 'Orbitron', sans-serif;
  color: black;
  background-color: rgb(235, 235, 235);
}

main {
  display: flex;
  flex-direction: column;
  gap: 15px;
}

.clock {
  width: 450px;
  display: flex;
  justify-content: space-between;
  font-size: 5rem;
}

.value {
  padding: 10px;
  width: 140px;
  text-align: end;
  border-radius: 5px;
  box-shadow: 0px 2px 4px black;
  background-color: rgb(252, 251, 251);
}

.seconds {
  width: 70px;
  display: flex;
  flex-direction: column;
  justify-content: space-between;
  align-items: flex-start;
}

.seconds p {
  font-size: 2rem;
}
Conclusion
It's a great project to learn how to handle time from a Date object in javascript. You can still refactor the code to make it look nice in javascript code. That I will do in the next blog where I make a stopwatch.
If you enjoyed it reading. If any changes you want comment. Please comment on this blog.


Top comments (5)
Good Work ❤
Here are few more things you can do.
Thank you for advice I will definitly add those things in this project.
My Pleasure :)
How do you do that?
If you like to see how to build an analog clock, see this post