In this tutorial, I will be showing you how you can deploy your telegram bot and keep it running 24/7 entirely for free.
For telegram bot development, there are generally 2 methods used: polling and webhooks. Many tutorials out there make use of polling using a NodeJS or Python server, that listens to any messages received by the bot. This means that in order to deploy it, we would need a server running 24/7 that keeps polling for updates. There aren’t many free options available to keep a server running (the most common one would be Heroku, but once the server sleeps, there isn’t a good way to get it up again to continue responding to messages)
Today, we will explore the options of webhooks. Setting a webhook for your telegram bot means that whenever your bot receives a new message, telegram will send that update to your pre-defined webhook endpoint. From our custom endpoint, we are then free to do whatever we want with this knowledge that our bot has received a message, and we can respond to it.
For example, when our bot receives a message from a user, telegram will send a POST request with a payload containing information about that message (the user, message text, time, etc) to our pre-defined endpoint. Our endpoint will receive that POST request with the payload, and with that, we can respond to the user.
But does this mean we will also need a server to accept these POST requests? Yes, but we do not need the server to be running 24/7. Instead, we will use serverless functions. There are many free serverless function options available: Cloudflare Workers, Vercel Serverless functions, etc.
In this tutorial, we will utilise Cloudflare Workers to create a POST endpoint which we will set up as our webhook for our Telegram bot.
Table of Contents:
- Creating a new Cloudflare Worker
- Setting webhooks for our Telegram bot
1. Creating a new Cloudflare Worker
- Navigate to dash.cloudflare.com and login (or sign up)
- On the sidebar, click on ‘Workers’
- Click on ‘Create a service’ to create your new worker
- Enter a name for your new worker and select the ‘HTTP handler’ as the starter, and click on ‘Create service’

- Once your service has been created, click on ‘Quick Edit’ to edit your worker directly in the browser

- Now, in your editor, you should be seeing the default code for a new Cloudflare worker.
addEventListener("fetch", event => {
  event.respondWith(handleRequest(event.request))
})
async function handleRequest(request) {
  return new Response("Hello world")
}
The logic of how we are going to handle the incoming request will be done in the handleRequest function.
At this point, it is good to know what is the payload that Telegram will be sending to us.
{
  "update_id": 1140,
  "message": {
    "message_id": 73,
    "from": {
      "id": "id of user",
      "is_bot": false,
      "first_name": "name of user",
      "username": "username of user",
      "language_code": "en"
    },
    "chat": {
      "id": id of chat,
      "first_name": "name of user",
      "username": "username of user",
      "type": "private"
    },
    "date": 1662102031,
    "text": "hi"
  }
}
From the payload, we are able to tell who the user is, what is the chat that the user is sending (important for group chats) and what is the message text. As a start, lets make our bot echo the user’s message, but add an ‘over’ at the end of the message.
async function handleRequest(request) {
  if (request.method === "POST") {
    const payload = await request.json()
    // Getting the POST request JSON payload
    if ('message' in payload) {
      // Checking if the payload comes from Telegram
      const chatId = payload.message.chat.id
      const text = payload.message.text + " over"
      const url = `https://api.telegram.org/bot${API_KEY}/sendMessage?chat_id=${chatId}&text=${text}`
      const data = await fetch(url).then(resp => resp.json())
      // Calling the API endpoint to send a telegram message
    }
  }
  return new Response("OK") // Doesn't really matter
}
In this code snippet, we check if the incoming request is a POST, and whether the payload contains the important information from Telegram. We get the chatId and text from the payload, and we generate a unique URL which we will call GET to, which will send a message via our bot programatically. One thing is still missing, which is the ${API_KEY}. This is where the bot API token will be substituted into, and we can set this value via the Cloudflare Workers settings.
- Go back to the your worker’s dashboard by clicking on ‘Save & Deploy’ and then exiting out of the editor.
- Under the settings panel, click on variables. Here you can set the environment variable for the worker.
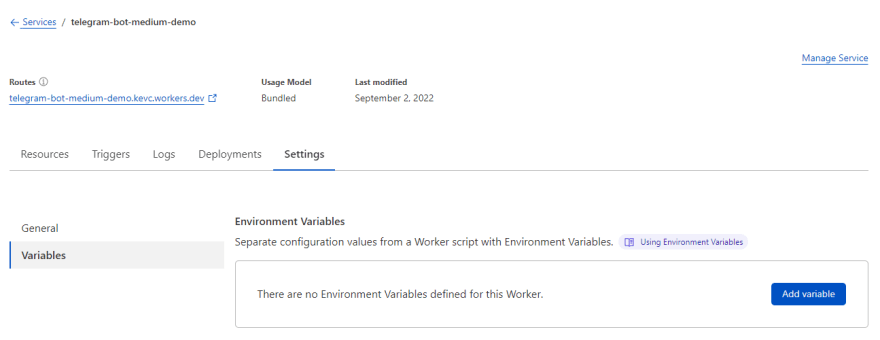
- Click on ‘Add variable’ and input the variable name as API_KEY and the value as the bot’s API token and save your settings.
2. Setting webhooks for our bot
Now, with our endpoint ready, all that is left to do is to set the webhook of our bot to our custom endpoint.
With our bot API token, and the URL of our new worker (which should be ending with workers.dev), substitute the values into this URL and simply copy and paste it into your browser and enter
https://api.telegram.org/bot<replace with bot api token>/setWebhook?url=<replace with our worker url>
If you see this as a response, you’re all set!
{"ok":true,"result":true,"description":"Webhook was set"}

Wasn’t that easy?
So now you have set up your telegram bot which is able to run 24/7 entirely for free! You can customise this code to make your bot do anything you want. In a future tutorial, I will be showing you how to use Cloudflare KV to setup a simple database for your bot, to retain user data and enhance the capabilites of your bot! It’s really simple too, so like this tutorial if you want to see more!

Top comments (1)
Ни икса не описан вызов отправки на бота
// Calling the API endpoint to send a telegram message
Дополни, пожалуйста, Кевин.