
What do React and Angular have in common besides being two of the biggest frontend web development frameworks/libraries out there?
They both are component-based!
In this article, we will create a simple frontend library that uses components with good old plain JavaScript. This may help us understand components a bit more and also sharpens our skills in plain JavaScript.
Prerequisites
Before we can dive into the JavaScript part of this article we need to set up our project structure. For that we create a new folder called component-library and some more subfolders and files:
$ mkdir component-library
$ cd ./component-library
$ mkdir lib style components
$ touch index.html index.js ./style/styles.css
Next up we need to fill out our HTML and CSS files like this:
<!DOCTYPE html>
<html lang="en">
<head>
  <meta charset="UTF-8">
  <meta name="viewport" content="width=device-width, initial-scale=1.0">
  <title>Document</title>
  <link rel="stylesheet" href="style/styles.css">
</head>
<body>
  <main id="app"></main>
  <script type="module" src="index.js"></script>
</body>
</html>
body {
  background-color: cornflowerblue
}

a {
  text-decoration: none;
  color: white;
}

.article {
  border: 1px solid cornflowerblue;
  margin: 0px 2px 5px 2px;
  padding: 10px 15px 15px 15px;
  background-color: white;
}
Now we are all set up and ready to write some JavaScript.
The library called Eszett
I like to start by pretending the library already exists. Because of that, the first thing we need to focus on is index.js.
At the very top of the file we need to import our library and then instantiate a new application:
// All our imports are here
import ß from ‘./lib/Eszett.js’;
// Initialize app
const app = new ß('app');
This code will throw an error because we did not export anything from our Eszett.js. In this file, we need a class called ß with a constructor that takes in a selector as a string and export it. So first of all we need to create a file like this:
$ touch ./lib/Eszett.js
The content of this file should look like this:
class ß {
  constructor(selector) {
    this.eszettElement = document.querySelector(`#${selector}`);
    console.log(‘Eszett initialized!’);
  }
}
export default ß;
If you run your application now we won’t get an error anymore and the text ‘Eszett initialized’ should appear in your browser’s console. But so far we don’t do that much with our code. Let’s change that by implementing the possibility to register components in our application.
Components
For this to work we need to implement two things:
a field to store all the registered components
a registerComponent method
First of we add the following line in the constructor right above the console.log:
this.components = {};
The plan is to register all the components in this field as key-value-pairs. To do that we need to add the following method below the constructor:
registerComponent(component {
  this.components[component.name] = component;
}
Now we can register components in our application. The registration will take place in the index.js right below the initialization of our app. Our first component will be a MenuComponent. This will be a two-step process, first, we import the component and then we register it after the initialization of the app.
After doing that our index.js should look like this:
// All our imports are here
import ß from ‘./lib/Eszett.js’;
import MenuComponent from ‘./components/MenuComponent.js’;
// Initialize app
const app = new ß(‘app’);
// Adding our Components to the App
app.registerComponent(MenuComponent)
At the moment our application will throw an error because we don’t have the MenuComponent yet, now we go ahead and create that by adding a new file like this:
$ touch ./components/MenuComponent.js
In this file, we will import our not yet existing Component.js, so that we can create a new component. After that, we need an HTML-Template and last but not least the component itself. This is how it should look like:
// Import statements
import Component from '../lib/Component.js';

// HTML-Template
const menuTemplate = (state) =>`
  <header>
    <h1>
      <a href="#/posts">${state.name}'s Blog</a>
    </h1>
  </header>
`;

// Component
const MenuComponent = new Component(
  'menu',
  {
    name: 'Jakob'
  },
  menuTemplate);

export default MenuComponent;
Let’s take a closer look at the HTML-Template first. It is a function that returns a template literal (template string) and gets the state of the component passed in as a parameter. In line 8 we see that this state gets used to dynamically render the name of the blog.
Taking a look at the component itself we see that it gets passed in three parameters. The first parameter is the name of the component itself, the second parameter is an object with a single attribute called name. This is the state object we pass on to our menuTemplate which is also our last parameter.
For all of this to work, we need to implement our component.js. First, we need to create a file like this:
$ touch ./lib/Component.js
The implementation of our component is straight forward. We need a constructor that takes in three parameters and we need a function that calls our HTML-Template-Function and returns its result. At the end it should look like this:
class Component {
  constructor(name, state, template) {
    this.name = name;
    this.state = state;
    this.template = template;
  }

  view() {
    return this.template(this.state);
  }
}

export default Component;
Now our page won’t show any error but it won’t display our MenuComponent either.
Rendering
We can create a component and register it in our application but we can’t display the components HTML. Before we tackle this problem I want to add a PostsComponent to our application so that we can render two components at the same time.
For that we need to register it like this:
// All our imports are here
import ß from './lib/Eszett.js';
import MenuComponent from './components/MenuComponent.js';
import PostsComponent from './components/PostsComponent.js';

// Initialize app
const app = new ß('app');

// Adding our Components to the App
app.registerComponent(MenuComponent);
app.registerComponent(PostsComponent);
Create it:
$ touch ./components/PostsComponent.js
And implement it like that:
import Component from '../lib/Component.js';

const postsTemplate = (state) => `
  ${state.posts.map(post => `
    <li>
      <div class="article">
        <h3>${post.title}</h3>
        <p>${post.text}</p>
      </div>
    </li>`).join('')}
`;

const PostsComponent = new Component(
  'posts',
  {
    posts: [{
      title: 'My first blog post',
      text: 'This is my first blog post EVER, its awesome!'
    },
    {
      title: 'Writing my own component library',
      text: 'In this article I want to share with you my experience on how to write a component library!'
    }],
  },
  postsTemplate
);

export default PostsComponent;
For the rendering to work we need to update the DOM by calling the view method of our components and inserting the returned HTML into the already defined eszettElement. The described behavior should be one method of our ß class and be called inside our registerComponent method. This is the final implementation of our class:
class ß {
  constructor(selector) {
    this.eszettElement = document.querySelector(`#${selector}`);
    this.components = {};
    console.log('Eszett initialized!');
  }

  registerComponent(component) {
    this.components[component.name] = component;
    this.updateView();
  }

  updateView() {
    if (this.components) {
      let mergedViews = '';
      Object.keys(this.components).forEach(key => {
        mergedViews += this.components[key].view()
      });
      this.eszettElement.innerHTML = mergedViews;
    }
  }
}

export default ß;
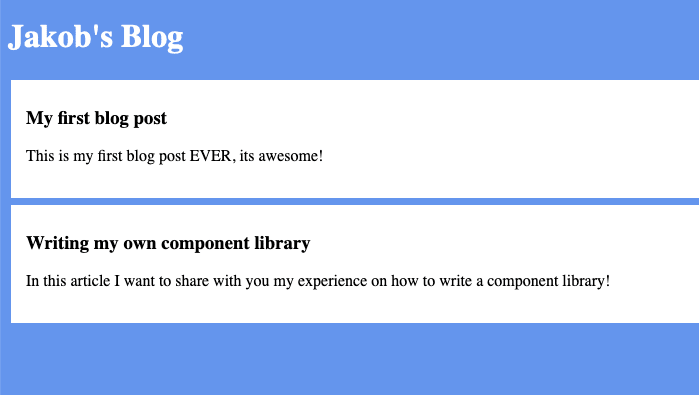
The updateView method first checks if there are any components registered. If that is the case it iterates over all the components and calls the view method of every single one of them. The returned HTML will be merged and set to the innerHTML of the eszettElement. If everything worked out your final page should look like this:
What could be next?
We just created our small library called Eszett. We can create components that contain isolated state and their own HTML-Templates. These components can be registered and rendered at the application level.
There are a few more features we could add. For example, a Router that displays certain components on certain routes or the possibility to nest a component inside another component and pass down the state.
Just try out adding new features to this to sharpen your JavaScript skill and while you are at it, have fun!
As always you can find the code for this project on my GitHub.

Top comments (0)