
🇧🇷 Caso prefira ler em outra língua, esse artigo foi publicado também em português. Clique AQUI para acessar!
Introduction
I don't know about you, but I don't handle changes well. An example of this was the departure of Charlie Sheen from the series Two and a Half Men… I'm not over it yet. So, in order to avoid creating trauma and nightmares with penguins, I will teach you how to install a Linux distro without having to delete the Windows already installed.
This process is called dualboot and basically consists of dividing the internal memory in one part with the OS already installed and another free part to install the other system and, when turning on the computer, you choose which one you want use.
Having dualboot on your PC means that you have 2 operating systems on it, but it doesn't necessarily have to be Windows and a Linux distro (it can be two Linux distros, two versions of Windows...). There is also multiboot where you could install more than 2 OSs on the same computer.
Do not worry! Only one of the operating systems runs at a time, so all of your computer's performance will be focused on the OS you choose when you start it up.
So grab a coffee mug, separate a 4 GB or more pen drive that can be erased and let's get down to business!
“Next, Next, Next”
There was a time when Linux distros were difficult to install or even unfriendly to the common user, with their use concentrated on people familiar with the world of technology.
As the penguin world became more known and stood out for privacy, security and speed, the potential of open-source software has grown infinitely in the eyes of many people.
And it was there that the hope for competition worthy of the Microsoft OS was ignited, thus giving rise to Ubuntu: a distro created and maintained by Canonical that opened many doors and hearts for the community.
Over time, other distros have also emerged with focus on being friendly and installation methods have been facilitated, installers have gained a graphical interface and the whole process has become intuitive.
Currently the process of installing some distros is so easy that it is basically a succession of clicks on the “Next” button… Does that sound familiar? 🙃
A family of distros
Something very common in the Linux world is a distro to use another as a base, as this saves time by not having to reinvent the wheel, allowing developers to focus on solving existing problems and creating new features.
This tends to create a “family” of distros that share the same base, having in common a large part of the inherited resources. Ubuntu is a beautiful example of this as it is based on Debian, inheriting its stable base but making shorter releases to deliver some news to its users faster.
Curiosity: Ubuntu has an “official family” called Ubuntu flavours.
Being part of a “family” is, in general, a good thing! Because solutions to some problems, system modifications and applications made for a particular distro can also work in other distros that have the same basis.
Linux Mint, I choose you!
In the Linux world, there is a sea of distro options with different interfaces and purposes. And, to continue with this article, I had to choose one from this great variety. This distro being one of the ones I used on a daily basis and that I can recommend to you.
Most distros have the installation process very similar to the one I chose, such as Ubuntu, KDE Neon, Manjaro, Pop! _OS and so on. But, as a guarantee, look for tutorials on the internet about the specific installation process of the distro you want to use, there is a lot of material out there (courtesy of our beloved community ❤️).
Linux Mint is one of the most recommended distros for anyone looking to migrate from Windows to the Linux world. This is due to the similarities that its main interface, Cinnamon, has with the Microsoft system.
But beware, Linux Mint is not just a pretty face! It is a powerful distro based on famous distros, inheriting almost all of its superpowers and qualities, but with new spices added to the recipe.
The varieties of mint
To clarify: I did not specify the distro that Linux Mint is based on purpose, as there are variants with different bases, write it down!
| Based on Ubuntu | Based on Debian |
|---|---|
| Linux Mint - Cinnamon | LMDE (Linux Mint Debian Edition) - Cinnamon |
| Linux Mint - MATE | |
| Linux Mint - Xfce |
Cinnamon, MATE and Xfce are the name of the interfaces that are installed by default in each variant.
Having download options with different different interfaces is a way of respecting the different tastes of users. But why a variant based on Debian? Simple, a little extra stability. Not to mention extended support.
LTS, not LTS and Rolling Release
By "extended support" I meant that the distro has a considerably longer period in which it will receive updates, without you having to update your distro's version (a deeper, time-consuming update that can cause bugs or incompatibilities). Distros that have this type of support are called LTS (Long-Term Support).
All versions of Linux Mint are LTS and based on a LTS version of Ubuntu, with 2 years of support each. However, the Debian-based variant is supported until shortly after its next release (which takes about 2-3 years).
Within the 2 year period, 4 new versions of Ubuntu are released, but only 1 of them is LTS. Within that same period new versions of Linux Mint are also released, all of them LTS and based on the last Ubuntu LTS released.
As such, non-LTS distros do not have a large update period, with support time around 9 months. Ubuntu, for example, launches an LTS distro and, every 6 months, launches a new version with reduced support time until completing the 2 year cycle for the new LTS.
There are still some distros that are Rolling Release which, as the name suggests, is not limited to these milestones and release versions, as they are in a constant development process. Arch Linux follows this model of updates, always delivering the latest to its users.
Women as inspiration
Numbers are so boring and lackluster that, in addition to the version number, each new release of Linux Mint is codenamed with a female name ending with the letter a. Just a curiosity to sweeten your day. 😉
Do you want to know more about it and have a look at the codenames used until today? Take a look at this 🇺🇸 It’s FOSS article and the Linux Mint page on 🇺🇸 Wikipedia.
Caution is never too much
First of all, it is important that you back up your files in case an error occurs during the Linux Mint installation process.
Take it easy, this is just a step to make sure you don't miss anything important, it doesn't mean there is a big error rate.
You can save your most important files to another HDD/SSD or upload them to sites like Google Drive, OneDrive and Dropbox.
Downloading the ISO
ISO is the format used to aggregate all information and files on a CD or DVD, as if it were a RAR or ZIP file. Think of .iso files as a virtual CD or DVD.
In your preferred browser, visit the 🇺🇸 Linux Mint website to download the distro installation file.

It has been some time since the developers of Linux Mint announced that they will update the project's website, but, as of the writing and publication of this article, this has not yet happened.
In the top menu of the website, click on "Download" (or just hover over it and click on "Linux Mint 20.1"). You will be taken to the page where you can choose from the most recent variants based on Ubuntu LTS.

If you have a Ryzen 5 or 7 processor go to the next topic!
A little further down the page you will find links to download the variants. The one we are going to install is Cinnamon!

Finally you will be taken to the page where you can download the ISO. I recommend downloading it via torrent or that you choose the mirror that is closest to you!
Mirror, in this case, is another server that contains the file we need, as a "reflection" of the original server. It is interesting to use a mirror closer for the download to occur faster, because the closer, the shorter the distance the data has to travel.
For you to download via torrent, it is necessary to have installed a program that supports this type of download such as Free Download Manager (#tip).

While the file downloads, take the opportunity to have a coffee, play with the pet and check on social networks because, depending on your connection, it may take a little while.
If your internet connection is really bad, you can leave it downloading overnight and program the download manager to shut down your PC as soon as it is over. 😜
Houston, we have a problem
The Kernel 5.4 LTS, which comes standard on Linux Mint 20.1, does not offer good support for Ryzen 5 and 7 processors (I believe they are only 3rd generation). So, in order not to affect the support of their standard ISOs, the development team made available a version of the Cinnamon variant with Kernel 5.8 (not LTS), which has better support for the mentioned processors.
To download this ISO, just in the "Download" menu click on "All versions", choose the version "20.1 Ulyssa" and access "Cinnamon (Edge, 64-bit)" or just click on this link. You will be taken to a downloads page very similar to the one we see above.
Creating a bootable pen drive
Creating a bootable pen drive is basically copying the files contained in the ISO to the USB device and giving it the ability to start from it when the computer is turned on.
You could also create a bootable CD or DVD with other methods.
Downloading Rufus
There are several software that are capable of creating a bootable pen drive, such as balenaEtcher, Universal USB Installer and YUMI. However, we will be using Rufus which is fast, powerful and has support for several languages. To do this, just click on this link to access the official Rufus page.

Note that in the upper right corner there is the option to change the language of the site, if you prefer.
Scrolling down the page you will arrive at the “Download” section where you can choose between the installable version and the portable version of Rufus. Download the one you prefer.

In the installable version, just run it and the program is quickly installed. Open Rufus and let's start making the settings to format the pen drive.

Formatting the pen drive
If you have not stuck your USB stick in your PC yet, the time has come! In the "Drive Properties" section, in the "Device" subsection, select your pen drive.
Remembering that the pen drive must have 4 GB or more of storage!
In the subsection "Boot Selection" click "SELECT" and look for the ISO you downloaded.
Now, in the subsection “Partition scheme”, you are shown two options: MBR and GTP. However, before we go any further, we need to talk a little bit about it.
Partition schemes are standards regarding how your data is stored in memory.
It turns out that the MBR (Master Boot Record) is the standard on older devices, usually those that came with Windows 8.1 or earlier. If your PC came with Windows 10, your partition scheme is probably GPT (GUID Partition Table), a newer and more powerful standard.
To be sure of the partition scheme your computer uses, enter the BIOS or UEFI (used on newer PCs) and look for an option that mentions UEFI.
UEFI (Unified Extensible Firmware Interface) is, in short, the younger brother of the BIOS, a replacement for it that has the ability to work with GPT partition systems.

Then choose between MBR and GPT according to what your computer supports. And, when choosing one of the two options, the field in the subsection “Target system” will be changed automatically, we do not need to modify it manually.
And ready! The basic settings are these. If you wish, in the “Formatting options” section, in the “Volume name” subsection, you can change the name that your pen drive will have when it is formatted.
Of course, if you are experienced with formatting, there are some advanced settings you can do.

Now, in the “Status” section, just click on the “START” button to start the process! If the following message appears, use the recommended option, just give an "OK"!
Basically the ISO we downloaded gives us 2 options to make the pen drive bootable: the ISO Image mode and the DD Image mode.
The ISO Image mode partitions and formats the thumb drive so that Windows can understand it and, after making the appropriate copies of the ISO content, give you access to the files on the thumb drive (either to modify any settings or access a document).
The DD Image mode, on the other hand, only creates an exact clone of the file we downloaded, without having to format or partition the pen drive, however, you will no longer be able to access the contents of the pen drive or your access to it will be very limited.

Now a warning message will appear informing you that the pen drive will be erased, just "OK" too.

Under no circumstances remove the pen drive from your computer before the process is finished or you have canceled it.
Wait until the progress bar is completely filled and ready!

Freeing up space for installing Linux Mint
The Linux Mint installer has a powerful built-in tool that is able to partition the memory however, we have to be aware of an astute villain called Disk Fragmentation.
Partitioning memory means separating spaces in storage so that each space is managed separately.
Imagine that your storage consists of several little boxes that hold the same amount of data and that these little boxes form several rows. When storing a file, your system will try to put its data in little boxes in sequence, but it may happen that it does not find the necessary number of little boxes in sequence for this or reach the end of a row. So the solution is to store the file data in little boxes that may not be in sequence.
Now think about the mess that writing and deleting multiple files can make! This is disk fragmentation. Therefore, it is advisable to use the Windows disk defragmentation tool to ease this mess.
It is also recommended to free up space for the distro by the Windows disk management tool, as the fragmentation mess cannot be completely undone, so the OS that caused it knows for sure how far it can free.
By disks I mean any type of storage, whether they are SSDs, HDDs, and so on.
Knowing this, let's take a look at this disk! But calm down that the process is simple. Among Windows programs, look for “Defragment and Optimize Drives”. In the window that opens, click on “Analyze”, wait for the analysis to complete and, finally, click on “Optimize”.

Now in the Windows search field, type "Create and format hard disk partitions" to open the Windows disk manager.
In the window that opens, right-click on the main partition (usually the disk (C:)) and select the "Shrink Volume" option.

An analysis will be made by the system of how much memory it can free without affecting its files and its functioning. In the window that opens, the only editable field comes with the maximum amount of memory that you can free up in MegaBytes.
There is no minimum space standard for a distro, some require more space and some do not. Some like Deepin do not allow to be installed in a storage smaller than 64GB. This version of the Linux Mint we downloaded requires only 12.1 GB to install.

The space you must leave for the distro depends on what you intend to do. If you are going to use it lightly and download a few apps and files, I think 64 GB is enough. In case you want to make a more intensive use, it might be interesting to think about making available 240 GB or more.
However, if you free up less space than Linux Mint needs (12.1 GB), the option "Install Linux Mint alongside Windows 10" does not appear.

In this case, I will only leave a space around 15GB, as this installation will be used only for this article.
Tip: Choose the number of GigaBytes you want to separate and multiply by 1024 (value of 1 GB in MB), you will have the value in MegaBytes!
Now that you have entered the MegaBytes value that will be made available to the distro, just click on "Shrink"! It may take a few seconds to finish and after that, the free space will appear as “Unallocated”.

An unallocated space is a space that exists, it is available for use, however, before using it, it is necessary to format it.
If you just want to test the distro I recommend that, instead of dualboot, test it via Live Mode or on a Virtual Machine.
Changing the boot priority
In this step we are going to inform the computer that we want it to look for the OS first, not on the HD or SSD, but on the bootable flash drive that we just created. With the stick on the computer, restart the system. When the machine starts to restart, press the assigned key to enter the BIOS or UEFI a few times.
This key may vary between manufacturers and their models, search Google "how to access bios/uefi samsung notebook, model np123xyz" or something similar.

On the BIOS/UEFI screen, look for the “Boot” section.

If your computer came from the factory with Windows 8.1 or earlier, you may have to disable “Secure Boot Control”. If you have difficulties I recommend taking a look at this article.
In case you want to know the reason for this I found a very didactic explanation in Techlog360.
Click on the “Boot priority” option and put the pen drive/USB device as the first option.

Now save your changes and restart the machine!
Booting from pen drive
If you chose the GPT partition system even though your computer does not support it, an error message similar to this one will be presented to you.

However, if you have chosen the MBR partition system, but your computer is newer and came with UEFI as standard, no error will be presented to you and you will be able to proceed with the installation normally however, when the PC is restarted, it will probably boot directly on Windows (it will not give you the menu to choose which OS you want to use).
If the steps were followed correctly, when restarting the computer you should be presented with a screen similar to the following:
Probably the screen that will appear to you will be a little more "rustic", say, boiling down to a black screen and white letters. But don't despair, in any case it is choosing the first option that we start Linux Mint.

Just select the first option to proceed, then the Linux Mint will be loaded, taking you to its home screen.
Live Mode

Note that no installation window has been opened, but that there is a CD/DVD icon on the Desktop for you to open the installer. This is because of a feature that many distros have: Live Mode. You are using a complete Linux system from your pen drive.
But this has its drawbacks… For example: the space for installing applications is limited to the free space of your pen drive and, when restarting, all changes made are lost.
Feel free to explore and make sure you want to continue, as the only changes we've made so far have been changing the boot priority (something that doesn't even have to be undone because, seeing that there is no plugged-in flash drive, the PC skips to the next storage unit) and frees up memory for the distro (which can be easily undone by going to the disk manager, right-clicking on the storage that has been downsized, and clicking “Extend Volume”).
You could also test Linux distros through a Virtual Machine… But that is the subject of another article! But if you want to learn soon I recommend watching the videos 🇧🇷 Máquinas Virtuais de forma SIMPLES - GNOME Boxes, 🇧🇷 Esqueça o VirtualBox! Conheça o Virt Manager! and 🇧🇷 VirtualBox - Testando sistemas operacionais SEM FORMATAR!.
Beginning of installation
If you got here it is because your determination has no limits, my dear penguin brother. It's time to start (finally) the installation process! Double-click the CD / DVD icon on the Desktop to open the installer.
On the first screen that appears, choose the language in which you want to have your Linux Mint (you can change it later, if you wish), the installer's language will be changed to the chosen one as well. Click the "Continue" button.

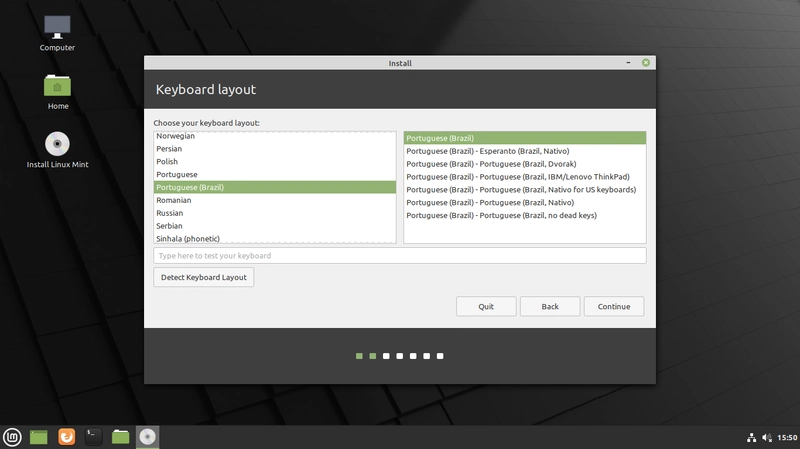
On the screen that follows choose the layout of your keyboard or the one you want to use. Click the "Continue" button.
On this screen, it is not mandatory, but I recommend installing the codecs that he suggests so that there are no problems in the reproduction of some media. Click the "Continue" button.
Codec is the acronym for encoder/decoder. In this case, it is software that understands some media formats.

You should now have reached the following screen:

If you check the second option, the Linux Mint installer will erase all files and Windows from storage to install the distro.
In the third option, it is possible to make advanced configurations in partitioning (subject for a future article!).
But let's use the first option: the installer has already intelligently detected that it has a unallocated space (the space that we released) and will install Linux Mint on it.
Now just click on “Install now” and, in the window that opens, click on “Continue”.
In this window, the changes that will be made to the unallocated space are informed: it will be divided in two, the first partition being responsible for keeping the boot information and the second the OS itself.

On the next screen, choose your time zone reference location (just click on the map or type the name of the city).

Now, enter the information as you wish and choose a strong password to protect your account. I won't do that, but if you wanted a little more security, you can check the option "Encrypt my home folder".

Now just proceed to the installation to finally begin! A green bar fills as the process progresses and some information about what is happening is written above it. Slides with information about Linux Mint will run during installation, feel free to read.

If you want more detailed information about what is happening, just click on the triangle next to the progress bar.

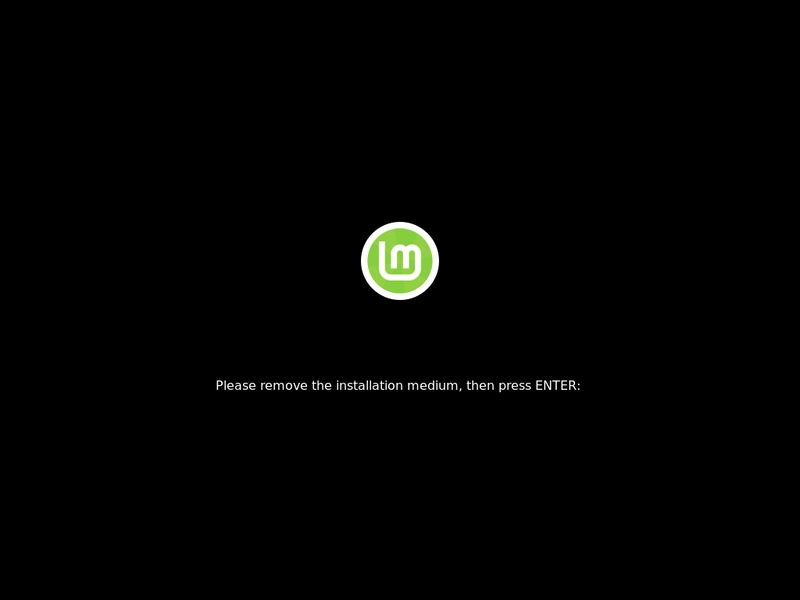
Finally, this window will open indicating that the installation is finished and that you can now restart your computer to enjoy your new operating system!

As soon as you click to restart, a screen will appear before the system shuts down, indicating that you can now remove the pen drive from the computer.
When restarting the computer, you will be presented with a menu (probably much more beautiful than the one below) where you can choose between Linux Mint and Windows 10, just choose with the arrow keys and press "Enter". If it takes more than 10 seconds to switch to Windows 10 the first option in the menu will start by default.
The name of this menu is GRUB (GRand Unified Bootloader), a software that gives the user the option of starting one of the installed systems or accessing some advanced options for distros that are installed.
My GRUB is more "ugly" because I am using a Virtual Machine to have better images for you.

It's time to login for the first time!

Now it's official, welcome to the Linux world! When you log in for the first time, the “Welcome” application will start so you can stay on top of the basic features of the distro and make your first settings. So that this application does not open every time you sign in to Linux Mint, just uncheck the checkbox “Show this dialog at startup”.

Take a good look at this application, so you will feel more comfortable in the system.
Sharing files between Windows and Linux
Interestingly, Windows cannot even find the folders for any Linux distro installed on the same computer. However, distros can access Windows files without a problem. So, you could either create a separate memory space just to be a shared files space between the two OSs or just leave the files you need in Windows storage.
Microsoft has promised that in future updates Windows will be able to access the distros folders installed on the same PC.
Your life with a taste of mint
Now it's your duty to explore and learn about this new land, penguin soldier! There are a lot of tutorials and courses out there for you to study... just avoid changing the system files without you knowing what you are doing that everything will be fine.
Knowledge is power
My intention was not just to make a quick tutorial, but to try to ensure that you understand the whole process so that you are not afraid to try. We must not abhor the unknown, we must seek a way to understand, know and learn from it.
Feedback!
This article was initially written in Portuguese, so if you find any inconsistencies in the text, please let me know!
Feel free to say what you think of this article, ask questions, point out a topic that was not very well explained or that needed to be talked about, suggest other topics and complement what has already been said. To the next!
References and recommendations
🇧🇷 Curso de Linux - Curso em Vídeo - YouTube
🇺🇸 Curious Case Of Linux Distribution Code Names - It’s FOSS

Top comments (0)