There are only a few examples of how to write web apps in Reason/rescript yet so I'd like to make my small contribution here. I'm going to show you how to implement a calendar component in ReasonReact from scratch, starting from setup the empty project and finishing on a simple calendar component that:
- Displays the current month initially
- Contains the navigation allowing to switch between months
- Is configurable (allows to set the first day of the week)
- Supports internationalization
- Looks nice
The plan is to build the component using the following dependencies:
- date-fns, to make all the calculations and display names of days and months in the selected language
- tailwindcss, to make the component looking good
Let's start!

Setup the empty project
I'm new in the Reason ecosystem, but I have a lot of experience in JavaScript and React development, so to feel more confident, I'm going to start a new create-react-app application and just add Reason to it.
yarn create react-app reason-calendar
cd reason-calendar
More about how to create an empty app using create-react-app you can find here: https://create-react-app.dev/docs/getting-started/#yarn
Now let's remove all generated files, we don't need them:
cd src
rm App.css App.js App.test.js setupTests.js logo.svg index.css serviceWorker.js
Now open the index.js file and make it as simple as possible:
import React from 'react';
import ReactDOM from 'react-dom';

ReactDOM.render(
  <React.StrictMode>
    <div>Hello Reason</div>
  </React.StrictMode>,
  document.getElementById('root')
);
Run yarn start in the terminal to check if it's working.
Now it's time to set up ReasonReact. Again, nothing fancy here, I just suggest doing exactly the same what the ReasonReact docs ask you to do here.
cd .. # go to the root directory of your project
yarn add bs-platform --dev --exact
yarn add reason-react --exact
…and update the package.json:
"scripts": {
  "re:build": "bsb -make-world -clean-world",
  "re:watch": "bsb -make-world -clean-world -w"
}
…and create the bsconfig.json:
{
  "name": "reason-calendar",
  "reason": { "react-jsx": 3 },
  "bsc-flags": ["-bs-super-errors"],
  "sources": [
    {
      "dir": "src",
      "subdirs": true
    }
  ],
  "package-specs": [
    {
      "module": "es6",
      "in-source": true
    }
  ],
  "suffix": ".bs.js",
  "namespace": true,
  "bs-dependencies": [
    "reason-react"
  ],
  "ppx-flags": [],
  "refmt": 3
}
And that's actually it. You can check the repo here:
git clone git@github.com:luski/reason-calendar-tutorial.git --branch step-1
What we will make
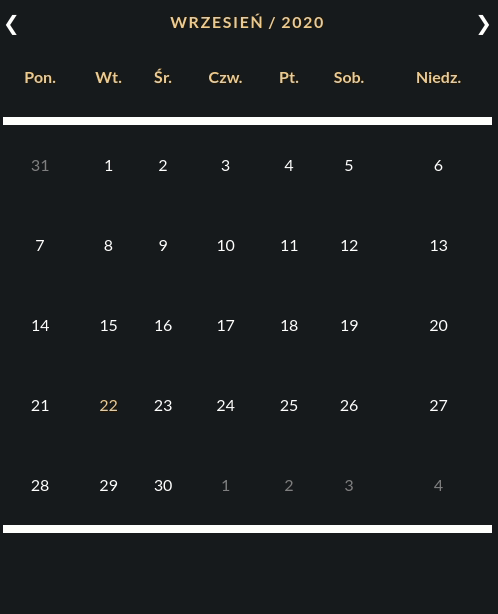
I believe it's high time to define what exactly we are going to implement. The following image shows a calendar from one of the mockups that I was supposed to implement the other day. Let's use it and try to implement it:
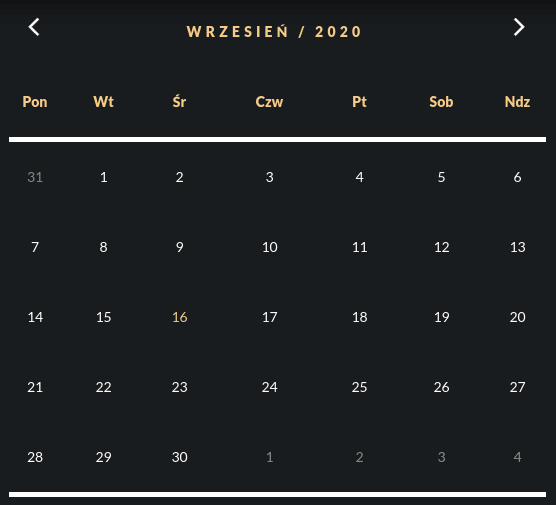
As you can see, the component presents a month view. It's in polish, but no worries, we are going to support internationalization. As you can see, in the header we have arrows for switching between months and the MONTH/YEAR header.
Below, there is a list of days of a week and in the middle - day numbers. The current day has an accent color and days not belonging to the currently rendered month are grayed out.
The plan
Let's start by splitting the task into subtasks. Here's my proposal:
- Make a UI with dummy data
- Implement the logic
- Style the UI with tailwindcss
UI with dummy data
Let's start with the dummy data. It would help us with defining the data structure. The simplest what comes to my mind is to define two functions: one returning a list of day names (for displaying the header row) and another returning a list of lists of days with metadata (for displaying weeks). Here's the code:
/* MockData.re */
type dayOfMonth = {
  number: int,
  isToday: bool,
  isForeign: bool,
};

let daysOfMonth = [|
  [|
    {number: 31, isToday: false, isForeign: true},
    {number: 1, isToday: false, isForeign: false},
    {number: 2, isToday: false, isForeign: false},
    {number: 3, isToday: false, isForeign: false},
    {number: 4, isToday: false, isForeign: false},
    {number: 5, isToday: false, isForeign: false},
    {number: 6, isToday: false, isForeign: false},
  |],
  [|
    {number: 7, isToday: false, isForeign: false},
    {number: 8, isToday: false, isForeign: false},
    {number: 9, isToday: false, isForeign: false},
    {number: 10, isToday: false, isForeign: false},
    {number: 11, isToday: true, isForeign: false},
    {number: 12, isToday: false, isForeign: false},
    {number: 13, isToday: false, isForeign: false},
  |],
  [|
    {number: 14, isToday: false, isForeign: false},
    {number: 15, isToday: false, isForeign: false},
    {number: 16, isToday: false, isForeign: false},
    {number: 17, isToday: false, isForeign: false},
    {number: 18, isToday: false, isForeign: false},
    {number: 19, isToday: false, isForeign: false},
    {number: 20, isToday: false, isForeign: false},
  |],
  [|
    {number: 21, isToday: false, isForeign: false},
    {number: 22, isToday: false, isForeign: false},
    {number: 23, isToday: false, isForeign: false},
    {number: 24, isToday: false, isForeign: false},
    {number: 25, isToday: false, isForeign: false},
    {number: 26, isToday: false, isForeign: false},
    {number: 27, isToday: false, isForeign: false},
  |],
  [|
    {number: 28, isToday: false, isForeign: false},
    {number: 29, isToday: false, isForeign: false},
    {number: 30, isToday: false, isForeign: false},
    {number: 31, isToday: false, isForeign: false},
    {number: 1, isToday: false, isForeign: true},
    {number: 2, isToday: false, isForeign: true},
    {number: 3, isToday: false, isForeign: true},
  |],
|];

let daysOfWeek = [|"sun", "mon", "tue", "wed", "thu", "fri", "sat"|];
/* CalendarView.re */
let daysOfWeek = () => MockData.daysOfWeek;
let daysOfMonth = () => MockData.daysOfMonth;

[@react.component]
let make = () => {
  <div>
    // Here goes the calendar UI
  </div>;
};
Such a data structure allows us to build the UI very straightforward. The calendar is a table with a header and rows for each week. Besides, above the table we have a row with arrows and MONTH/YEAR title. Here's how I implemented it. It's rather self-explanatory, looks almost like a pure React.
/* CalendarView.re */
[@react.component]
let make = () => {
  <div>
    <button> {React.string("<")} </button>
    <span> {React.string("September / 2020")} </span>
    <button> {React.string(">")} </button>
    <table>
      <thead>
        <tr>
          {daysOfWeek()
           ->Belt.Array.map((day: string) =>
               <th key=day> {React.string(day)} </th>
             )
           ->React.array}
        </tr>
      </thead>
      <tbody>
        {daysOfMonth()
         ->Belt.Array.mapWithIndex((weekNumber, days) =>
             <tr key={string_of_int(weekNumber)}>
               {days
                ->Belt.Array.map(({number, isToday, isForeign}) =>
                    <td key={string_of_int(number)}>
                      {number->string_of_int->React.string}
                    </td>
                  )
                ->React.array}
             </tr>
           )
         ->React.array}
      </tbody>
    </table>
  </div>;
};
Now we can add our sketch to the main app to see how it looks. Open the index.js and import the component:
import React from "react";
import ReactDOM from "react-dom";
import { make as Calendar } from "./CalendarView.bs";

ReactDOM.render(
  <React.StrictMode>
    <div>
      <Calendar />
    </div>
  </React.StrictMode>,
  document.getElementById("root")
);
As the listing shows, importing the ReasonReact components to JS code is almost as simple as importing React components. We must only remember that they are visible as make field.
Here's the result:
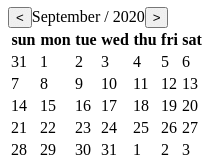
Repo for this step:
git clone git@github.com:luski/reason-calendar-tutorial.git --branch step-2
Logic implementation
Let's make it work. We are going to use the date-fns, so first, we need to add it to the project:
yarn add date-fns
Also, we need to bind this library. There are at least two binding libraries, but none of them fully worked for me, so let's just bind the functions that we need. I'd suggest starting with the JS version of the code and later transform it into Reason. Actually this is how the docs recommend doing.
import {format, addDays, startOfWeek} from 'date-fns';

const daysOfWeek = () => {
  const days = [0, 1, 2, 3, 4, 5, 6];
  const firstDayOfWeek = startOfWeek(new Date());

  return days.map(
    dayNumber => format(addDays(firstDayOfWeek, dayNumber), 'EE')
  );
}
The above function returns a list of day names starting from the first day of a week, it would be (for english): ['Sun', 'Mon', 'Tue', 'Wed', 'Thu', 'Fri', 'Sat'].
So first we need to bind the format, addDays, and startOfWeek from date-fns:
module DateFns = {
  type date = Js.Date.t;

  [@bs.module "date-fns"] external format: (date, string) => string = "format";
  [@bs.module "date-fns"] external addDays: (date, int) => date = "addDays";
  [@bs.module "date-fns"] external startOfWeek: date => date = "startOfWeek";
};
And implementation, pretty similar to the JS version, isn't it?
let daysOfWeek = () => {
  open DateFns;
  open Belt.Array;

  let days = [|0, 1, 2, 3, 4, 5, 6|];
  let firstDayOfWeek = startOfWeek(Js.Date.make());

  days->map(dayNumber =>
    firstDayOfWeek->addDays(dayNumber)->format(_, "EE")
  );
};
And finally, we can solve the main challenge of the task - implement a function generating weeks of the selected month. Again, let's start with the JS implementation:
import {startOfWeek, startOfMonth, addDays, isSameDay} from 'date-fns';

function daysOfMonth(date) {
  // first day that appears in the month view.
  // It's a first day of the first week of the month.
  const firstDayOfWeek = startOfWeek(startOfMonth(date));

  return generateWeeks(date.getMonth(), firstDayOfWeek, []);
}

function generateWeeks(monthNum, firstDayOfWeek, weeksAccumulator) {
  const week = [0, 1, 2, 3, 4, 5, 6]  // days of week
    .map(dayNumber => addDays(firstDayOfWeek, dayNumber)) // days of week transformed into dates
    .map(date => createDateOfWeek(monthNumber, date)); // dates transformed into dayOfWeek objects

  if (week[6].isForeign) {
     // last generated day is not belonging to the current month so we stop the recursion
    return [...weeksAccumulator, week];
  } else {
    // otherwise we generate next week
    return generateWeeks(monthNum, addDays(firstDayOfWeek, 7), [...weeksAccumulator, week]);
  }
}

function createDateOfWeek(monthNumber, date) {
  return {
    number: date.getDate(),
    isToday: isSameDay(date, new Date()),
    isForeign: date.getMonth() === monthNumber
  };
}
The code can look a bit unusual for a JS programmer because instead of a simple loop I used recurrency. I think it's a more natural way of executing loop in functional programming because we don't need any temporal mutable variables.
The first function, daysOfMonth takes some date and generates an array of month weeks represented as an array of objects defined in MockData.re - dayOfMonth. I hope the code is self-explanatory and doesn't need any additional comments. So let's change it to Reason.
First, we need to update our bindings:
module DateFns = {
  type date = Js.Date.t;

  [@bs.module "date-fns"] external format: (date, string) => string = "format";
  [@bs.module "date-fns"] external addDays: (date, int) => date = "addDays";
  [@bs.module "date-fns"]
  external addMonths: (date, int) => date = "addMonths";
  [@bs.module "date-fns"] external startOfWeek: date => date = "startOfWeek";
  [@bs.module "date-fns"] external startOfMonth: date => date = "startOfMonth";
  [@bs.module "date-fns"] external isSameDay: (date, date) => bool = "isSameDay";
};
Next, we just rewrite the code:
type dayOfMonth = {
  number: int,
  isToday: bool,
  isForeign: bool,
};

let daysOfWeek = () => {
  open DateFns;
  open Belt.Array;

  let days = [|0, 1, 2, 3, 4, 5, 6|];
  let firstDayOfWeek = startOfWeek(Js.Date.make());

  days->map(dayNumber =>
    firstDayOfWeek->addDays(dayNumber)->format("EE")
  );
};

let createDateOfWeek = (monthNumber, date) => {
  number: Js.Date.getDate(date)->int_of_float,
  isToday: DateFns.isSameDay(date, Js.Date.make()),
  isForeign: Js.Date.getMonth(date) !== monthNumber,
};

let rec generateWeeks = (monthNum, startingDay, weeks) => {
  open Belt.Array;
  open DateFns;

  let week =
    [|0, 1, 2, 3, 4, 5, 6|]
    ->map(addDays(startingDay))
    ->map(createDateOfWeek(monthNum));

  if (!getUnsafe(week, 6).isForeign) {
    generateWeeks(
      monthNum,
      startingDay->addDays(7),
      concat(weeks, [|week|]),
    );
  } else {
    concat(weeks, [|week|]);
  };
};

let daysOfMonth = date => {
  open DateFns;

  let firstDayOfWeek = date->startOfMonth->startOfWeek;
  generateWeeks(Js.Date.getMonth(date), firstDayOfWeek, [||]);
};
Notice I moved the type declaration from MockData.re to CalendarView.re because we just implemented all functions from the MockData.re and now we can delete this file 🎉
Notice also that the generateWeeks function has the rec keyword. Recursive functions must be marked with this keyword.
And here are the fruits of our work:
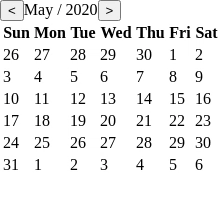
The full code of this step:
git clone git@github.com:luski/reason-calendar-tutorial.git --branch step-3
Internationalization support
By internationalization of the Calendar, I mean adding support for other languages than english and configuring the starting day of the week because in many countries Monday is the starting day.
Luckily date-fns provides all these features, we only need to use them.
The format function from date-fns takes as optional argument the configuration object. This object can contain field named locale and it is used to display results of the function is the desired language. Here's how to do it in JavaScript:
import pl from 'date-fns/locale/pl';
import {format} from 'date-fns';

///...

const polishText = format(new Date(), 'EE', {locale: pl});
If we want to mark a different day than Sunday as the first day of a week, we need to pass an extra configuration object to function startOfWeek. Again, here's how to do it in JavaScript:
import {startOfWeek, startOfMonth} from 'date-fns';

const lastMonday = startOfWeek(new Date(), {weekStartsOn: 1});
Let's change our code!
First, the bindings. We need to use a locale object of unknown type (it's not really unknown, but we don't care what's inside). We can get instances of this type by importing them from date-fns/locale package. Let's then introduce a new module inside DateFns and name it Locale. For convenience let's add two instances of Locale inside, for instance en-US and pl:
module DateFns = {
  // ...
  module Locale = {
    type t;
    [@bs.module "date-fns/locale/pl"] external pl: t = "default";
    [@bs.module "date-fns/locale/en-US"] external en: t = "default";
  };

  type formatOptions = {locale: Locale.t};

  [@bs.module "date-fns"]
  external format: (date, string, formatOptions) => string = "format";
  // ...
};
What is worth to mention, I defined type t inside the Locale module. The name is taken by the convention. Usually, modules representing a type have this type defined inside and its name is t. As you noticed, this type is only a declaration, we don't know what is inside! It's fine because this type reprensents an object imported from date-fns, we don't care what's inside since we use it only to pass it to external functions. Reason doesn't care as well what's inside so we won't get any compilation errors there.
But we will see a compilation error anyway, because we added the second argument to the format function and we didn't change calls of that function yet, so let's do it now!
I'd like to allow external users of the Calendar to specify the location and if they don't do it, I'd use the 'us-US' as default. So first, we need to add an optional property to the component:
[@react.component]
let make = (~locale=?) => {
  let localeValue = Belt.Option.getWithDefault(locale, DateFns.Locale.en);
 //... rest of implementation
And now, having the localeValue inside the component we only need to pass it to all occurrences of the DateFns.format, for example here's the changed daysOfWeek:
let daysOfWeek = (locale) => {
  open DateFns;
  open Belt.Array;

  let days = [|0, 1, 2, 3, 4, 5, 6|];
  let firstDayOfWeek =
    startOfWeek(Js.Date.make());

  days->map(dayNumber =>
    firstDayOfWeek->addDays(dayNumber)->format("EE", {locale: locale})
  );
};
The same process must be done with the starting day of week. First, bindings:
module DateFns = {
  // ...
  type weekStartsOnOptions = {weekStartsOn: int};

  external startOfWeek: (date, weekStartsOnOptions) => date = "startOfWeek";
  // ...
};
Next, let's introduce another optional property to the component:
[@react.component]
let make = (~locale=?, ~weekStartsOn=?) => {
  // ...
  let weekStartsOnValue = Belt.Option.getWithDefault(weekStartsOn, 0);

// ...
Finally, let's pass weekStartOnValue to functions using startOfWeek.
Voilà, the component is ready. To test it, we must pass the custom configuration in index.js:
import React from "react";
import ReactDOM from "react-dom";
import { pl } from "date-fns/locale";

import { make as Calendar } from "./CalendarView.bs";

ReactDOM.render(
  <React.StrictMode>
    <div>
      <Calendar locale={pl} weekStartsOn={1} />
    </div>
  </React.StrictMode>,
  document.getElementById("root")
);
Here's how it works:

You can check the code here:
git clone git@github.com:luski/reason-calendar-tutorial.git --branch step-4
Styling with tailwindcss
Add tailwind to your project
Regardless of whether we write the app in React or ReasonReact, the final output is a plain javascript code. When we realize that, it becomes clear that using any external tools working with React will work also with ReasonReact. Therefore, to integrate tailwindcss with our project we just need to follow the guide on tailwincss.
Let's then do what the getting started page suggests doing:
-
install the dependencies
yarn add --dev tailwindcss postcss-cli -
create the base css file, name it (for instance)
tailwind.cssand store in/src/stylesfolder:
tailwind.css:
@tailwind base; @tailwind components; @tailwind utilities; -
create the configuration file
tailwind.config.js
npx tailwindcss init -
create scripts for building styles in
package.json
"scripts": { "build:css": "postcss src/styles/tailwind.css -o src/styles/style.css", "watch:css": "postcss src/styles/tailwind.css -o src/styles/style.css -w" } -
create
postcss.config.jsfile:
module.exports = {
 plugins: [require("tailwindcss"), require("autoprefixer")],
};
Now if you run yarn run build:css the app.css file will appear in /src/styles. It will be build from tailwind.css using configuration from tailwind.config.js. If you run yarn run watch:css the app.css will be rebuilt every time when you change something in the app.css.
So let's call yarn run build:css to create the styles/style.css and include this file in the main file of the app: index.js:
import "./styles/style.css";
Configure
To make the calendar look like on the graphics, we need to add the right color palette and the right font to the tailwind. Here's the updated tailwind.config.js:
module.exports = {
  theme: {
    fontFamily: {
      lato: "Lato, sans-serif",
    },
    colors: {
      black: "#000000",
      white: "#FFFFFF",
      yellow: "#f2cb80",
      gray: {
        100: "#191c1e",
        900: "#808182"
      },
    }
  },
}
There is a lot of ways of adding the font to the project. I decided to add the link tag to the header of the index.html file:
    <link
      href="https://fonts.googleapis.com/css2?family=Lato:wght@400;700;900&display=swap"
      rel="stylesheet"
    />
Now we are all good and can finally do the coding 😁
Using tailwind
Using tailwind is not rocket science, we're just adding classes to elements. Instead of printing my all changes, that you can find in the repo, I'd like to give you several tips that I used in this project.
VSCode plugin for tailwind
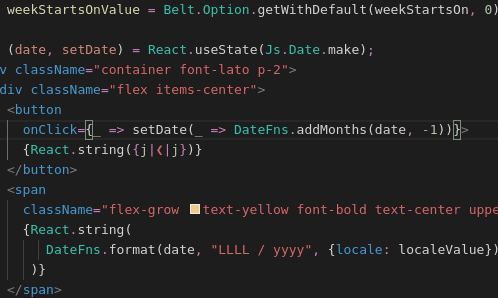
If you're using VSCode, I strongly suggest installing the tailwind intellisense plugin. Look how nice it works:
re-classnames library
I deliberately ignored the isForeign and isToday flags that can be found in our data model. It's because those flags are used only to change the decoration of the calendar days and now it's high time for handling it.
According to the graphics design, the regular days should be white, foreign days – gray, and today – yellow. In other words, the regular days get the class name text-white, foreign: text-gray-900, today: text-yellow.
For setting classnames dependent on some state I like using the re-classnames utility - similarly like I use classnames utility in JavaScript.
So let's add the library:
yarn add re-classnames
We must also add it to the bsconfig.json to make it visible by Reason:
"bs-dependencies": [
  "reason-react",
  "re-classnames"
],
And here's how to implement the coloring of days with this library:
<td
  key={string_of_int(number)}
  className=Cn.(
      "text-white"->on(!isToday && !isForeign)
    + "text-yellow"->on(isToday)
    + "text-gray-900"->on(isForeign)
  )>
  {number->string_of_int->React.string}
</td>
You'll probably notice the warning 44. The re-classnames docs suggest to turn it off, so let's do it by adding the following text to bsconfig.json:
"warnings": {
  "number": "-44"
}
Well, that's all that I wanted to share regarding the tailwindcss. Here's the repo of the complete solution of our task:
git clone git@github.com:luski/reason-calendar-tutorial.git --branch step-5
And look at the demo. Looks good, doesn't it?
Summary
I've written this post because I'm learning rescript and the calendar component was a widget that I really had to implement. I learned a couple of new things during the implementation so I decided to share my knowledge hoping that it can be helpful for other newcomers.
I just realized that the implementation of this small widget covers a lot of rescript and ReasonReact crucial elements. We learned how to:
- Write functional React components with internal state and optional parameters
- Import ReasonReact components to JS code
- Interop with JS libraries - by using
date-fns - Write recursive functions
- Set up a new project from scratch
- And maybe other things that I don't remember now? 😉
It was my first blog post, so please let me know what you think about it and share it if you think it's somehow valuable.

Top comments (1)
Thanks for putting this together, really appreciated and useful.