💡 Hey Clouder Devs! ⚡
Hope your LocalStack is up and running ⚙️, and may your Docker container always be healthy 🐳!
💾 All code, docs, and resources are available in my GitHub repository:
 madhurimarawat
/
Cloud-Computing
madhurimarawat
/
Cloud-Computing
This repository focuses on cloud computing and demonstrates how to set up virtual machines, S3, and other services using LocalStack. It provides a comprehensive guide to simulating AWS services locally for development and testing purposes.
Cloud-Computing
This repository focuses on cloud computing and demonstrates how to set up virtual machines, S3, and other services using LocalStack. It provides a comprehensive guide to simulating AWS services locally for development and testing purposes.


Tools and Technologies ⚙️💻
1. AWS CLI
AWS Command Line Interface (CLI) is a powerful tool that allows users to interact with AWS services directly from the terminal. It simplifies managing cloud resources by providing commands for a wide range of AWS services, enabling tasks such as provisioning, managing, and automating workflows with ease.
2. LocalStack
LocalStack is a fully functional, local testing environment for AWS services. It enables developers to simulate AWS services on their local machines, facilitating the development and testing of cloud-based applications without needing access to an actual AWS account.
3. Docker
Docker is a containerization platform that allows developers to build, share, and run applications in isolated environments called…
In the last article:

We learned how to set up LocalStack. Now, let’s learn how to create a VM in it.
🖥️ Let's Get Started!
First, let's understand what a Virtual Machine (VM) is.
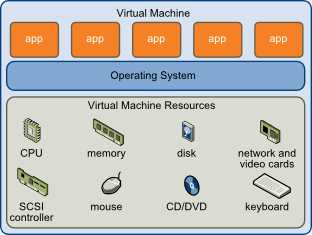
Virtual Machine
A virtual machine (VM) is a software-based emulation of a physical computer that runs an operating system and applications just like a physical machine. It operates in an isolated environment, using allocated resources such as CPU, memory, and storage from the host system. VMs are widely used in cloud computing to create scalable, on-demand instances, allowing users to deploy and manage applications without needing dedicated hardware. They provide flexibility, cost efficiency, and security by enabling multiple VMs to run on a single physical server, each operating independently with its own configurations and software stack.
- Definition: A virtual machine (VM) is a software-based emulation of a physical computer.
- Isolation: Operates in a secure, isolated environment with dedicated resources.
- Resource Allocation: Uses allocated CPU, memory, and storage from the host system.
- Cloud Computing: Enables scalable, on-demand instances without dedicated hardware.
- Flexibility: Supports different operating systems and configurations on the same physical server.
- Cost Efficiency: Reduces hardware costs by running multiple VMs on a single server.
- Security: Provides sandboxed environments, preventing conflicts between VMs.
- Use Cases: Commonly used for development, testing, deployment, and cloud-based applications.
Steps to Set Up a VM in LocalStack
Start LocalStack and Docker
- Start Docker Desktop.
- Then, execute:
localstack start
Now, LocalStack and Docker should have successfully started. ✅
Starting a VM
- Simulate EC2 Service:
LocalStack emulates a limited set of EC2 functionalities. The goal is to create mock resources like key pairs, security groups, and instances.
- Create a Key Pair:
Use the AWS CLI to generate a key pair:
   aws ec2 create-key-pair --key-name local-key
   --endpoint-url=%AWS_ENDPOINT_URL%
The output will include the generated public/private key pair.
- Create a Security Group:
Create a security group to define network rules:
   aws ec2 create-security-group --group-name local-sg
   --description "Local Security Group"
   --endpoint-url=%AWS_ENDPOINT_URL%
- Run an Instance:
Launch a mock EC2 instance using:
   aws ec2 run-instances
     --image-id ami-12345678
     --count 1
     --instance-type t2.micro
     --key-name local-key
     --security-group-ids sg-12345678
     --endpoint-url=%AWS_ENDPOINT_URL%
Replace ami-12345678 with an example AMI ID that is recognized by LocalStack.
Example output:
- Security Group ID: sg-2cd410ccd533c7f8b
- Image ID: ami-a2678d778fc6
Command:
aws ec2 run-instances --image-id ami-a2678d778fc6 --count 1
--instance-type t2.micro --key-name local-key
--security-group-ids sg-2cd410ccd533c7f8b
--endpoint-url=%AWS_ENDPOINT_URL%
Explanation of Parameters
aws ec2 run-instances
- This is the AWS CLI command to launch one or more Amazon EC2 instances.
--image-id ami-a2678d778fc6
- What it is: The unique ID of the Amazon Machine Image (AMI) you want to use.
- Why it matters: An AMI is like a template that defines what the instance will look like, including its operating system, software, and configuration.
- Example: If you want to run an Ubuntu server, you select an AMI ID for an Ubuntu image.
--count 1
- What it is: The number of EC2 instances to create.
-
Why it matters: You can launch multiple instances at once. In this case,
1means you're creating a single instance.
--instance-type t2.micro
- What it is: The type of EC2 instance to launch.
- Why it matters: Instance types determine the amount of CPU, memory, and networking performance available.
-
Example:
t2.microis a small, low-cost instance type suitable for lightweight tasks or free-tier usage.
--key-name local-key
- What it is: The name of the key pair to use for SSH access to your instance.
- Why it matters: A key pair ensures secure access to the instance. You’ll need the private key file associated with this name to log in.
--security-group-ids sg-2cd410ccd533c7f8b
- What it is: The ID of the security group to associate with the instance.
- Why it matters: Security groups act as firewalls for your instance, controlling which traffic is allowed to enter or leave.
- Example: You might configure it to allow SSH (port 22) or HTTP (port 80) traffic.
-
--endpoint-url=%AWS_ENDPOINT_URL%- What it is: Specifies a custom endpoint URL for your AWS service.
- Why it matters: This is useful when working with a local AWS emulator (e.g., LocalStack) or custom AWS environments.
-
Example:
%AWS_ENDPOINT_URL%expands to the URL you set earlier, such ashttp://localhost:4566.
What Happens When You Run This Command?
- The AWS CLI will create a single EC2 instance based on the AMI (
ami-a2678d778fc6). - The instance will be of type
t2.micro, suitable for low-resource tasks. - The instance will use the
local-keykey pair for SSH access. - The security group (
sg-2cd410ccd533c7f8b) will control the traffic to and from the instance. - The endpoint URL will be used to connect to the specified AWS service.
Example Use Case
- We want to set up a small server (like an Ubuntu instance) locally for testing, using our custom AWS endpoint URL (
http://localhost:4566) with specific security and access configurations.
- List Instances:
-
Verify the instance creation:
aws ec2 describe-instances --endpoint-url=%AWS_ENDPOINT_URL%
This will display a list of all instances in the terminal.
📄 Want to see the output step by step? Check it out here:
This document walks you through the output after a successful installation and shows how the VM output will look. It also includes images for better visualization. 🚀
So here we are! 🎉 You’ve now learned how to set up a VM in this local cloud setup using Docker, AWS CLI, and LocalStack.
💡 I hope this guide helped you! If you run into any issues, drop a comment—we’ll solve them together! 🕵️♂️
🔥 Stay tuned for the next article, where I'll walk you through deploying applications in this local cloud setup—right on your Windows machine! 🚀
💬 Let me know your thoughts in the comments! 📝 Did you find this guide helpful? Was the setup smooth for you? Drop a like and a comment to show some love! 💛😊

Top comments (0)